

The moment the intoxicating aroma of grilling chicken, mingled with sweet and savory spices, hits you, you know you are about to experience something truly special. This is the magic of Thai street food, and today, I am going to show you how to recreate that vibrant, irresistible experience right in your own kitchen. My recipe for Thai Chicken Satay with Peanut Sauce is not just another recipe; it is a journey to authentic flavors, promising juicy, tender chicken and a creamy, addictive peanut sauce that will transport your taste buds straight to the bustling markets of Thailand. Get ready to master a dish that is as impressive as it is delicious.
Why You’ll Love This Recipe
I have spent countless hours perfecting this Thai Chicken Satay recipe, and what truly sets it apart is my unique twist: a secret blend of toasted spices (cumin, coriander, turmeric) bloomed in hot oil before marinating the chicken. This simple yet profound technique activates the fat-soluble flavor compounds within the spices, creating a more potent, aromatic, and deeply integrated flavor profile that permeates the chicken more effectively than dry spices alone. It is a traditional Thai approach for maximum fragrance and depth that you will taste in every single bite.
Unrivaled Depth of Flavor: The bloomed spices create an authentically complex and fragrant taste that truly stands out from other satay recipes. You will experience a rich, layered flavor that is simply unforgettable.
Juicy, Tender Chicken: My careful techniques for marination and cooking ensure that your chicken is consistently tender and moist, never dry or rubbery. Every piece is a testament to perfect texture.
Meal Prep & Versatility: This recipe is incredibly adaptable for making ahead, fitting perfectly into your busy schedule. Whether you are grilling outdoors or cooking indoors, it is a fantastic choice for effortless weeknight meals or impressive entertaining.
Ingredients Needed

For the Chicken Satay:
1.5 pounds boneless, skinless chicken thighs, cut into 1/4-inch thick strips
1 tablespoon freshly ground turmeric powder
1 tablespoon freshly ground cumin powder
1 tablespoon freshly ground coriander powder
1 teaspoon white pepper
1 tablespoon minced garlic
1 tablespoon minced ginger
1/4 cup full-fat coconut milk
2 tablespoons fish sauce
2 tablespoons soy sauce (or tamari for gluten-free)
1 tablespoon brown sugar
1 tablespoon neutral oil (for blooming spices)
Bamboo skewers, soaked in water for at least 30 minutes
For the Peanut Sauce:
1 cup creamy natural peanut butter
1/2 cup full-fat coconut milk
2 tablespoons red curry paste
2 tablespoons fish sauce
2 tablespoons soy sauce (or tamari for gluten-free)
1 tablespoon brown sugar
1 tablespoon lime juice
1/2 cup hot water (or more, for thinning)
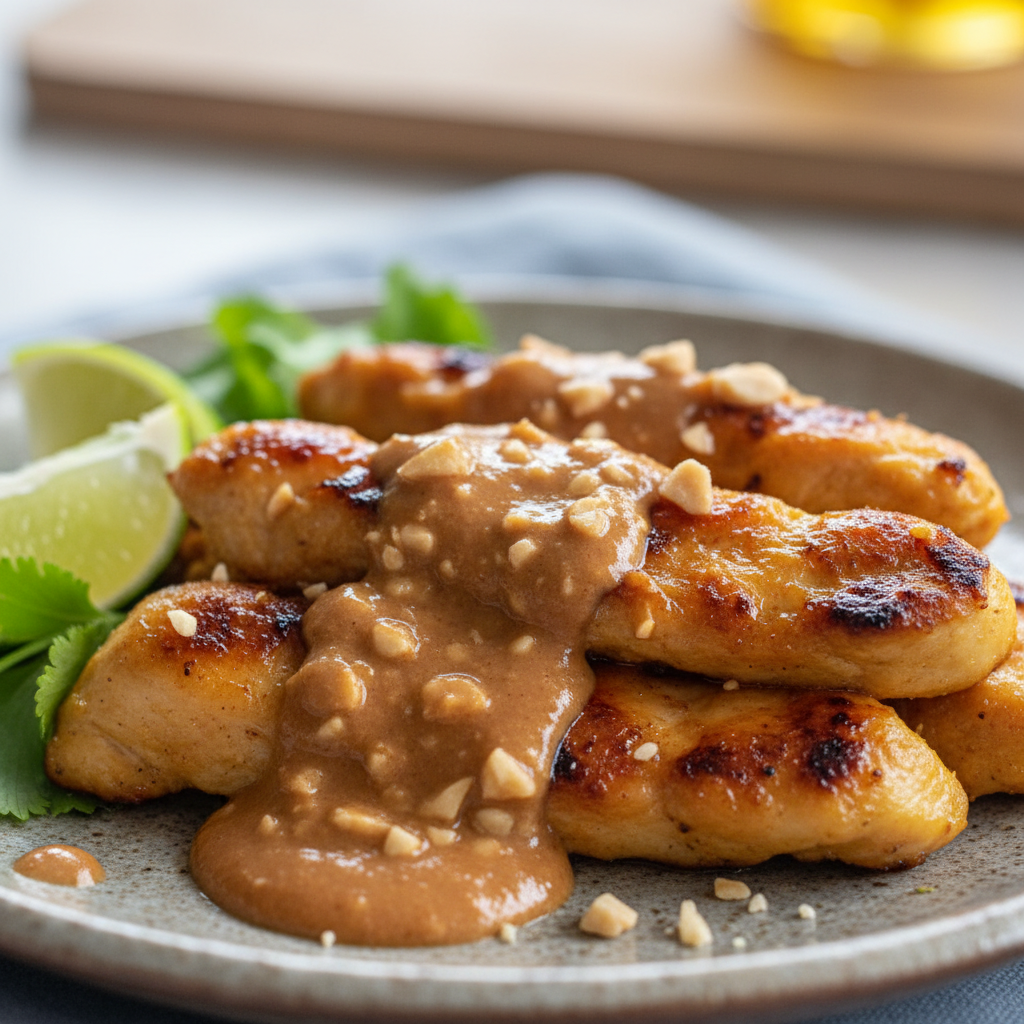
Optional garnishes: chopped cilantro, crushed roasted peanuts, lime wedges
Ingredient Notes & Substitutions
Chicken: I always recommend using boneless, skinless chicken thighs for this recipe because they stay incredibly juicy and tender during cooking. If you prefer chicken breast, you can certainly substitute it, but be extra vigilant with cooking times to prevent it from drying out.
Fish Sauce: For authentic umami, a good quality fish sauce is crucial. Look for brands like Red Boat or Squid Brand in your local Asian markets or well-stocked grocery stores. It provides a depth of savory flavor that cannot be skipped.
Coconut Milk: Always opt for full-fat coconut milk when making the peanut sauce. This ensures the richest, creamiest texture and the most satisfying flavor. While light coconut milk can be used, it will result in a thinner, less luxurious sauce.
Peanut Butter: Stick with creamy, natural peanut butter for the best results. Try to avoid brands with excessive added sugars or oils, as these can alter the flavor and texture of your sauce. The simple, pure taste of natural peanut butter shines here.
Spices: The unique twist in this recipe hinges on the freshness and quality of your spices. I encourage you to use freshly ground cumin, coriander, and turmeric for the most aromatic and flavorful results. Sourcing whole spices and grinding them just before use will elevate your satay immensely.
Dietary Swaps: To make this recipe gluten-free, simply ensure you are using tamari instead of regular soy sauce, and double-check the label on your fish sauce as some brands may contain gluten. Coconut milk is naturally dairy-free, making the entire dish suitable for those avoiding dairy.

How to Make Thai Chicken Satay with Peanut Sauce
This recipe is divided into a few simple phases, ensuring you achieve maximum flavor and perfectly cooked satay every time. My secret to truly outstanding satay lies in the spice blooming step for the marinade.
Phase 1: Prepare the Chicken and Marinate
First, pat your chicken strips dry with paper towels. This helps the marinade adhere better and promotes better browning later.
Now, for our secret step. Heat 1 tablespoon of neutral oil in a small pan over medium heat. Once shimmering, add the ground turmeric, cumin, and coriander powders. Stir constantly for about 30 seconds to 1 minute, until the spices become incredibly fragrant and slightly darker. Be careful not to burn them. This blooming process awakens their fat-soluble flavors. Remove from heat immediately.
In a large bowl, combine the bloomed spices with the minced garlic, minced ginger, white pepper, full-fat coconut milk, fish sauce, soy sauce (or tamari), and brown sugar. Whisk everything together until well combined, creating a thick, fragrant marinade.
Add the chicken strips to the marinade, tossing to ensure every piece is thoroughly coated. Cover the bowl and refrigerate for at least 2 hours, or ideally overnight, for the deepest, most complex flavors. Marinating longer allows the chicken to truly absorb all those amazing aromatics.
Phase 2: Prepare the Peanut Sauce
While the chicken is marinating, you can prepare the luscious peanut sauce. In a saucepan or microwave-safe bowl, combine the creamy natural peanut butter, full-fat coconut milk, red curry paste, fish sauce, soy sauce (or tamari), brown sugar, and lime juice.
Gently heat the mixture over low heat on the stovetop, whisking constantly until everything is smooth and well combined. If using a microwave, heat in 30-second intervals, stirring in between, until smooth.
Gradually whisk in the hot water, a little at a time, until the sauce reaches your desired silky smooth consistency. You might need a bit more or less depending on your peanut butter. Taste and adjust the seasonings as needed, adding more fish sauce for savoriness, brown sugar for sweetness, or lime juice for brightness.
Remove the sauce from heat and set aside. It will thicken slightly as it cools.
Phase 3: Skewer and Cook the Satay
Once your chicken has marinated sufficiently, thread the chicken strips onto the pre-soaked bamboo skewers. Aim for 3-4 pieces per skewer, weaving them onto the skewer in an accordion style. Do not overcrowd the skewers, as this prevents even cooking and browning. About 1 inch of skewer should be left exposed at each end for easy handling.
Preheat your grill to medium-high heat. Lightly oil the grill grates to prevent sticking.
Place the chicken satay skewers on the hot grill. Cook for 2-3 minutes per side, turning occasionally, until the chicken is golden-brown with a slight char and cooked through. The internal temperature should reach 165 degrees F (74 degrees C). Cooking times can vary based on the thickness of your chicken and grill temperature, so watch them closely to avoid overcooking and drying out the chicken.
Once cooked, remove the satay from the grill and let it rest for a few minutes before serving. This helps keep the chicken juicy.
Gap-Filling Sections: Versatile Cooking & Meal Prep Strategies
I want to make sure you can enjoy this incredible Thai Chicken Satay anytime, anywhere, and in any way that suits your lifestyle. That is why I have included these handy tips for alternative cooking methods and effortless meal prep.
Cooking Satay Without a Grill (Oven & Air Fryer Methods)
No grill? No problem! You can still achieve wonderfully juicy and flavorful satay with these alternative cooking methods.
Oven Method:
Preheat your oven to 400 degrees F (200 degrees C).
Line a baking sheet with parchment paper or foil for easy cleanup, and lightly grease it.
Arrange the skewered chicken satay in a single layer on the prepared baking sheet, ensuring they are not touching.
Bake for 15-20 minutes, flipping halfway through, until the chicken is cooked through and lightly browned.
For an extra char, you can finish them under the broiler for 1-2 minutes, watching carefully to prevent burning. This helps replicate that grilled texture.
Air Fryer Method:
Preheat your air fryer to 375 degrees F (190 degrees C).
Place the chicken satay skewers in the air fryer basket in a single layer, making sure not to overcrowd. You will likely need to cook them in batches.
Cook for 8-12 minutes, flipping halfway through, until the chicken is golden-brown and cooked through. Air frying results in a lovely crispy exterior while keeping the inside tender.
Regardless of your cooking method, the goal is always to maintain the juicy texture of the chicken. Monitor the internal temperature for doneness.
Make-Ahead & Freezing for Effortless Weeknights
This Thai Chicken Satay is perfect for meal prep, allowing you to enjoy delicious, homemade food even on your busiest days.
Marinated Chicken: You can store raw, marinated chicken in an airtight container in the refrigerator for up to 2 days. This is fantastic for prepping on a Sunday for a Tuesday dinner. For longer storage, you can freeze the raw, marinated chicken strips (either on or off the skewers) for up to 3 months. Thaw overnight in the refrigerator before cooking.
Cooked Satay: Once cooked, the chicken satay can be stored in an airtight container in the refrigerator for 3-4 days. To reheat, I recommend gently warming them in a microwave or a low oven (300 degrees F / 150 degrees C) until just heated through to maintain their moisture. Avoid high heat reheating that can dry them out. Cooked satay also freezes well for up to 3 months. Thaw in the refrigerator and reheat as directed.
Peanut Sauce: Homemade peanut sauce keeps beautifully in an airtight container in the refrigerator for up to 1 week. It might thicken in the fridge; simply whisk in a tablespoon or two of hot water or coconut milk to restore its smooth consistency before serving. You can also freeze the peanut sauce for up to 2 months. Thaw overnight in the refrigerator and whisk well, adding a little hot water if needed, to bring it back to its original texture.
Pro Tips & Troubleshooting
I want you to feel completely confident making this recipe, so here are my best tips and common pitfalls to avoid.
Pro Tips
Blooming Spices is Key: Do not skip the step of blooming the spices in hot oil for the marinade. This crucial technique truly unlocks their full aromatic potential and is the secret to an authentically flavorful satay.
Marinate Longer for Deeper Flavor: While 2 hours is good, marinating the chicken overnight (8-12 hours) will result in an even deeper, more integrated flavor that is simply sensational. Plan ahead if you can!
Taste and Adjust Your Peanut Sauce: Homemade peanut sauce is all about balance. Continuously taste your sauce and adjust the seasonings—more lime for brightness, more fish sauce for savory depth, or a touch more brown sugar for sweetness—until it is perfect for your palate. Thin with hot water or coconut milk until it reaches your desired silky consistency.
Do Not Overcrowd the Skewers or Grill: Ensure chicken pieces are not packed too tightly on the skewers and that there is space between skewers on the grill or pan. Overcrowding leads to steaming instead of searing, preventing that beautiful golden-brown char.
Soak Bamboo Skewers: Always soak your bamboo skewers in water for at least 30 minutes before threading the chicken. This prevents them from burning and splintering on the grill or in the oven.
Use Fresh, Quality Spices: The vibrancy of your satay flavor depends heavily on the freshness of your spices. Invest in good quality, fresh spices, and consider grinding them yourself for the best aromatic results.
Common Mistakes to Avoid
Overcooking the Chicken: This is the most common mistake, leading to tough, dry satay. Chicken cooks quickly, so watch it closely and use a meat thermometer to ensure it reaches 165 degrees F (74 degrees C) without going over.
Insufficient Marination Time: A short marination period will result in chicken that lacks the deep, complex flavors characteristic of good satay. Allow at least 2 hours, but preferably overnight, for the marinade to work its magic.
Using Stale Spices: Old, dormant spices will yield a bland, uninspired flavor, even with the blooming technique. Always check the freshness of your spices.
Not Soaking Bamboo Skewers: Forgetting to soak bamboo skewers is a surefire way to end up with burnt, brittle skewers that can ruin your presentation and handling.
Gritty or Separated Peanut Sauce: This can happen if you use low-quality peanut butter with uneven consistency or if you do not whisk the sauce thoroughly while heating. Ensure everything is well emulsified for a smooth, creamy sauce.
Overcrowding the Cooking Surface: Whether grilling, baking, or air frying, overcrowding prevents proper air circulation and direct heat, leading to steamed chicken rather than beautifully seared pieces. Cook in batches if necessary.
Serving & Storage
Serving this Thai Chicken Satay is an experience in itself. Here are my favorite ways to present and enjoy this dish.
Serving Ideas
Classic Pairings: I love serving Thai Chicken Satay with a side of fluffy jasmine rice to soak up all that delicious peanut sauce. A refreshing cucumber salad, often called Ajaad, with its tangy and sweet dressing, is the perfect counterpoint to the rich flavors. Always include fresh lime wedges for a final squeeze of bright acidity.
Creative Sides: For lighter options, consider serving with steamed green beans or broccoli, a simple green salad with a light vinaigrette, or even a bed of rice noodles.
Garnishes: Elevate your presentation and flavor with garnishes. Chopped fresh cilantro adds herbaceous notes, crushed roasted peanuts provide a lovely crunch, and crispy fried shallots offer an extra layer of savory texture.
Drink Pairings: A tall glass of iced Thai tea is a classic non-alcoholic choice. For something alcoholic, a light lager or a crisp, dry white wine pairs beautifully. Sparkling water with a squeeze of lime is always a refreshing option.
Storage and Make-Ahead
Cooked chicken satay can be stored in an airtight container in the refrigerator for 3-4 days. The homemade peanut sauce will also keep well in the fridge for up to 1 week.
For detailed instructions on freezing raw marinated chicken (on or off skewers), cooked satay, and the peanut sauce, as well as specific reheating guidance to maintain optimal moisture and flavor, please refer back to Section 5: Make-Ahead & Freezing for Effortless Weeknights.
Adaptations for Family Dinners & Parties
This recipe is incredibly versatile for any occasion. To scale it up for larger gatherings, simply multiply the ingredients. The prep can easily be done in advance, making it a stress-free option for entertaining.
For family dinners, serve the satay as a fun, interactive main course alongside rice and vegetables. For parties, I love presenting the skewers on a large platter with a bowl of warm peanut sauce for dipping. Garnish generously to make it a show-stopping appetizer that guests can easily pick up and enjoy.
Conclusion
There you have it—my personal journey to creating the most authentic and utterly delicious Thai Chicken Satay with Peanut Sauce you will ever taste. The vibrant, savory, and subtly sweet flavors, combined with the incredibly juicy chicken, make this recipe an absolute winner in my kitchen. The secret, as you now know, lies in blooming those aromatic spices, a technique that elevates the dish to restaurant-quality perfection.
Do not be intimidated; this recipe is designed to guide you to success, even if you are new to Thai cooking. I truly encourage you to try it, experiment with the serving ideas, and perhaps even discover your own favorite variations. I am confident that once you make this Thai Chicken Satay, it will become a cherished staple in your culinary repertoire. Enjoy, and please feel free to share your experiences and comments below!
FAQ
Q: What’s the best way to cook chicken satay if I don’t have a grill?
A: You have excellent options! You can cook chicken satay in a preheated 400 degrees F (200 degrees C) oven for 15-20 minutes, flipping halfway. For a crispier texture, try an air fryer at 375 degrees F (190 degrees C) for 8-12 minutes, also flipping halfway. Refer to the “Cooking Satay Without a Grill” section for detailed instructions.
Q: Can I make chicken satay ahead of time for meal prep?
A: Absolutely! This recipe is fantastic for meal prep. You can marinate the chicken up to 2 days in advance in the refrigerator. Both the raw, marinated chicken and the cooked satay can be frozen for up to 3 months. The peanut sauce also keeps well in the fridge for a week and can be frozen. See the “Make-Ahead & Freezing” section for full details.
Q: How long does homemade peanut sauce keep, and can I freeze it?
A: Homemade peanut sauce can be stored in an airtight container in the refrigerator for up to 1 week. Yes, it freezes beautifully for up to 2 months. When thawing, you may need to whisk in a little hot water or coconut milk to restore its smooth consistency.
Q: How do I make this recipe gluten-free?
A: To make this recipe gluten-free, ensure you use tamari instead of regular soy sauce for both the chicken marinade and the peanut sauce. Also, always double-check the label on your fish sauce to confirm it is gluten-free, as some brands may contain wheat.
Q: What are common mistakes when making chicken satay?
A: Common mistakes include overcooking the chicken (leading to dryness), insufficient marination time (for bland flavor), not soaking bamboo skewers (they burn), and overcrowding the cooking surface (prevents proper searing). Using stale spices or low-quality peanut butter can also impact the final taste and texture.
Q: How can I make the chicken extra tender and juicy?
A: For extra tender and juicy chicken, always use boneless, skinless chicken thighs. Ensure you marinate the chicken for at least 2 hours, or even better, overnight. Also, be careful not to overcook the chicken; monitor it closely and remove it from the heat as soon as it reaches 165 degrees F (74 degrees C).
Q: Can I freeze raw, marinated chicken on skewers?
A: Yes, you can freeze raw, marinated chicken either on or off the skewers. If on skewers, arrange them in a single layer on a baking sheet to freeze solid, then transfer to a freezer-safe bag or container. This prevents them from sticking together. Thaw them overnight in the refrigerator before cooking.
Q: Are there options for a vegan peanut sauce?
A: Yes, you can easily adapt the peanut sauce to be vegan. Simply substitute the fish sauce with a high-quality vegan fish sauce alternative or an equal amount of light soy sauce or tamari, and ensure your red curry paste is vegan (some contain shrimp paste). The rest of the ingredients are typically vegan.
Authentic Thai Chicken Satay with Peanut Sauce (Secret Twist!)
Ingredients
Equipment
Method
- First, pat your chicken strips dry with paper towels. This helps the marinade adhere better and promotes better browning later.
- Now, for our secret step. Heat 1 tablespoon of neutral oil in a small pan over medium heat. Once shimmering, add the ground turmeric, cumin, and coriander powders. Stir constantly for about 30 seconds to 1 minute, until the spices become incredibly fragrant and slightly darker. Be careful not to burn them. This blooming process awakens their fat-soluble flavors. Remove from heat immediately.
- In a large bowl, combine the bloomed spices with the minced garlic, minced ginger, white pepper, full-fat coconut milk, fish sauce, soy sauce (or tamari), and brown sugar. Whisk everything together until well combined, creating a thick, fragrant marinade.
- Add the chicken strips to the marinade, tossing to ensure every piece is thoroughly coated. Cover the bowl and refrigerate for at least 2 hours, or ideally overnight, for the deepest, most complex flavors. Marinating longer allows the chicken to truly absorb all those amazing aromatics.
- While the chicken is marinating, you can prepare the luscious peanut sauce. In a saucepan or microwave-safe bowl, combine the creamy natural peanut butter, full-fat coconut milk, red curry paste, fish sauce, soy sauce (or tamari), brown sugar, and lime juice.
- Gently heat the mixture over low heat on the stovetop, whisking constantly until everything is smooth and well combined. If using a microwave, heat in 30-second intervals, stirring in between, until smooth.
- Gradually whisk in the hot water, a little at a time, until the sauce reaches your desired silky smooth consistency. You might need a bit more or less depending on your peanut butter. Taste and adjust the seasonings as needed, adding more fish sauce for savoriness, brown sugar for sweetness, or lime juice for brightness.
- Remove the sauce from heat and set aside. It will thicken slightly as it cools.
- Once your chicken has marinated sufficiently, thread the chicken strips onto the pre-soaked bamboo skewers. Aim for 3-4 pieces per skewer, weaving them onto the skewer in an accordion style. Do not overcrowd the skewers, as this prevents even cooking and browning. About 1 inch of skewer should be left exposed at each end for easy handling.
- Preheat your grill to medium-high heat. Lightly oil the grill grates to prevent sticking.
- Place the chicken satay skewers on the hot grill. Cook for 2-3 minutes per side, turning occasionally, until the chicken is golden-brown with a slight char and cooked through. The internal temperature should reach 165 degrees F (74 degrees C). Cooking times can vary based on the thickness of your chicken and grill temperature, so watch them closely to avoid overcooking and drying out the chicken.
- Once cooked, remove the satay from the grill and let it rest for a few minutes before serving. This helps keep the chicken juicy.