

There’s nothing quite like the irresistible crunch and tangy burst of a homemade fermented pickle. Forget those limp, overly vinegary store-bought versions; making your own `Fermented Pickles` at home offers a deeply satisfying experience and a flavor profile that’s simply unmatched. They also make a fantastic tangy accompaniment to a comforting bowl of hearty cowboy soup. I’m here to guide you through creating consistently crisp, flavorful, and incredibly probiotic-rich fermented pickles, even if you’re new to the world of `Lacto-fermentation`. I’ll share a special technique that promises reliable results and a truly delicious outcome.
Why You’ll Love This Recipe: The Secret to Consistently Crisp Pickles
My secret to consistently crisp, perfectly tangy pickles every single time? It’s simple, yet powerfully effective: I jumpstart the fermentation process with a small amount of live, unpasteurized starter brine. This can be from store-bought `sauerkraut` or even a successful previous batch of `Dill pickles` you’ve made!
- Robust Head Start: This starter brine is teeming with beneficial `Lactobacillus bacteria`. Introducing them early means they quickly establish dominance in your jar.
- Faster Fermentation: The presence of an active bacterial culture gets the fermentation bubbling much sooner, often reducing the initial lag phase.
- Enhanced Safety: By swiftly promoting a healthy acidic environment (optimal `pH stabilization`), the good bacteria outcompete any undesirable microorganisms, creating a safer ferment.
- Consistent Crunch & Flavor: This robust start leads to optimal `lactic acid production`, which is key for maintaining the cucumbers’ firm `cell walls` and developing that classic, balanced `tangy` profile you crave in a good `fermented pickle`.
- Reliability for All: This technique makes the process more forgiving and predictable, significantly reducing common fermentation failures, especially for beginners. You get that superior taste and texture every time, along with an incredible `probiotic boost` for your `gut health` and `immunity`.
Ingredients Needed

- 2- 2 1/2 lbs pickling cucumbers– all similar size ( 5 inches)
- 5 cups filtered water or tap water (that is not overly chlorinated)
- 2 tablespoons fine sea salt or Himalayan salt (or basically one heaping teaspoon fine sea salt (7 grams) per one cup of water, to make a 3% brine.) * see notes.
- 1/4 teaspoon turmeric (optional, adds a “fresh” flavor)
- 1 teaspoon each: fennel seeds, coriander seeds, allspice, peppercorns, dill seeds, mustard seeds, celery seeds- and feel free to add more peppercorns!
- 10-20 garlic cloves, sliced (or double for extra garlicky)
- 1/2 onion, thinly sliced (optional)
- big handful of fresh dill
- 1-3 fresh red chilies – or dried arbol chilies, or add chili flakes (all optional)
- 3-4 bay leaves (or a grape leaf or oakleaf) – these are sources of tannic acid to help them stay crisp.
- 1-2 tablespoons unpasteurized live starter brine (e.g., from store-bought sauerkraut or a previous successful pickle batch – *see notes below*)
Ingredient Notes & Substitutions
When it comes to `Fermented Pickles`, choosing the right ingredients makes all the difference.
- Pickling Cucumbers: For that ultimate crisp texture, always seek out actual `pickling cucumbers`. Varieties like `Kirby cucumbers`, `Calypso cucumbers`, `Royal cucumbers`, `Boston Pickling cucumbers`, and `National Picking cucumbers` are superior because they have a higher flesh-to-seed ratio, thinner skins, and naturally firmer `cell walls` designed to stay crisp through fermentation. Avoid large slicing cucumbers, which tend to get soft.
- Salt: Using the correct `salt brine` is crucial. Always use non-iodized `fine sea salt` or `Himalayan salt`. Iodine and anti-caking agents found in table salt can inhibit beneficial bacteria. Our recipe uses a 3% `salt brine`, perfect for `half-sour pickles` (3-5 days). For `full-sour pickles` (14-21 days), you might increase the salt to a 3.5% or even 4.5% ratio for a stronger preservation and tang.
- Water Quality: `Tap water` often contains `chlorine` or `chloramines`, which can inhibit the delicate `Lactobacillus bacteria` vital for `Lacto-fermentation`. I highly recommend using `filtered water` for optimal results. If using tap water, let it sit uncovered for 24 hours to allow chlorine to dissipate, or boil and then cool it to remove both chlorine and some chloramines.
- Fresh Dill: A generous “big handful” of `fresh dill` is non-negotiable for authentic `Dill pickles` and that vibrant herbaceous flavor.
- Garlic & Onion: I love extra garlicky pickles, so feel free to double the `garlic cloves` if you wish! The `thinly sliced onion` adds a lovely subtle sweetness and complexity, making for delicious `Garlic dill pickles`.
- Turmeric: This is entirely optional but adds a beautiful golden hue and a unique ‘fresh’ flavor profile. If you don’t have fresh, `ground turmeric` works perfectly fine.
- Spices: The blend of `fennel seeds`, `coriander seeds`, `allspice`, `peppercorns`, `dill seeds`, `mustard seeds`, and `celery seeds` creates a classic, aromatic pickle. Don’t be shy about adjusting these! Add more `red chilies`, `arbol chilies`, or `chili flakes` for a spicy kick.
- Tannins for Crispness: This is an `expert tip`! The `tannic acid` found in `bay leaves`, `grape leaves`, or even a slice of `horseradish root` helps to keep your pickles wonderfully crisp by inhibiting softening enzymes during fermentation.
- The Starter Brine (Unique Twist): This is the game-changer! Use 1-2 tablespoons of the liquid from unpasteurized `sauerkraut`, `kimchi`, or a previous successful `Lacto-fermentation` batch. It acts as an instant inoculation, ensuring a robust and reliable fermentation, leading to a consistently crisp and flavorful outcome.

How to Make Fermented Pickles
Prepare Your Cucumbers for Crispness
Start by thoroughly rinsing your `pickling cucumbers`. The secret to preventing soft pickles lies in properly preparing the ends. Identify the `blossom end` (the end opposite the stem, which sometimes has a small, dried flower remnant) and remove about 1/16-inch. The enzymes here can cause softening. For an extra crisp result, place the trimmed cucumbers in an `ice bath` for 15-30 minutes. I always keep them whole for better texture retention. They should feel firm and cold when ready.
Mix the Brine
In a separate bowl, combine 2 tablespoons of `fine sea salt` with 5 cups of cold `filtered water`. Whisk or stir thoroughly until the `salt` is completely dissolved. A clear brine means it’s ready to go!
Clean Your Equipment (No Need to Sterilize)
Good hygiene is important for `Food safety` in `Lacto-fermentation`. Wash your hands, `Mason jars` (I typically use a `two-quart jar` or `half-gallon jar`), and all utensils with hot, soapy water. Rinse them well. There’s no need to `sterilize` for fermentation; simply clean is sufficient to remove competing bacteria.
Assemble Your Jar with Care
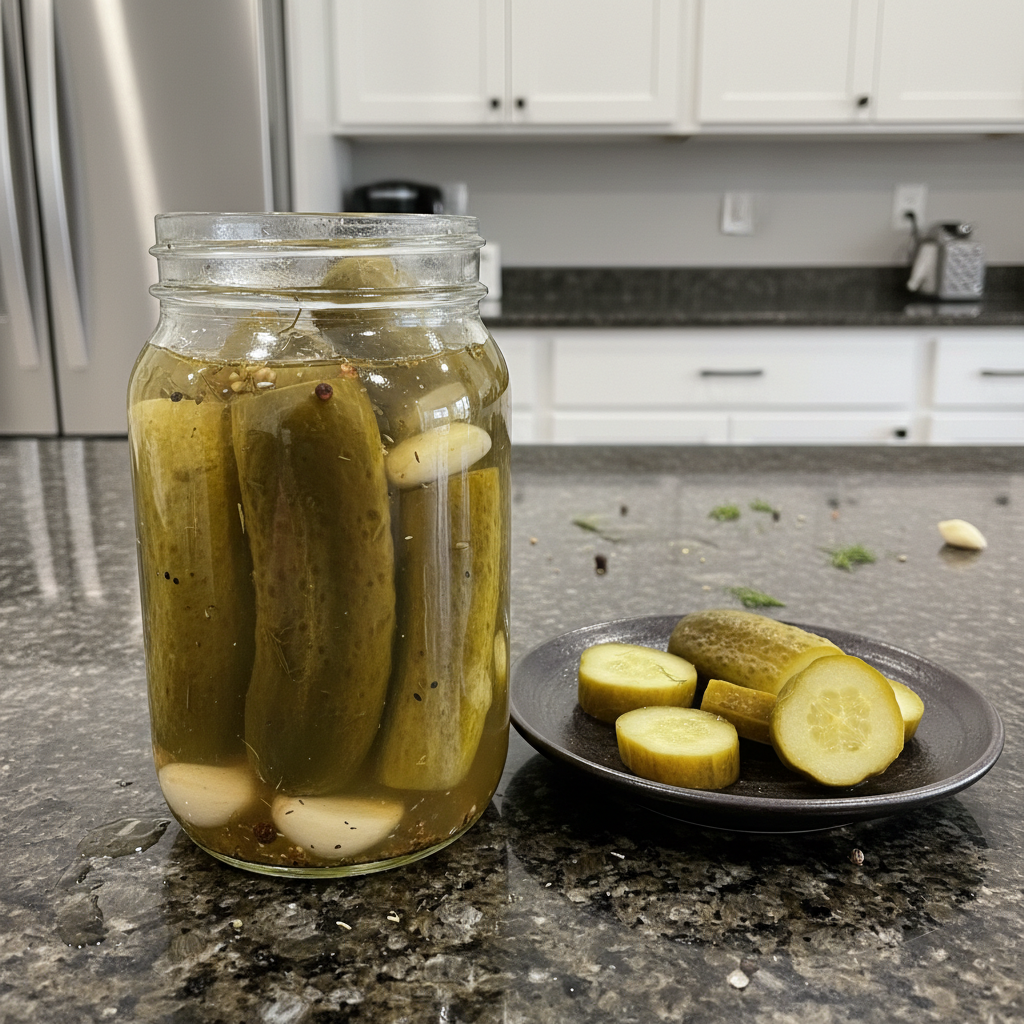
Into the bottom of your clean `Mason jar`, add all the whole spices: `fennel seeds`, `coriander seeds`, `allspice`, `peppercorns`, `dill seeds`, `mustard seeds`, and `celery seeds`. Next, layer in the `fresh dill`, `sliced garlic cloves`, and `onion` or `turmeric` if you’re using them. Now, with clean hands, carefully pack in the cucumbers. Start with one layer standing on end, add the `bay leaves` (or `grape leaf`/`oakleaf` for `tannic acid`), then add a second layer of cucumbers, packing them tightly. The goal is to leave about 1 ½ inches of `headroom` at the top.This is where our unique twist comes in! Pour 1-2 tablespoons of your unpasteurized live `starter brine` over the packed cucumbers. This small addition provides an immediate boost of `Lactobacillus bacteria`, ensuring a vigorous and successful `Lacto-fermentation`. Finally, pour your prepared `saltwater brine` over everything until the cucumbers are completely submerged. Use a `fermentation weight` to keep all cucumbers and spices pressed down under the `brine`. It’s crucial that everything stays submerged to prevent `mold (fermentation)`. Remove any rogue spices that float to the surface. Loosely cover the jar with a `lid` or a breathable `cloth cover` to allow `gases` to escape while keeping dust out.
Begin the Fermentation Process
Place your jar in a pan or bowl to catch any potential `overflow` from `bubbles` and active `acid production`. Find a cool, dark place (ideally between `Fermentation temperature (60-70F)`) in your home – a basement or lower kitchen cupboard works perfectly. Let it ferment for 2-3 days for the initial stage. You’ll soon see signs of life: small `bubbles` rising, a slightly cloudy `brine`, and perhaps a faint tangy, fresh aroma.For `half-sour pickles`, 3-5 days at this temperature is usually ideal, yielding crisp, lighter-colored interiors. If your room is cooler than 65°F, fermentation will slow down; if warmer, it will speed up. For `full-sour pickles`, you’ll ferment for 14-21 days (and might use a slightly stronger salt ratio, as discussed in notes, for an even tangier flavor and softer texture). Remember, the starter brine helps ensure you’ll see activity quickly!
Check and Inspect Your Ferment
After about 2 days, start checking for active `bubbles`, `overflow`, or a `clouding` of the brine. Tapping the jar can help dislodge tiny bubbles, making them more visible. I typically ferment for 3-4 days, as I prefer my pickles really crunchy and vibrant. Longer ferments will yield a tangier pickle, but they will naturally soften a bit and lose some of their bright green color. It’s all a matter of personal preference!You can taste your pickles at any point after you see `bubbles`. The cloudy brine is a completely normal and good sign of active `Lacto-fermentation`! Once you observe consistent bubbling, you can move the jar to the `refrigerator storage`, where the `fermentation process` will slow down significantly. Always ensure the pickles remain submerged under the brine, even in the fridge.
Refrigerate and Enjoy
Once your pickles are chilled, give them a taste. They should be wonderfully crispy, packed with flavor, and have that characteristic tang. If you desire a tangier or slightly softer pickle, you can always bring them back out of the fridge and let them ferment for a few more days at room temperature.If you enjoy a `fizzy brine`, simply tighten the lid once refrigerated and `burp` the jar (release the pressure) every week or so. Alternatively, using an `airlock` will allow gases to escape without daily attention. If you prefer not to think about `burping jars`, just give the lid one loose twist, allowing `gases` to escape naturally.
Mastering Your Fermentation Setup: Jars, Water, & Airlocks
Successful `Lacto-fermentation` hinges on a few key elements beyond just the ingredients. Understanding your equipment and environment is paramount.
Cleaning vs. Sterilizing: What You Need to Know
For `Fermented Pickles` and other `Lacto-fermentation` projects, `clean` equipment is essential, but `sterile` is not. In fact, attempting to `sterilize` can sometimes be counterproductive, as extreme heat might kill some of the beneficial bacteria you want to introduce. My rule of thumb: wash your `Mason jars`, `lids`, `fermentation weights`, and any utensils (like a `slotted spoon`) thoroughly with hot, soapy water, then rinse them completely clean. This removes any potential contaminants without creating an overly sterile environment that might confuse your friendly `Lactobacillus bacteria`.
Water Quality for Fermentation
The quality of your `water` can significantly impact your ferment. `Chlorine` and `chloramines` in `tap water` can actively inhibit or even kill the beneficial `Lactobacillus bacteria` crucial for `Lacto-fermentation`. This means your pickles might not ferment properly, leading to `no bubbles` or even spoilage. Here are my best practices for preparing tap water:
- Letting it Sit Out: The easiest method is to simply pour your tap water into an open container and let it sit uncovered for 24 hours. `Chlorine` is a gas and will naturally dissipate into the air.
- Boiling and Cooling: Boiling your tap water for 15-20 minutes and then allowing it to cool completely will remove both chlorine and many chloramines. Be sure it’s completely at room temperature before mixing your brine.
- Filtering: A good carbon `filter` (like a Brita or a faucet filter) is also effective at removing chlorine and chloramines. This is my preferred method for convenience.
Using `filtered water` or properly dechlorinated water ensures your beneficial bacteria have the best chance to thrive.
Airlock Usage for Beginners
While not strictly necessary for open ferments covered with a cloth, an `airlock` can be a fantastic tool, especially for beginners seeking a hands-off approach and added peace of mind. An `airlock` creates an `anaerobic environment`, allowing the `carbon dioxide` (the `gases` creating `bubbles`) produced during fermentation to escape without letting fresh `oxygen` in, which can promote `mold growth`.
- Installation: An airlock usually fits into a rubber `grommet` in a special `fermentation lid`. Simply insert the narrow end of the airlock into the grommet, then fill the airlock’s reservoir with a small amount of water up to the fill line. This water creates a seal.
- Benefits: Besides preventing oxygen ingress, airlocks reduce the need for daily `burping jars`, significantly lowering the risk of `mold` or `contamination`, and creating a very stable `fermentation environment`.
- Common Pitfalls: Ensure the airlock is properly seated and the lid is tight. Check the water level in the airlock occasionally, as it can evaporate over time; refill as needed. Blockages are rare but can occur if tiny bits of spice get into the airlock; gently remove if observed.
Beyond airlocks, `Mason jars` (quart-sized jars work well for smaller batches), `fermentation weights` to keep everything submerged, and `cloth covers` are your essential tools.
Beyond the Recipe: Understanding Your Ferment & Brine Reuse
Selecting the Best Pickling Cucumbers
For truly superior `Fermented Pickles`, the choice of cucumber is critical. It’s not just about “thin bumpy skin”; specific `pickling cucumber` varieties are bred for their characteristics that excel in fermentation. These include a higher `flesh-to-seed ratio`, naturally thinner skins, and `firmer cell walls` that resist softening during the `acid production` process. My top recommendations, which you can often find at farmer’s markets, include: `Kirby cucumbers`, known for their crunch and classic bumpy texture; `Calypso cucumbers`, prized for their uniform shape and excellent crispness; `Royal cucumbers`; `Boston Pickling cucumbers`, a heritage variety with a great track record; and `National Picking cucumbers`, another reliable choice. Avoiding large, watery slicing cucumbers is key to preventing `soft pickles`.
Managing Leftover Brine
Don’t ever discard that precious `leftover brine` from your `Fermented Pickles`! It’s liquid gold, packed with beneficial `probiotics` and flavor. Here’s how I use it:
- As a Starter for New Batches: This is a core component of my unique twist. I always reserve 1-2 tablespoons of clean leftover brine to use as a ‘starter’ for my next batch of `Fermented Pickles`. It ensures a reliable and robust `Lacto-fermentation` every time.
- Brine Tonic: Many enjoy drinking a shot of the tangy, fizzy brine as a `probiotic tonic` to support `gut health`. It’s surprisingly refreshing and an excellent immunity-boosting ritual.
- Cocktail Enhancer: Get creative! I love using it in savory cocktails. A `Gin & Brine Martini` is surprisingly sophisticated, or try adding a splash to a Bloody Mary.
- Pickled Hard-Boiled Eggs: For a quick and easy snack, soak peeled hard-boiled eggs in your leftover brine in the refrigerator for a few days. They’ll absorb that incredible tangy flavor!
Exploring Half-Sour vs. Full-Sour Pickles
The beauty of homemade `Fermented Pickles` is that you control the sourness! You can easily make both `half-sour pickles` and `full-sour pickles` just by adjusting fermentation time and, potentially, your `salt ratio`.
- Half-Sour Pickles: These are typically fermented for 3-5 days at room temperature (60-70°F). They are characterized by a vibrant green color, a super crisp texture, and a milder, fresher tangy flavor. They retain more of the fresh cucumber taste. The 3% `salt brine` used in this recipe is perfect for half-sours.
- Full-Sour Pickles: Fermented for 14-21 days (or even longer), full-sours have a much deeper, more intense tangy flavor and a softer, but still pleasant, texture. Their color will be duller, and the brine will be quite cloudy. If you’re aiming for true full-sours, you might consider increasing your salt ratio to 3.5% or even 4.5% to ensure adequate preservation over the longer fermentation period. Simply taste your pickles regularly until they reach your preferred level of sourness.
Pro Tips & Troubleshooting
Pro Tips for Perfect Pickles
- Cool Fermentation for Crispness: I always recommend fermenting your pickles at the cooler end of the spectrum, ideally between `60-70°F`. Cooler temperatures lead to a slower, more controlled `acid production`, which helps maintain that coveted crisp texture.
- Tannins are Your Friend: Don’t skip the `bay leaves`, `grape leaves`, or a sliver of `horseradish root`! These contain `tannic acid` which inhibits the `enzymes` that cause cucumbers to soften, ensuring your pickles stay wonderfully crunchy.
- Keep Submerged: This is a non-negotiable rule. Any part of the cucumber or spice that is exposed to `oxygen` above the `brine` is an invitation for `mold (fermentation)`. Always use `fermentation weights` to keep everything completely submerged.
- The Power of the Starter Brine: My unique twist, adding a small amount of live `starter brine`, truly makes a difference. It jumpstarts `Lacto-fermentation` quickly, leading to more reliable, consistently crisp, and safe results.
- Taste Test Often: Don’t be afraid to taste your `Fermented Pickles` at various stages after `bubbles` appear. This is the best way to discover your perfect balance of tang and texture.
- Cloudy Brine is Normal: Seeing `cloudy brine` can be alarming for beginners, but it’s actually a wonderful sign! It indicates active `Lacto-fermentation` as the beneficial bacteria are multiplying and doing their work.
- Fizzy Brine Fun: If you enjoy a refreshing fizz, once your pickles are refrigerated, tighten the lid and ‘burp’ the jar every week or so to release pressure. The accumulating `carbon dioxide` will infuse into the brine, making it bubbly!
Common Mistakes to Avoid
- Soft Pickles: This is perhaps the most common frustration. The main culprits are `fermentation temperatures` that are too warm (which speeds up `enzymes` that break down `cell walls`), not removing the `blossom end` of the cucumber, or simply fermenting for too long past your desired crispness.
- Incorrect Salt Levels: The `salt ratio` is a delicate balance. Too much salt can inhibit *all* bacteria, preventing `Lacto-fermentation` altogether. Too little salt, however, allows undesirable bacteria to thrive, leading to spoilage. Always measure accurately for the 3% brine.
- Contamination & Mold: `Contamination` often stems from dirty hands, utensils, or jars. The most critical defense against `mold growth` is ensuring all your `pickling cucumbers` and spices remain fully `submerged` under the `brine` at all times.
- No Bubbles: If you see `no bubbles`, don’t panic immediately. Initial `fermentation` can sometimes be slow, especially in cooler temperatures (below 65°F) or if you didn’t use a `starter brine`. Patience is key. Tapping the jar might reveal tiny `bubbles`. The good news is, with my `unique twist` of using a starter brine, this issue is far less likely!
- Off-Smells: A healthy ferment should smell pleasantly tangy, garlicky, and fresh. Any foul, rotten, or putrid smells indicate `contamination` or spoilage, and the pickles should be discarded immediately. Trust your nose!
- Identifying Mold: It’s important to distinguish between harmless `Kahm yeast` and harmful fuzzy `mold`. `Kahm yeast` is typically a thin, white, opaque film that lies flat on the surface of the brine, often with a yeasty or slightly sweet smell. It can be skimmed off, and the pickles beneath are usually fine. However, if you see any fuzzy, raised, or colored `mold` (green, black, pink), that indicates spoilage, and you must discard the entire batch. When in doubt, throw it out.
Serving & Storage
Serving Ideas
My `Crunchy Fermented Pickles` are versatile and delicious in so many ways!
- Everyday Enjoyment: Enjoy them straight out of the jar as a refreshing, `low-calorie snack`. They’re also perfect sliced on `sandwiches`, `burgers`, or served simply as a tangy `side dish` with hearty meals like a spicy chili or perhaps alongside a delicious one-pot creamy garlic chicken.
- Creative Culinary Uses: Don’t let that incredible `brine` go to waste!
- Probiotic Brine Tonic: Drink a small shot of the fizzy brine daily for its impressive `probiotic` and `immunity-boosting` benefits.
- Cocktail Enhancer: Get adventurous! A “Gin & Brine Martini” is a surprising hit, or add a splash to a savory `Bloody Mary`.
- Pickled Hard-Boiled Eggs: Simply peel hard-boiled eggs and submerge them in your leftover brine in a clean jar in the refrigerator for a few days. They soak up all that wonderful tangy flavor!
Storage and Make-Ahead
- Refrigeration: Once your `Fermented Pickles` have reached your desired taste and tang, move the sealed `Mason jar` to the `refrigerator storage`. The cold temperature will drastically slow down the `fermentation process`, preserving their crisp texture and vibrant flavor. My pickles last for many, many months in the fridge, often indefinitely, as long as they remain fully `submerged` in their `brine`.
- Maintaining Texture and Flavor: Cold temperatures are your ally in preserving that wonderful crisp texture. The `acid production` continues at a much slower rate, preventing them from becoming overly soft or sour.
- Burping in the Fridge: While `gas production` slows significantly in the refrigerator, it doesn’t stop entirely. If you’re using a tight lid and want that delicious `fizzy brine`, occasional `burping jars` (every week or two) is still beneficial to prevent pressure buildup. If you’re not concerned about fizz, a loosely twisted lid allows any minimal gases to escape.
- Can You Cut & Transfer?: Absolutely! Once fermented, you can cut your pickles into spears or slices and transfer them to smaller jars if desired. Just ensure they remain covered by their original `brine` for best preservation and flavor.
- Canning Fermented Pickles: This is a common question, but one I advise against if your goal is probiotic benefits. `Canning fermented pickles` will kill all the beneficial `probiotics` due to the high heat, and it will inevitably soften your crisp pickles. While it extends shelf life, it essentially turns them into vinegar pickles, defeating the purpose of `Lacto-fermentation`.
Conclusion
There you have it—my tried-and-true method for making perfectly crunchy, tangy, and `probiotic-rich` `Fermented Pickles` right in your own kitchen. By incorporating the simple yet powerful `unique twist` of a starter brine, you’re set up for consistent success, ensuring a reliable and delicious batch every time. Even if you’re a beginner, with these detailed steps and `expert tips`, you’ll be making incredible pickles with confidence.
Don’t be afraid to experiment with different `spices` or levels of heat. The world of `Lacto-fermentation` is incredibly rewarding. So go ahead, grab some `Kirby cucumbers`, print out this recipe, and embark on your crunchy pickle adventure. Your `gut health` (and your taste buds) will thank you!
FAQ
- Q: What are fermented pickles?
- A: `Fermented pickles`, also known as `Lacto-fermented pickles`, are made by submerging cucumbers in a `salt brine` (salt and water). This encourages beneficial `Lactobacillus bacteria` to thrive, which then convert sugars into lactic acid. This process preserves the pickles, gives them their characteristic tangy flavor, and enriches them with `probiotics` for `gut health`. They are distinctly different from vinegar pickles, which rely on vinegar for preservation.
- Q: How long do fermented pickles take to make?
- A: The time depends on your desired taste and temperature. `Half-sour pickles` typically take 3-5 days at room temperature (`Fermentation temperature (60-70F)`), resulting in a milder tang and crisp texture. `Full-sour pickles` can take 14-21 days for a deeper, more intense sourness. Using a `starter brine` (my unique twist) can speed up the initial `bubbling` phase.
- Q: What is the correct salt-to-water ratio for fermented pickles?
- A: For this recipe, I recommend a 3% `salt brine`, which translates to 2 tablespoons of `fine sea salt` (or `Himalayan salt`) per 5 cups of `filtered water`. This ratio is ideal for `half-sour pickles`. For `full-sour pickles` or longer ferments, some prefer a slightly higher ratio, such as 3.5% or 4.5%.
- Q: How do you keep fermented pickles crisp?
- A: Several factors contribute to crispness: using fresh `pickling cucumbers` (`Kirby cucumbers` are excellent), removing the `blossom end` of the cucumber, giving them an `ice bath` before fermenting, adding sources of `tannic acid` like `bay leaves` or `grape leaves`, and fermenting at cooler `Fermentation temperatures` (60-70°F). Ensuring they remain fully `submerged` under the `brine` is also crucial.
- Q: How do I know if my fermented pickles are bad?
- A: Trust your senses. Healthy `Fermented Pickles` will smell pleasantly tangy, garlicky, and fresh. If you detect any foul, rotten, or putrid `off-smells`, discard them. Also, look for visible signs of harmful `mold (fermentation)`, which is typically fuzzy, raised, and colored (green, black, or pink). A white, flat film (harmless `Kahm yeast`) or `cloudy brine` are generally normal and not signs of spoilage.
- Q: Can I re-use fermented pickle brine for a new batch?
- A: Yes, absolutely! Re-using clean `leftover brine` is an excellent practice. I specifically recommend using 1-2 tablespoons of it as a `starter` for your new batches. This `inoculation` jumpstarts the `Lacto-fermentation` process, ensuring consistent results and robust `probiotic` activity.
- Q: How long do fermented pickles last in the refrigerator?
- A: Once you transfer your `Fermented Pickles` to `refrigerator storage`, the `fermentation process` slows down dramatically. Kept submerged in their `brine`, they will last for many months, often `indefinitely`. The cold temperatures help maintain their `crisp texture` and `tangy flavor` for extended periods.
- Q: Why did my fermented pickles turn out too soft?
- A: `Soft pickles` are often caused by fermenting at too high a temperature, which accelerates the breakdown of `cucumber cell walls`. Not properly removing the `blossom end` of the cucumber (which contains softening `enzymes`) is another common reason. Additionally, simply fermenting for too long can lead to a softer texture, especially with `full-sour pickles`.
- Q: What if my fermented pickles are not bubbling?
- A: Lack of `bubbles` can be a common concern, but it doesn’t always mean failure. Initial `fermentation` can sometimes be slow, particularly in cooler `fermentation temperatures` (below 65°F) or if you haven’t used a `starter brine`. Patience is often key; try gently tapping the jar, and you might see tiny `bubbles` rise. My `unique twist` of adding `starter brine` helps significantly in initiating active `fermentation` more quickly and reliably, so this issue should be less frequent.
Crunchy Fermented Pickles: The Easiest Probiotic Recipe
Ingredients
Equipment
Method
- Start by thoroughly rinsing your `pickling cucumbers`. Identify the `blossom end` (opposite the stem) and remove about 1/16-inch, as enzymes here can cause softening. For extra crispness, place the trimmed cucumbers in an `ice bath` for 15-30 minutes. Keep them whole for better texture retention. They should feel firm and cold.
- In a separate bowl, combine 2 tablespoons of `fine sea salt` with 5 cups of cold `filtered water`. Whisk or stir thoroughly until the `salt` is completely dissolved. A clear brine means it’s ready.
- Wash your hands, `Mason jars` (a `two-quart jar` or `half-gallon jar` works well), and all utensils with hot, soapy water. Rinse them well. `Sterilizing` is not necessary for fermentation; simply clean is sufficient.
- Into the bottom of your clean `Mason jar`, add all the whole spices: `fennel seeds`, `coriander seeds`, `allspice`, `peppercorns`, `dill seeds`, `mustard seeds`, and `celery seeds`. Next, layer in the `fresh dill`, `sliced garlic cloves`, and `onion` or `turmeric` if using. Carefully pack in the cucumbers, starting with one layer standing on end. Add the `bay leaves` (or `grape leaf`/`oakleaf`), then add a second layer of cucumbers, packing them tightly. Leave about 1 ½ inches of `headroom` at the top.
- Pour 1-2 tablespoons of your unpasteurized live `starter brine` over the packed cucumbers. Finally, pour your prepared `saltwater brine` over everything until the cucumbers are completely submerged. Use a `fermentation weight` to keep all cucumbers and spices pressed down under the `brine`. It’s crucial that everything stays submerged to prevent `mold`. Remove any rogue spices that float to the surface. Loosely cover the jar with a `lid` or a breathable `cloth cover` to allow `gases` to escape while keeping dust out.
- Place your jar in a pan or bowl to catch any potential `overflow`. Find a cool, dark place (ideally between `60-70°F`) in your home. Let it ferment for 2-3 days for the initial stage. You’ll soon see `bubbles` rising, a slightly cloudy `brine`, and perhaps a faint tangy aroma.
- For `half-sour pickles`, 3-5 days at this temperature is usually ideal. For `full-sour pickles`, you’ll ferment for 14-21 days (and might use a slightly stronger salt ratio for a tangier flavor and softer texture). The starter brine helps ensure you’ll see activity quickly!
- After about 2 days, start checking for active `bubbles`, `overflow`, or a `clouding` of the brine. Tapping the jar can help dislodge tiny bubbles. Ferment for 3-4 days for really crunchy and vibrant pickles. Longer ferments yield a tangier pickle, which will naturally soften a bit and lose some bright green color. Taste your pickles at any point after you see `bubbles`. Once you observe consistent bubbling, move the jar to the `refrigerator storage`, where the `fermentation process` will slow down significantly. Always ensure the pickles remain submerged under the brine, even in the fridge.
- Once your pickles are chilled, give them a taste. They should be wonderfully crispy, packed with flavor, and have that characteristic tang. If you desire a tangier or slightly softer pickle, you can always bring them back out of the fridge and let them ferment for a few more days at room temperature.
- If you enjoy a `fizzy brine`, simply tighten the lid once refrigerated and `burp` the jar (release the pressure) every week or so. Alternatively, using an `airlock` will allow gases to escape without daily attention. If you prefer not to think about `burping jars`, just give the lid one loose twist.