

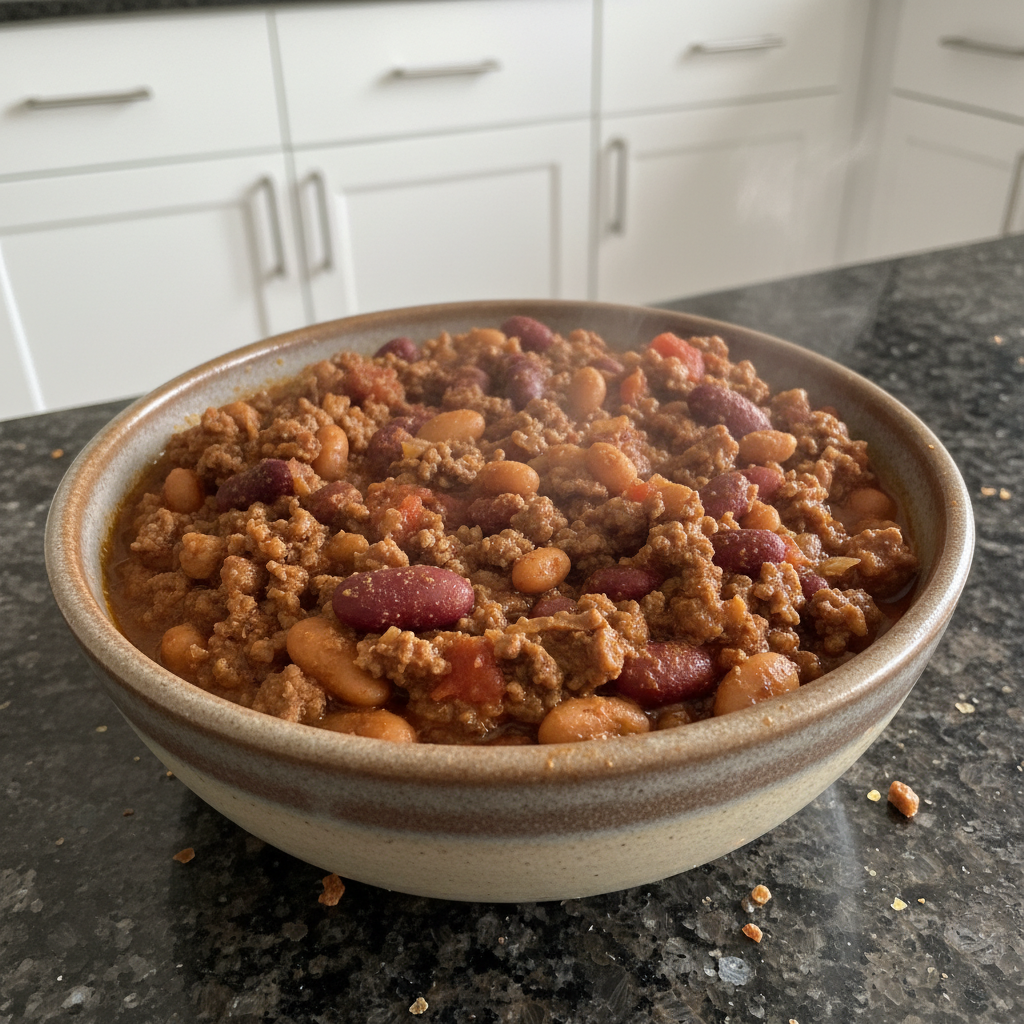
There’s nothing quite like a steaming bowl of homemade chili to warm the soul, especially when it’s packed with robust flavors and hearty goodness. As a chef and passionate home cook, I’ve dedicated countless hours to perfecting my cowboy chili recipe, aiming for that deep, rich taste that truly satisfies. This isn’t just another chili; it’s a meticulously crafted experience, designed to bring exceptional depth and warmth to your table. Get ready for an unforgettable journey into the world of truly great comfort food.
Why You’ll Love This Recipe
What makes this cowboy chili recipe truly stand out from the rest? It’s all in a simple, yet incredibly powerful flavor-blooming technique that I absolutely swear by. After we’ve sautéed our foundational vegetables and garlic, we’ll take a crucial step: adding 1 tablespoon of tomato paste, 1 tablespoon of unsweetened cocoa powder, the chili seasoning mix, and chili powder directly to the pot. We cook this mixture, stirring constantly, for 1-2 minutes until the kitchen fills with an incredibly fragrant aroma, and only then do we introduce the beef broth and diced tomatoes.
- Flavor Intensity: This “blooming” step is a game-changer. By cooking the dry spices and cocoa powder in hot fat, we intensely develop their fat-soluble flavor compounds. This process releases a deeper, more aromatic profile than simply adding them to liquid, creating a foundational base bursting with flavor.
- Rich Umami & Complexity: Caramelizing the tomato paste at this stage allows the Maillard reaction to work its magic, developing incredibly concentrated umami notes. And that unsweetened cocoa powder? It’s my secret ingredient! It deepens the color and adds a wonderful complexity, balancing the richness of the beef without making the chili taste like chocolate.
- Overall Impact: This intentional layering of flavors results in a more robust, well-developed, and truly unforgettable chili base. It elevates the entire dish, setting it apart from standard recipes.
- Practical Benefits: This hearty chili is a crowd-pleaser perfect for family gatherings and game nights. It also freezes beautifully, making it ideal for meal prep, and its satisfying nature makes it a great choice for budget-conscious cooks.
Ingredients Needed

Here’s what you’ll need to create this incredible cowboy chili. I always recommend gathering all your ingredients before you start cooking—it makes the process so much smoother!
- 2 pounds 80/20 ground beef
- 1 medium onion (diced)
- 1 large green bell pepper (diced)
- 2 teaspoons minced garlic
- 1 (15.5 ounce) can pinto beans, rinsed and drained
- 1 (15.5 ounce) can dark red kidney beans, rinsed and drained
- 3 (14.5-ounce) cans diced tomatoes
- 1 (1.25 ounce) package chili seasoning mix
- 2 tablespoons chili powder
- 2 (14.4 ounce) cans beef broth
- Salt and pepper to taste
Ingredient Notes & Substitutions
Flexibility is key in the kitchen, and this recipe is wonderfully adaptable. Here are some notes and substitution ideas to make this cowboy chili your own:
- Ground Beef: I highly recommend 80/20 ground chuck for the best balance of flavor and texture. It renders just enough fat to carry the spices without making the chili greasy, and prevents a dry, crumbly result. For a leaner option, you could use ground turkey, ground chicken, or ground pork, or even a flavorful three-meat blend for extra depth.
- Beans: While pinto beans and dark red kidney beans are classics, feel free to experiment! Black beans, cannellini beans, or even chickpeas can work. If you prefer a bean-free chili, simply omit them or replace with more meat or vegetables like mushrooms or zucchini.
- Tomatoes: For an added smoky depth, try using fire-roasted diced tomatoes. If you have fresh tomatoes on hand, about 2 cups of fresh chopped tomatoes can replace one 14.5-ounce can.
- Vegetables: Swap the green bell pepper for sweeter red or yellow bell peppers. For a smoky, milder kick, a diced poblano pepper is an excellent choice.
- Spices: While a store-bought chili seasoning mix works well, you can easily make your own. A good homemade blend often includes cumin, paprika, oregano, cayenne, and onion powder. Adjust to your heat preference!
- Broth: Beef broth provides a rich base, but chicken stock or vegetable broth can be used as alternatives without sacrificing too much flavor. Bone broth is also a great option for added nutrients.
- Umami Boosters: A small splash of soy sauce or Worcestershire sauce can further boost the savory umami notes, and can even help reduce the need for extra salt.

How to Make Cowboy Chili
Making a truly great cowboy chili is a rewarding experience, and I’ll walk you through each step to ensure you get incredible results. Remember, patience during the simmer is key to those deep, melded flavors!
Brown the Beef
Add the ground beef to a large stock pot or Dutch oven. Cook over medium heat, breaking up the meat with a spoon, until it’s no longer pink – this usually takes about eight minutes. You’ll hear a satisfying sizzle as the beef browns and develops flavor through the Maillard reaction. Use a slotted spoon to strain the beef from the pot and set it aside. Drain all but about one tablespoon of the rendered grease from the pot; this little bit of fat is crucial for our next steps.
Sauté Aromatics
Add the diced onion and green bell pepper to the remaining grease in the pot. Sauté these vegetables over medium heat for 8-10 minutes, stirring occasionally, until they become tender and slightly softened. They’ll start to sweeten and provide a wonderful aromatic foundation.
Add Garlic
Stir in the minced garlic and sauté for just another 30 seconds. Be careful not to burn it; you want it golden and fragrant, not bitter.
Develop Deep Flavors
Return the browned ground beef to the pot with the sautéed aromatics. This is where our unique twist comes in! Add 1 tablespoon of tomato paste, 1 tablespoon of unsweetened cocoa powder, the chili seasoning mix, and chili powder. Cook, stirring constantly with a wooden spoon, for 1-2 minutes. You’ll notice the mixture deepening in color and the aroma becoming incredibly rich and complex as the fat-soluble flavors are released and the tomato paste caramelizes. This step is essential for an unparalleled depth of flavor.
Simmer to Perfection
Now, add the pinto beans, kidney beans, diced tomatoes with their juice, and beef broth to the pot. Stir until everything is well combined and the ingredients are evenly distributed. Bring the mixture to a gentle boil.
Once boiling, reduce the heat to medium-low, cover the pot, and let the chili simmer for two hours. This low, slow simmer allows all the flavors to truly meld and deepen, transforming individual ingredients into a rich, cohesive, and incredibly satisfying dish. Remember to stir occasionally to prevent any sticking to the bottom of the pot.
Final Seasoning and Serve
After two hours, taste your chili and season with salt and pepper to your preference. Don’t be shy about adjusting here – a little extra salt or a fresh crack of pepper can make all the difference. Serve your cowboy chili hot with your choice of toppings.
Mastering Your Cowboy Chili: Beyond the Stovetop & Troubleshooting
While my stovetop method for this Cowboy Chili is stellar, I know many of you appreciate versatility in the kitchen. Here are methods for using your Instant Pot or slow cooker, along with tips for fine-tuning your chili to perfection.
Instant Pot & Slow Cooker Methods
These appliances are fantastic for convenience without sacrificing flavor, especially with a recipe like this!
Instant Pot Cowboy Chili
The Instant Pot speeds up the simmering process beautifully:
- Sauté Function: Use the SAUTE function to brown your ground beef, then drain the excess fat, leaving about 1 tablespoon. Add the onion and green bell pepper, sautéing until tender. Stir in the garlic for 30 seconds.
- Introduce the Twist: Return the browned beef to the pot. Add the tomato paste, unsweetened cocoa powder, chili seasoning mix, and chili powder. Cook, stirring constantly, for 1-2 minutes until fragrant.
- Pressure Cooking: Add the pinto beans, kidney beans, diced tomatoes (with their juice), and beef broth. Stir well. Secure the lid, set the vent to Sealing, and cook on MANUAL function (or Pressure Cook) on high pressure for 20-25 minutes.
- Pressure Release: Allow for a natural release for 10 minutes, then manually quick release any remaining pressure. This prevents splattering and helps the flavors settle.
- Season & Serve: Open the lid carefully, stir, season with salt and pepper to taste, and serve hot.
Slow Cooker Cowboy Chili
For a hands-off, all-day simmer, the slow cooker is ideal. If you’re a fan of these convenient appliances, you might also love our ultimate crockpot beef stew:
- Browning First: This step is critical! In a separate skillet on your stovetop, brown the ground beef, drain the fat, and set aside. In the same skillet, sauté the onion and green bell pepper until tender, then add the garlic for 30 seconds. Add the tomato paste, cocoa, chili seasoning, and chili powder, cooking for 1-2 minutes until fragrant.
- Combine in Slow Cooker: Transfer the browned beef and sautéed aromatics (with the bloomed spices) to your Crock Pot. Add the pinto beans, kidney beans, diced tomatoes (with their juice), and beef broth. Stir everything together.
- Cook Times: Cook on Low for 6-8 hours or on High for 3-4 hours, until the flavors have melded and the chili is wonderfully thick.
- Season & Serve: Stir well, season with salt and pepper to your liking, and serve warm with your favorite toppings.
Adjusting Consistency, Dried Beans & Homemade Seasoning
Here are some tips to customize your chili experience.
Adjusting Chili Consistency
- Thickening Chili: If your chili is too thin, you have a few options:
- Simmer uncovered for an additional 15-30 minutes to allow more liquid to evaporate.
- Carefully mash a portion of the beans against the side of the pot with a spoon; their starches will help thicken the chili.
- Make a cornstarch slurry: whisk 1-2 tablespoons of cornstarch with an equal amount of cold water, then stir into the simmering chili until thickened.
- Thinning Chili: If your chili becomes too thick, simply stir in additional beef broth or water, a quarter cup at a time, until it reaches your desired consistency.
Cooking Dried Beans from Scratch
Using dried beans offers a superior texture and flavor, but they need to be cooked separately:
- Preparation: Soak your dried pinto or kidney beans overnight in plenty of cold water (at least 3-4 times their volume). Alternatively, use the quick soak method: bring beans to a boil in water, boil for 5 minutes, then remove from heat, cover, and let stand for 1 hour.
- Cooking: Drain the soaked beans and add them to a fresh pot with enough water to cover by about 2 inches. Simmer until tender, usually 1-2 hours, depending on the bean. Acidic foods like tomatoes can prevent beans from softening, so always cook them separately before adding to your chili. Once cooked, drain and add to the chili during the simmering stage.
Homemade Chili Seasoning Mix
For those who prefer to make their own seasoning blend, a good starting point is a mix of: 2 tablespoons chili powder, 1 tablespoon cumin, 1 tablespoon paprika, 1 teaspoon oregano, 1/2 teaspoon cayenne pepper (adjust to taste), and 1/2 teaspoon onion powder. Whisk them together and use as directed in the recipe.
Pro Tips & Troubleshooting
Even seasoned cooks benefit from a few extra insights. Here are my top tips for success and common pitfalls to avoid with your cowboy chili.
Pro Tips for the Best Cowboy Chili
- Optimal Beef Choice: I can’t stress this enough – using 80/20 ground chuck is paramount for the best flavor and texture. It provides enough fat to carry the flavors without making the chili greasy, and ensures a moist, tender result. Proper browning is key to developing those rich Maillard reaction flavors.
- Deepen Flavors with our Twist: Remember our unique twist! Don’t skip the step of blooming the spices, cocoa, and tomato paste in hot fat. This step is where unparalleled depth and aroma are created.
- Adjusting Heat: For those who like a little more kick, consider adding a diced jalapeño or serrano pepper with the bell pepper, a few chopped chipotle peppers in adobo (and a spoonful of the sauce!) for smoky heat, or simply a pinch more cayenne pepper.
- Smoky Notes: To infuse a campfire-like essence, a teaspoon of smoked paprika or even a tiny splash of liquid smoke can deepen the smoky profile.
- Salt & Pepper: Always taste and adjust your seasoning at the end. Broths and seasoning mixes vary widely in sodium content, so a final taste test ensures perfect balance.
- Advance Prep: Like many stews, chili often tastes even better the next day, after the flavors have had more time to meld. This makes it a fantastic make-ahead meal for entertaining or busy weeknights.
Common Mistakes to Avoid
- Skipping Browning the Beef: This is a cardinal sin in chili making! Skipping this step means you miss out on crucial flavor development from the Maillard reaction, leading to less flavorful chili, a mushier texture, and often excess liquid and grease in the final dish.
- Cooking Dried Beans Directly in Chili: As I mentioned, the acidity from ingredients like tomatoes can prevent dried beans from softening properly, leaving them tough. Always cook them separately!
- Using Too Lean or Too Fatty Beef: While 90/10 beef can result in dry, crumbly chili lacking richness, overly fatty beef (like 70/30) can lead to a mushy texture and an unpleasantly greasy chili. 80/20 is the sweet spot.
- Not Blooming Spices: Skipping our unique spice-blooming step means you’re missing out on the intense aromatic compounds and deep, layered flavors this recipe promises. Don’t rush past this!
- Ignoring Simmer Time: Adequate simmering is absolutely crucial for the flavors to meld, deepen, and for the chili to develop its characteristic rich, comforting profile. Patience truly is a virtue here.
Serving & Storage
Once your cowboy chili is perfected, it’s time to enjoy! Here are my favorite ways to serve it, plus essential tips for storing any delicious leftovers.
Serving Ideas
Chili is a versatile dish that welcomes a variety of toppings and pairings. Don’t be shy about customizing your bowl!
- Classic Toppings: A sprinkle of shredded cheddar cheese, a dollop of sour cream, and a handful of sliced green onions are my go-to. Other favorites include corn chips or tortilla chips, sliced black olives, diced purple onion, a squeeze of freshly squeezed lime juice, fresh or pickled jalapeños, diced green chilis, diced avocado, crackers, fresh cilantro, fresh garden salsa, or a sprinkle of cotija cheese.
- Hearty Sides: Serve alongside warm homemade skillet cornbread, fluffy buttermilk biscuits, or savory cheese straws for a truly satisfying meal.
- Creative Meals: Get inventive! Serve your chili over pasta for a comforting chili mac, spoon it over fluffy rice, or create epic Twice Baked Potatoes loaded with chili and all your favorite fixings.
Storage and Make-Ahead
This cowboy chili is a fantastic dish for meal prepping and freezes beautifully, often tasting even better the next day!
- Refrigeration: Allow the chili to cool completely to room temperature (within 2 hours) before transferring it to an airtight container. It will keep safely in the refrigerator for up to 3-4 days.
- Freezing: For longer storage, chili freezes exceptionally well. Once cooled, transfer the chili to airtight freezer bags (lay them flat to save space) or freezer-safe containers, leaving about an inch of headspace for expansion. It can be frozen for up to 3-6 months.
- Thawing & Reheating: To thaw, simply transfer frozen chili to the refrigerator overnight. Reheat gently on the stovetop over medium-low heat, stirring occasionally until piping hot throughout. You can also reheat individual portions in the microwave. If it’s too thick after reheating, add a splash of beef broth or water to reach your desired consistency.
Conclusion
There you have it—my ultimate cowboy chili recipe, a dish that transcends the ordinary to deliver truly deep, layered flavors. That secret twist, blooming the spices and cocoa with caramelized tomato paste, is the heart of what makes this chili so incredibly robust and unforgettable. I promise you, even if you’re new to chili making, you can achieve fantastic results with this recipe.
Don’t hesitate to make it your own by experimenting with different toppings or adding a personal touch of heat. I invite you to print this recipe, share it with friends and family, and explore other comforting classics right here in my kitchen. Happy cooking!
FAQ
What is the difference between Cowboy Chili and regular chili?
While often used interchangeably, “Cowboy Chili” typically implies a hearty, robust chili, often with a focus on meat (usually beef) and beans, less on other vegetables, and designed to be a filling, substantial meal. It evokes a sense of rugged simplicity and big flavors, often leaning into traditional chili powder, cumin, and sometimes a hint of smoky notes. My recipe emphasizes this heartiness while introducing a deep flavor twist for complexity.
Can I make Cowboy Chili in an Instant Pot or slow cooker?
Absolutely! This recipe is incredibly versatile. I’ve provided detailed instructions for both the Instant Pot and slow cooker methods in the “Mastering Your Cowboy Chili” section. Both options allow for a deeply flavorful chili with reduced hands-on time after the initial browning and flavor-blooming steps.
Why is browning ground beef important for cowboy chili, and what kind of beef should I use?
Browning the ground beef, a process known as the Maillard reaction, is crucial for developing rich, savory flavors that form the foundation of your chili. It creates complex flavor compounds and a desirable texture. I recommend using 80/20 ground chuck as it provides the perfect balance of fat for flavor without making the chili overly greasy, ensuring a moist and tender result.
Can I use dried beans in Cowboy Chili?
Yes, you can! Using dried beans offers a superior texture. However, it’s essential to cook them separately beforehand. Acidic foods like tomatoes, if added too early, can prevent dried beans from softening properly, leaving them tough. Refer to my “Cooking Dried Beans from Scratch” section for detailed instructions.
What are the best toppings and serving suggestions for Cowboy Chili?
The best part about chili is customizing it! Classic toppings include shredded cheddar cheese, sour cream, sliced green onions, and corn chips. For extra flair, try diced avocado, fresh cilantro, pickled jalapeños, or a squeeze of fresh lime juice. Serve it with warm cornbread, buttermilk biscuits, or even over rice or pasta for chili mac.
How should I store, freeze, and reheat leftover Cowboy Chili?
Leftover chili stores beautifully! Once cooled, transfer it to an airtight container and refrigerate for up to 3-4 days. For longer storage, chili freezes wonderfully for 3-6 months in freezer bags or freezer-safe containers. To reheat, thaw overnight in the fridge and warm gently on the stovetop or in the microwave until piping hot.
How can I adjust the spice level of my Cowboy Chili?
You can easily dial the heat up or down! To increase the spice, consider adding a diced jalapeño or serrano pepper with the bell peppers, a few chipotle peppers in adobo, or an extra pinch of cayenne pepper. If you prefer it milder, simply reduce the amount of chili powder and omit any additional spicy ingredients.
What are some substitutions for common Cowboy Chili ingredients?
This recipe is very flexible! You can swap 80/20 ground beef for leaner ground turkey or a blend of meats. Pinto and kidney beans can be replaced with black beans or cannellini beans. Feel free to use red or yellow bell peppers instead of green, or add a poblano pepper for a smoky note. Vegetable or chicken broth can stand in for beef broth, and you can even make your own chili seasoning mix from scratch. Check my “Ingredient Notes & Substitutions” section for more ideas!
Ultimate Cowboy Chili Recipe
Ingredients
Equipment
Method
- Add the ground beef to a large stock pot or Dutch oven. Cook over medium heat, breaking up the meat with a spoon, until it’s no longer pink – this usually takes about eight minutes.
- Use a slotted spoon to strain the beef from the pot and set it aside. Drain all but about one tablespoon of the rendered grease from the pot.
- Add the diced onion and green bell pepper to the remaining grease in the pot. Sauté these vegetables over medium heat for 8-10 minutes, stirring occasionally, until they become tender and slightly softened.
- Stir in the minced garlic and sauté for just another 30 seconds. Be careful not to burn it.
- Return the browned ground beef to the pot with the sautéed aromatics. Add 1 tablespoon of tomato paste, 1 tablespoon of unsweetened cocoa powder, the chili seasoning mix, and chili powder.
- Cook, stirring constantly with a wooden spoon, for 1-2 minutes until the mixture deepens in color and the aroma becomes incredibly rich and complex.
- Now, add the pinto beans, kidney beans, diced tomatoes with their juice, and beef broth to the pot. Stir until everything is well combined and evenly distributed.
- Bring the mixture to a gentle boil, then reduce the heat to medium-low, cover the pot, and let the chili simmer for two hours. Stir occasionally to prevent sticking.
- After two hours, taste your chili and season with salt and pepper to your preference.
- Serve your cowboy chili hot with your choice of toppings.