

Valentine’s Day is just around the corner, and what better way to celebrate love than with a batch of homemade treats straight from your kitchen? I’m absolutely delighted to share my recipe for the most enchanting red velvet valentines day cookies you’ll ever bake. These aren’t just any cookies; they’re a labor of love, designed to bring joy with their vibrant color, tender crumb, and a unique twist that elevates them to an art form. Whether you’re a seasoned baker or just starting your culinary journey, this recipe will guide you to create truly beautiful, delicious, and unforgettable cookies for that special someone.
Why You’ll Love This Recipe
My kitchen thrives on creating dishes that surprise and delight, and these red velvet valentines day cookies are no exception. The unique twist I’ve brought to this classic is a delicate drizzle of tangy cream cheese glaze over the set chocolate kiss, perfectly completing the authentic red velvet flavor profile. Here’s why these cookies will become your new favorite:
- Flavor Elevation: The subtle tang and creamy texture of the cream cheese glaze are the quintessential partners to red velvet, offering a crucial contrast that deepens the mild cocoa and sweet notes of the cookie. It’s a harmonious balance, enhancing the true red velvet experience without overpowering the star ingredients.
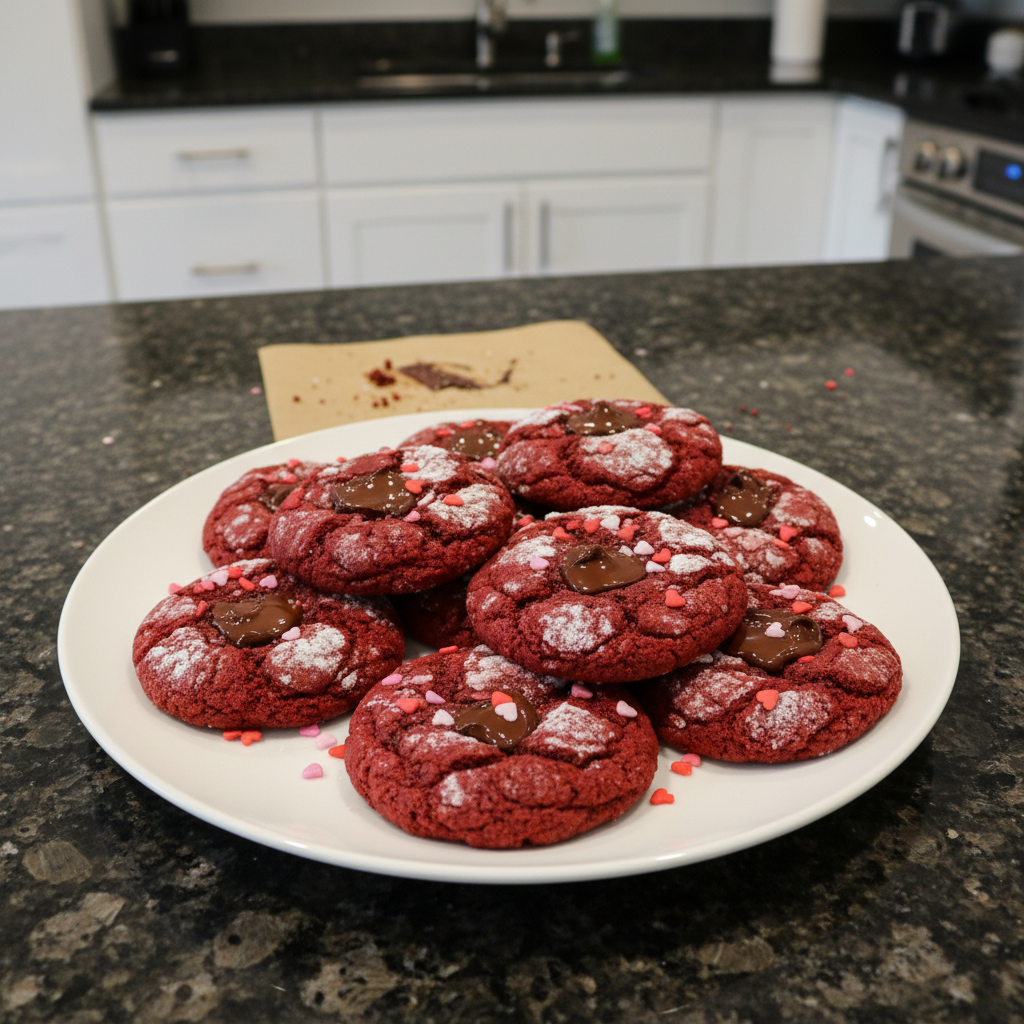
- Festive & Beautiful: With their striking red hue, glistening sugar sprinkles, and the elegant chocolate blossom crowned with a creamy drizzle, these cookies are a feast for the eyes. They’re absolutely perfect for Valentine’s Day, Galentine’s Day gatherings, or any occasion that calls for a touch of edible romance.
- Soft & Chewy Perfection: I’ve perfected the recipe to ensure each bite delivers a wonderfully soft, slightly underdone interior that melts in your mouth. This delightful chewiness contrasts beautifully with the firm chocolate and the creamy glaze, creating a symphony of textures.
- Easy to Master: Don’t let their impressive appearance intimidate you! I promise you, this recipe is straightforward and incredibly rewarding. With my step-by-step guidance, even novice bakers will achieve bakery-worthy results.
Ingredients Needed

Gather these ingredients to create your beautiful red velvet valentines day cookies. Precision here is key to their success!
- 1/2 cup butter, slightly softened
- 3/4 cup brown sugar
- 1/4 cup granulated sugar
- 1 egg
- 1 and 1/2 cups all purpose flour
- 2 Tbsp. cup cocoa powder
- 1 teaspoon baking soda
- 1/4 teaspoon salt
- 1 Tbsp. milk
- 2 teaspoons vanilla extract
- 1 Tablespoon red or hot pink food coloring
- 1/2 cup sugar sprinkles (red or pink)
- 18 Dove Promises, dark or milk chocolate
Ingredient Notes & Substitutions
Let’s dive a little deeper into these crucial ingredients, ensuring you get the best possible outcome for your blossom cookies:
- Butter: My recipe calls for “slightly softened” butter, which is crucial for the perfect texture. This means it should give slightly when pressed, but not be greasy or melted. Butter that’s too warm will cause your cookies to spread excessively, losing their lovely shape.
- Cocoa Powder: For these red velvet cookies, I recommend using natural unsweetened cocoa powder. Its natural acidity reacts beautifully with the baking soda and red food coloring to enhance the iconic red hue, contributing to the delicate “cocoa chemistry” that defines red velvet. Dutch-process cocoa is alkalized and will result in a darker, less vibrant red.
- Red Food Coloring: To achieve that show-stopping, vibrant red, I highly suggest using a gel food coloring. It’s much more concentrated than liquid food coloring, meaning you’ll get a deeper, richer color without adding too much moisture to your dough. Hot pink food coloring also works beautifully for a fun, modern twist!
- Chocolate Kisses/Promises: While my recipe specifies Dove Promises, you can absolutely use other chocolate types like Hershey Kisses (milk or dark chocolate). The goal is a bite-sized, blossom-style chocolate that melts perfectly into the warm cookie.
- Milk: Any dairy milk works wonderfully here. If you’re looking for a dairy-free option, unsweetened almond milk or oat milk can be substituted seamlessly without affecting the cookie’s texture.
- Optional for Cream Cheese Glaze (Our Unique Twist): To create that irresistible tangy drizzle, you’ll also need:
- 2 oz cream cheese, softened
- 1/4 cup confectioners’ sugar (or powdered sugar)
- 1-2 Tablespoons heavy cream (or milk)
- 1/4 teaspoon vanilla extract

How to Make Red Velvet Valentine’s Day Cookies
Creating these beautiful red velvet valentines day cookies is a joyful process. Follow these steps carefully to achieve perfection in every batch!
Step 1: Prep Work (Preheat & Dry Ingredients)
First things first, preheat your oven to 375ºF. This ensures your oven is at the correct temperature for even baking. In a medium bowl, whisk together your dry ingredients: the all-purpose flour, cocoa powder, baking soda, and salt. Make sure these are thoroughly combined to ensure uniform leavening and flavor throughout your cookies.
Step 2: Creaming Butter & Sugars
In the bowl of a stand mixer fitted with the paddle attachment, beat the slightly softened butter and both the brown sugar and granulated sugar together. Cream them until the mixture is light, fluffy, and pale, usually for about 2-3 minutes. This aerates the butter and sugars, contributing to a wonderfully soft texture. Next, add the egg and mix until it’s just incorporated, scraping down the sides of the bowl as needed.
Step 3: Forming the Vibrant Red Dough
Now for the magic! To the creamed butter mixture in your stand mixer, add the dry flour mixture, the milk, the vanilla extract, and the red or hot pink food coloring. Mix on low speed until a beautiful, deep red dough forms. Be careful not to overmix; stop as soon as the ingredients are combined and no streaks of flour remain. The dough should be soft but manageable.
Step 4: Roll, Coat & Bake
Scoop about 2 tablespoons of dough at a time and gently roll it into a smooth ball between your palms. For that extra sparkle and a slight textural crunch, roll each dough ball in additional granulated sugar to coat it completely. Place these festive, sugar-coated dough balls onto an ungreased cookie sheet, leaving about 2 inches between each to allow for spreading. Bake the cookies for exactly 9 minutes. The edges should be just set, but the centers will still look soft and slightly underdone—this is the secret to a perfectly chewy cookie!
Step 5: Add Chocolate Kisses & Chill
As soon as you remove the cookies from the oven, while they are still piping hot, gently but firmly press one Dove Promise (or Hershey Kiss) into the center of each warm cookie. The residual heat will slightly melt the chocolate, allowing it to nestle perfectly into the cookie. This next step is critical: immediately move the entire cookie sheet (or transfer the cookies to a wire rack) to the refrigerator. This rapid cooling will quickly set the chocolate, preventing it from melting excessively into a puddle and ensuring it maintains its lovely blossom shape.
Step 6: The Unique Cream Cheese Glaze (Our Twist!)
While your cookies are chilling and the chocolate is setting, prepare our signature cream cheese glaze. In a small bowl, beat the softened cream cheese with the confectioners’ sugar, 1 tablespoon of heavy cream (or milk), and vanilla extract. Start with 1 tablespoon of cream, adding the second tablespoon only if needed to achieve a smooth, drizzly consistency. Once the cookies are fully cooled and the chocolate is completely set (typically after 15-20 minutes in the fridge), gently drizzle the tangy cream cheese glaze over the chocolate kiss on each cookie. Allow it to artfully pool and slightly drip down the chocolate, adding that signature red velvet touch and a final layer of deliciousness.
Unlock the Secrets: Perfect Red Velvet & More
Beyond just following the steps, understanding the nuances of red velvet baking can elevate your cookies from good to extraordinary. Let’s explore some of the deeper secrets.
The Science Behind Red Velvet
The allure of red velvet lies in its unique flavor profile and color, which is more than just adding red dye. Historically, the “velvet” texture came from the reaction between buttermilk (acid) and cocoa powder (a natural reddish-brown pigment with anthocyanins). When natural cocoa reacts with an acid and baking soda, it can create a reddish hue, alongside a tender crumb. Today, we often enhance this with red food coloring, but the subtle cocoa flavor and hint of tang are still central to its identity. It’s a beautiful dance between acid, alkali, and flavor compounds.
Achieving That Vibrant Red Color
For truly show-stopping Valentine’s Day cookies, achieving a vibrant red color is key. My best advice is to use a high-quality gel food coloring. These are much more potent than liquid dyes, meaning you’ll need less to get an intense, deep red without impacting your dough’s consistency. I often find a full tablespoon gives that stunning richness. Remember that natural cocoa powder, with its acidic properties, also helps to bring out reddish undertones more effectively than alkalized (Dutch-process) cocoa, complementing the added food coloring.
Troubleshooting Beyond Spreading
Even seasoned bakers encounter hiccups! Here’s how to troubleshoot common cookie issues beyond just spreading:
- Cookies Too Dry: This is often a culprit of over-measuring flour (always spoon and level!) or overbaking. Ensure your flour is measured accurately and stick to the recommended bake time.
- Cookies Not Chewy: If your cookies lack that satisfying chew, it could be due to baking them for too long, using butter that’s too warm, or an imbalance in your sugar ratios. Underbaking slightly is often the secret to chewiness.
- Glaze Consistency: For a perfectly drizzly cream cheese glaze, start with less heavy cream and gradually add more, drop by drop, until you reach your desired consistency. If it’s too thin, a touch more confectioners’ sugar can thicken it; if too thick, a few more drops of cream will thin it out.
Pro Tips & Troubleshooting
From my kitchen to yours, these are the essential tips and common pitfalls to navigate for perfect red velvet valentines day cookies every time.
Pro Tips for Success
- Chill Your Dough: While not strictly required for this recipe, chilling your cookie dough for even just 30 minutes can work wonders. It firms up the butter, which prevents excessive spreading, and allows the flavors to meld and deepen, resulting in a richer cookie.
- Perfect Butter Temperature: As I emphasized, slightly chilled (not fully softened or melted) butter is paramount for creaming. It helps create the right dough consistency and significantly minimizes cookie spreading.
- Quick Set for Chocolate: This is an absolute game-changer! Moving your cookies directly to the refrigerator immediately after pressing in the chocolate is the secret to maintaining those lovely, firm chocolate kisses without them turning into a melted puddle.
- Don’t Overbake: Trust the 9-minute bake time. The cookies will continue to cook slightly on the hot cookie sheet even after they come out of the oven. A slightly underbaked center guarantees those irresistibly soft and chewy interiors.
- Glaze Application: Always wait until your cookies are completely cooled and the chocolate is fully set before applying the cream cheese glaze. This ensures the glaze adheres beautifully and maintains its structure.
Common Mistakes to Avoid
- Over-Softened Butter: Using butter that is too warm is the number one cause of excessive cookie spreading. Your cookies will flatten out too much and lose their appealing thickness.
- Leaving Chocolate at Room Temp: Resist the urge to let your chocolate-topped cookies sit on the counter at room temperature. The residual heat from the cookie will continue to melt the chocolate, leading to messy, unappealing puddles instead of defined blossoms.
- Incorrect Flour Measurement: Scooping flour directly from the bag can compact it, leading to too much flour. Always use the “spoon and level” method: spoon flour into your measuring cup, then level off the top with a straight edge. This prevents dry, crumbly cookies.
- Rushing the Chill: Skipping the crucial chill step for both the dough (if you choose to pre-chill) and especially the freshly topped cookies can compromise both their texture and their beautiful appearance. Patience truly is a virtue in baking!
Serving & Storage
These red velvet valentines day cookies are truly special, and knowing how to best serve and store them ensures every bite is as delicious as the first.
Festive Serving Ideas
- Sweetheart Treat: These are the quintessential Valentine’s Day cookies, perfect for a romantic dessert, a thoughtful gift for a loved one, or a special treat to share.
- Celebration Ready: Don’t limit them to just Valentine’s! They’re fantastic for Galentine’s Day parties, class parties, or any festive gathering where a vibrant, delicious cookie is desired. The sugar sprinkles add an extra touch of celebration.
- Pairing Suggestions: Serve these cookies with a tall glass of cold milk, a steaming cup of coffee or espresso, or for an extra decadent dessert, alongside a scoop of vanilla bean ice cream.
- Gifting Presentation: These cookies make incredibly beautiful gifts. Arrange them in a pretty box lined with parchment paper, tie with a festive ribbon, or present them on a decorative platter. They’re sure to impress!
Storage and Make-Ahead Tips
- Baked Cookies (with glaze): Due to the cream cheese glaze, I recommend storing the baked and glazed cookies in an airtight container in the refrigerator for up to 5-7 days. If your kitchen is cool, they can sit at room temperature for 2-3 days, but for optimal freshness and food safety, the fridge is best. Make sure the glaze is fully set before stacking to prevent sticking.
- Freezing Baked Cookies: You can freeze baked red velvet cookies for up to 2-3 months. For best results, I suggest freezing them *before* adding the cream cheese glaze. Once thawed at room temperature, prepare and drizzle the fresh glaze. If you freeze them with the glaze, ensure the glaze is completely firm, then flash freeze them on a tray before transferring to an airtight container or freezer bag.
- Make-Ahead Cookie Dough: My favorite tip for busy bakers! Prepare the cookie dough as directed, roll into balls, and coat in sugar. Store these unbaked dough balls in an airtight container in the refrigerator for up to 3-4 days. For longer storage, freeze the dough balls on a baking sheet until firm, then transfer them to a freezer-safe bag for up to 1 month. You can bake them directly from frozen (add 1-2 minutes to the bake time) or let them thaw slightly on the counter first.
Conclusion
And there you have it—a recipe for truly spectacular red velvet valentines day cookies that will win hearts and impress palates! These tender, vibrant cookies, crowned with rich chocolate and kissed by our unique tangy cream cheese glaze, are more than just a treat; they’re an expression of love. I encourage you to bring the joy of baking into your home and create these gorgeous blossom cookies for Valentine’s Day, or any occasion that calls for a little extra sweetness. Don’t forget to share your creations with me, print out this recipe for your collection, and explore more festive cookie ideas from my kitchen. Happy baking!
FAQ
How do I prevent my red velvet cookies from spreading too much?
The best ways to prevent cookie spreading are using butter that is slightly chilled (not too warm or melted) when creaming, accurately measuring your flour (spoon and level), and briefly chilling your cookie dough before baking. Ensure your oven temperature is accurate as well.
What is the best way to achieve a deep red color in red velvet cookies?
For a vibrant, deep red, I highly recommend using a gel food coloring, which is much more concentrated than liquid dyes. Natural unsweetened cocoa powder also helps enhance the reddish undertones more than Dutch-process cocoa.
Can I prepare the red velvet cookie dough ahead of time?
Absolutely! You can prepare the cookie dough, roll it into balls, and coat it in sugar. Store the unbaked dough balls in an airtight container in the refrigerator for up to 3-4 days, or freeze them for up to 1 month. Bake from frozen, adding a minute or two to the bake time.
What is the shelf life of these Valentine’s Day red velvet cookies and how should I store them?
Due to the cream cheese glaze, these cookies are best stored in an airtight container in the refrigerator for up to 5-7 days. Ensure the glaze is fully set before stacking. You can also store them at room temperature for 2-3 days if your kitchen is cool.
Can I substitute other chocolate types for the Dove Promises?
Yes, you can! While Dove Promises are specified, Hershey Kisses (milk chocolate or dark chocolate) or similar blossom-style chocolates work perfectly. Choose your favorite type of chocolate to press into the warm cookies.
What makes a red velvet cookie unique compared to other chocolate cookies?
Red velvet cookies are unique for their subtle cocoa flavor (less intense than a traditional chocolate cookie), a distinctive hint of tang (often from buttermilk or the cocoa-acid reaction), and of course, their signature vibrant red color. The traditional pairing with cream cheese also sets them apart, enhancing their unique flavor profile.
What does red velvet taste like?
Red velvet has a unique flavor profile that is subtly chocolatey, with a mild cocoa taste rather than a rich, dark chocolate intensity. It typically carries a slight tang, often balanced with vanilla notes and, in this recipe, is wonderfully complemented by the creamy, tangy cream cheese glaze.
What if I don’t have a stand mixer?
No problem! You can absolutely make these cookies with a hand mixer, or even with a sturdy whisk and a good dose of arm strength. Just be prepared to put in a bit more effort when creaming the butter and sugars, as it might take a few extra minutes to achieve that light and fluffy texture.
Red Velvet Valentine’s Day Cookies with Cream Cheese Glaze
Ingredients
Equipment
Method
- Preheat your oven to 375ºF. In a medium bowl, whisk together the all-purpose flour, cocoa powder, baking soda, and salt. Make sure these are thoroughly combined.
- In the bowl of a stand mixer fitted with the paddle attachment, beat the slightly softened butter and both the brown sugar and granulated sugar together for about 2-3 minutes until light, fluffy, and pale. Next, add the egg and mix until it’s just incorporated, scraping down the sides of the bowl as needed.
- To the creamed butter mixture, add the dry flour mixture, the milk, the vanilla extract, and the red or hot pink food coloring. Mix on low speed until a beautiful, deep red dough forms. Be careful not to overmix; stop as soon as the ingredients are combined and no streaks of flour remain.
- Scoop about 2 tablespoons of dough at a time and gently roll it into a smooth ball. Roll each dough ball in additional granulated sugar to coat it completely. Place these festive, sugar-coated dough balls onto an ungreased cookie sheet, leaving about 2 inches between each. Bake the cookies for exactly 9 minutes; the edges should be just set, but the centers will still look soft and slightly underdone.
- As soon as you remove the cookies from the oven, while they are still piping hot, gently but firmly press one Dove Promise into the center of each warm cookie. Immediately move the entire cookie sheet (or transfer the cookies to a wire rack) to the refrigerator. This rapid cooling will quickly set the chocolate, preventing it from melting excessively.
- While your cookies are chilling and the chocolate is setting, prepare the cream cheese glaze. In a small bowl, beat the softened cream cheese with the confectioners’ sugar, 1 tablespoon of heavy cream (or milk), and vanilla extract. Start with 1 tablespoon of cream, adding the second tablespoon only if needed to achieve a smooth, drizzly consistency. Once the cookies are fully cooled and the chocolate is completely set (typically after 15-20 minutes in the fridge), gently drizzle the tangy cream cheese glaze over the chocolate kiss on each cookie.