

Welcome to the delightful world of Oreo sushi a viral, no-bake dessert that’s as fun to make as it is to eat! This guide will walk you through creating these adorable, bite-sized sweet treats, perfect for parties, kids’ activities, or a simple indulgent snack. But I’m not just making any Oreo sushi; I’m revealing a game-changing secret ingredient that ensures your rolls are firm, easy to slice, and never squishy, giving you bakery-worthy results every time. Get ready to impress with this easy, kid-friendly dessert that’s packed with nostalgic flavor and a satisfying texture.
Why You’ll Love This Recipe
The Secret to Success: My special addition of softened cream cheese or unsalted butter transforms the Oreo cream filling. This extra fat acts as an emulsifier, strengthening the cream’s structure. This means a filling that’s easier to spread evenly, holds its shape beautifully at room temperature, and results in cleaner, non-squishy slices for your Oreo sushi.
Luxurious Texture & Flavor: Beyond stability, the cream cheese or butter adds a subtle tang or buttery richness, balancing the intense sweetness of the Oreos and contributing to a more complex, luxurious mouthfeel.
Quick & No-Bake: This is a perfect easy recipe for when you need a delicious no-bake dessert without turning on the oven.
Kid-Friendly Fun: Involve the little ones in separating cookies, crushing Oreos, and rolling the ‘sushi’. It’s a fantastic kid-friendly dessert activity!
TikTok Trend Approved: This recipe embraces the viral TikTok trend of dessert sushi, making it a guaranteed crowd-pleaser and conversation starter for any party food.
Ingredients Needed

- 24 oreos (separated (one package))
- 1/4 cup milk
Ingredient Notes & Substitutions
- Oreos: While classic Oreos are fantastic, feel free to experiment with other flavored oreos (like mint, cinnamon bun, or even red velvet) for fun variations. For a gluten-free dessert, ensure you use gluten-free Oreos.
- Milk: Any kind of milk works here – dairy milk (whole, 2%, skim) or vegan milk options like almond, soy, or oat milk. Choose vegan milk and gluten-free Oreos for a complete vegan dessert version.
- The Unique Twist Ingredient: (Add to your shopping list!) Have 1 tablespoon of softened cream cheese or unsalted butter ready. This is my secret to a stable, rich, and perfectly spreadable filling, as detailed in ‘Why You’ll Love This Recipe’. Ensure it’s softened to room temperature for best results.

How to Make Oreo Sushi
1. Prepare the Oreo Base
Take your separated Oreos. In a food processor, blitz the cookies until they become very fine, uniform crumbs, resembling damp sand. This is key for a smooth dough. (Expert tip: A food processor makes this step easiest and ensures fine crumbs).
Add 3 tablespoons of milk to the food processor. Blitz again until the Oreo crumbs combine with the milk to form a cohesive ball of dough. The mixture should pull away from the sides. (Common mistake: If the dough falls apart, add a tiny bit more milk, a teaspoon at a time, and blitz again. If it’s too sticky, add a few more crumbs if possible).
2. Roll Out the Cookie Dough
Take the ball of Oreo dough and place it on a sheet of plastic wrap. Press the dough down into a rough square shape.
Using a rolling pin (or a smooth, heavy bottle if you don’t have one), roll everything into an even layer, aiming for about 1/4 inch thick. Work slowly and evenly. (Expert tip: Using the plastic wrap on top of the dough can help prevent sticking and achieve a smoother surface).
Trim off the sides with a sharp knife so you have a perfect square or rectangle with clean edges.
3. Prepare the Unique Creamy Filling
Take the reserved Oreo cream filling and place it in a mixing bowl. Add 2 teaspoons of milk *and 1 tablespoon of softened cream cheese or unsalted butter* to the bowl.
Mix thoroughly with a spoon or offset spatula until it is smooth, creamy, and easily spreadable. The cream cheese/butter will make it extra stable and rich.
4. Spread the Filling
Evenly spread the prepared Oreo cream mixture onto the rolled-out Oreo square. Ensure the layer is consistent right to the edges. (Expert tip: An offset spatula is ideal for smooth spreading. Alternatively, place another sheet of plastic wrap on top of the cream and gently use a rolling pin to smooth it out).
5. Roll the Oreo Sushi
Carefully begin to roll up the Oreo dough from one end, using the plastic wrap underneath to help guide and tighten the roll. Roll slowly, evenly, and tightly across the entire roll to avoid air pockets and ensure a compact ‘sushi’ log. (Expert tip: Roll it as snugly as you can without squishing).
Once rolled, you can wrap the entire log tightly in plastic wrap and pop it in the fridge for at least 30-60 minutes to firm it up significantly. This step is crucial for clean slicing technique and preventing squished rolls.
6. Slice and Enjoy
Unwrap the chilled roll. Using a very sharp knife, slice the log into rounds, about 1/2 to 3/4 inch thick. (Expert tip: Use a gentle slicing motion – moving the knife back and forth instead of just pushing straight down, which can squish the rolls).
Arrange your beautiful dessert sushi rounds and enjoy your sweet treat!
Mastering Your Oreo Sushi: Perfect Dough & Firm Rolls
Achieving the Perfect Dough Consistency
Preventing Crumbly Dough: If your Oreo base dough falls apart, it needs more moisture. Add milk just a tiny bit at a time (e.g., 1/2 teaspoon), processing briefly after each addition, until the dough comes together and holds its shape without being sticky. Don’t overdo it!
Avoiding Sticky Dough: If the dough is too sticky and hard to handle, it likely has too much milk or is too warm. Pop it in the fridge for 10-15 minutes to firm up slightly. If extremely wet, you can try adding a tablespoon of very fine Oreo crumbs (if you have extra).
The Critical Chill for Firm Rolls
Why it Matters: Specific chilling time recommendations for firm rolls are vital. My no-bake dessert relies on chilling to set the fats in the Oreo crumbs and my enriched cream cheese (or butter) filling. This process makes the rolls firm enough to slice cleanly without distorting their shape.
How Long: Wrap your rolled dessert sushi log tightly in plastic wrap and refrigerate for a minimum of 30-60 minutes. For even firmer, easier-to-slice results, chilling for 1-2 hours is ideal. This is especially important for party food presentation.
Slicing for Success
Sharp Knife is Key: Always use a very sharp knife to cut your chilled Oreo sushi. A dull knife will drag and squish the delicate rolls.
Slicing Motion: As mentioned in expert tips, employ a gentle back-and-forth slicing technique rather than pressing straight down. This helps create perfectly round, neat cuts.
Creative Oreo Sushi Variations & Serving Ideas
Flavor Twists & Dietary Adaptations
Alternate Cookies: Don’t limit yourself to classic Oreos! Use any cream sandwich cookie (like Nutter Butters for a peanut butter twist, or store-brand versions). You can also use other flavored Oreos like mint or Golden Oreos.
Gluten-Free & Vegan: For gluten-free dessert lovers, simply swap regular Oreos for gluten-free Oreos. For a vegan dessert version, use vegan cream sandwich cookies and a vegan milk alternative (like almond or oat milk). Ensure your cream cheese/butter substitute is also vegan.
Fun Decorations
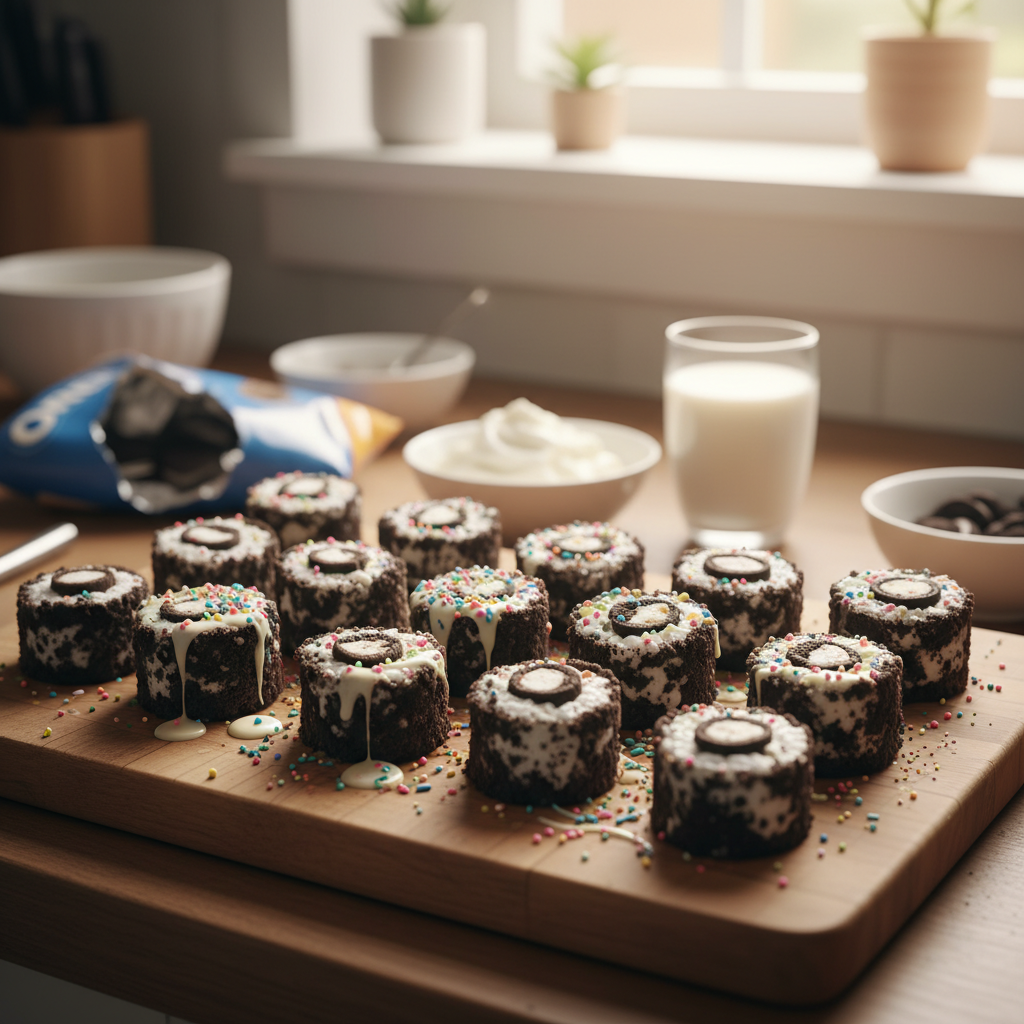
Elevate your sweet treat with creative decoration ideas! Drizzle with melted white chocolate, dark chocolate, or caramel sauce. Add a sprinkle of colorful sprinkles or crushed candy for extra texture and visual appeal.
Consider dusting with cocoa powder or powdered sugar for an elegant touch.
Serving Suggestions & Size
Serve your Oreo sushi as cute little sushi rounds on a platter. It makes for fantastic party food that’s visually engaging and easy to pick up.
Serving Size: Typically, 2-3 pieces make a good individual serving, depending on their size and how many other desserts are offered.
Pro Tips & Troubleshooting
Pro Tips
- Roll It Tight & Even: When rolling the dough, roll it slowly, evenly, and tightly across the entire roll, using the plastic wrap to help guide you. This creates a dense, uniform log for perfect slices.
- Pre-Slicing Chill is Key: For extra clean rounds, wrap up the roll in plastic wrap and place in the fridge for a couple of minutes to firm it up before slicing. Aim for at least 30-60 minutes, especially with my enriched filling, for best results.
- Master the Slicing Motion: When slicing, use a slicing motion instead of just pushing down on the knife to prevent squishing and achieve perfectly round pieces.
- Even Cream Spreading: Use an offset spatula for spreading the cream evenly, or place plastic wrap on top of the cream and use a rolling pin gently to ensure uniform filling.
- Food Processor for Perfection: A food processor is easiest for fine crumbs and dough mixing, leading to a smoother base dough texture.
Common Mistakes to Avoid
- Squished Sushi: Oreo sushi can be squished if the oreo base got too warm or too much milk was added to the dough. Also, not chilling the roll adequately before slicing is a major culprit. The unique twist in my cream helps prevent this!
- Crumbly Dough: Oreo dough falls apart if there is not enough milk. Add milk very gradually, a teaspoon at a time, until it just comes together into a cohesive ball.
- Improper Slicing: Improper slicing technique (pushing down vs. slicing motion) can lead to squished rolls. Always use a sharp knife and a gentle sawing motion.
- Uneven Rolling: A loosely or unevenly rolled log will result in misshapen slices. Take your time during the rolling step.
Serving & Storage
Serving Ideas
- Serve your Oreo sushi as individual sweet treat bites arranged artfully on a platter for a visually appealing presentation.
- They make excellent party food or additions to a dessert charcuterie board.
- Garnish with a drizzle of chocolate, a sprinkle of sea salt, or a few fresh berries for an elevated touch.
Storage and Make-Ahead
- Refrigeration: How to store Oreo sushi? Store leftover Oreo sushi in an airtight container in the refrigerator for up to 3-5 days. The unique twist helps maintain the cream’s stability.
- Make-Ahead: Can I make this recipe ahead of time? Absolutely! You can prepare the entire roll (steps 1-5) and keep it tightly wrapped in plastic wrap in the refrigerator for up to 2 days. Slice just before serving for the freshest look and best texture. This makes them perfect for meal prep or party planning.
Conclusion
Congratulations, you’re now equipped to create irresistible Oreo sushi that’s not only delicious but also perfectly structured and easy to slice! My secret ingredient ensures your sweet treats are firm, rich, and a joy to behold. This easy recipe is a fantastic way to engage with the TikTok trend and bring a smile to everyone’s face. Don’t be afraid to experiment with different flavored Oreos or fun decorations to make them your own. Dive in, get creative, and enjoy the process of making this delightful no-bake dessert.
Share your amazing Oreo sushi creations with us, or explore more of my kid-friendly dessert recipes!
FAQ
What is Oreo sushi?Oreo sushi is a fun, no-bake dessert made by crushing Oreo cookies to form a pliable dough, spreading their creamy filling inside, rolling it into a log, and then slicing it into rounds that resemble traditional sushi. It’s a popular sweet treat and TikTok trend.
How do I make perfectly round Oreo sushi rolls?The key to perfectly round rolls is a combination of factors: rolling the Oreo dough tightly and evenly using plastic wrap, ensuring the filling is stable (my unique cream cheese or unsalted butter twist helps significantly!), and most importantly, chilling the rolled log thoroughly (at least 30-60 minutes) before slicing technique with a sharp knife using a slicing motion.
How do I prevent my Oreo dough from falling apart or being too sticky?If your Oreo dough falls apart, it likely needs more moisture. Add milk sparingly, a teaspoon at a time, until it just comes together. If the dough is too squishy or sticky, it might have too much milk or be too warm; chill it briefly in the fridge or add a few more crumbs if possible.
Can I make Oreo sushi without a food processor or rolling pin?Yes! To crush Oreos without a food processor, place them in a ziplock bag and crush them finely using a heavy object like a rolling pin, meat mallet, or even a can/bottle. To roll out the dough without a rolling pin, use a clean, smooth, heavy bottle or glass to press and roll the dough evenly.
How should I store leftover Oreo sushi?How to store Oreo sushi? Store leftover dessert sushi in an airtight container in the refrigerator. They will stay fresh for 3-5 days. The unique twist in my filling helps keep them firm and delicious.
Can I use other types of cream sandwich cookies for this recipe?Absolutely! Use any cream sandwich cookie you like for fun variations. Other flavored oreos (like mint or peanut butter) work wonderfully, as do store-brand versions or even gluten-free Oreos for dietary needs.
Why is my Oreo sushi squished?Oreo sushi can be squished due to several reasons: the Oreo base dough being too warm or having too much milk, insufficient chilling time before slicing, or using an improper slicing technique (pushing down instead of a sawing motion). My unique cream cheese or unsalted butter addition helps stabilize the filling, significantly reducing squishing.
How long should I chill Oreo sushi for the best results?For firm rolls and the cleanest slices, I recommend chilling your rolled Oreo sushi log for a minimum of 30-60 minutes in the refrigerator. For even firmer and easier slicing technique, 1-2 hours is ideal. This is a critical step for a beautiful dessert sushi presentation.
Can I make this recipe ahead of time?Yes, this is a great make-ahead no-bake dessert! You can prepare the entire Oreo sushi roll (steps 1-5) and keep it tightly wrapped in plastic wrap in the refrigerator for up to 2 days before slicing and serving. This makes it perfect for party food preparation.
Oreo Sushi: Perfectly Sliced Rolls
Ingredients
Equipment
Method
- Take your separated Oreos. In a food processor, blitz the cookies until they become very fine, uniform crumbs, resembling damp sand.
- Add 3 tablespoons of milk to the food processor. Blitz again until the Oreo crumbs combine with the milk to form a cohesive ball of dough. The mixture should pull away from the sides. If the dough falls apart, add a tiny bit more milk, a teaspoon at a time, and blitz again.
- Take the ball of Oreo dough and place it on a sheet of plastic wrap. Press the dough down into a rough square shape.
- Using a rolling pin, roll everything into an even layer, aiming for about 1/4 inch thick. Trim off the sides with a sharp knife so you have a perfect square or rectangle with clean edges.
- Take the reserved Oreo cream filling and place it in a mixing bowl. Add 2 teaspoons of milk and 1 tablespoon of softened cream cheese or unsalted butter to the bowl.
- Mix thoroughly with a spoon or offset spatula until it is smooth, creamy, and easily spreadable.
- Evenly spread the prepared Oreo cream mixture onto the rolled-out Oreo square. Ensure the layer is consistent right to the edges, using an offset spatula if desired.
- Carefully begin to roll up the Oreo dough from one end, using the plastic wrap underneath to help guide and tighten the roll. Roll slowly, evenly, and tightly across the entire roll to avoid air pockets and ensure a compact ‘sushi’ log.
- Wrap the entire log tightly in plastic wrap and pop it in the fridge for at least 30-60 minutes to firm it up significantly. For even firmer, easier-to-slice results, chilling for 1-2 hours is ideal.
- Unwrap the chilled roll. Using a very sharp knife, slice the log into rounds, about 1/2 to 3/4 inch thick. Use a gentle slicing motion – moving the knife back and forth – instead of just pushing straight down.
- Arrange your beautiful dessert sushi rounds and enjoy your sweet treat!