

There is nothing quite like the experience of freshly baked homemade granola. The warm, inviting aroma filling my kitchen is pure comfort. Then comes the satisfying crunch, followed by a wholesome, subtly sweet flavor that store-bought versions simply cannot match. This homemade granola is the ultimate breakfast or snack.
I am going to share my absolute favorite recipe for creating the crunchiest, clumpiest homemade granola you have ever tasted, tailored to your preferences. Get ready to discover the secret ingredient for creating those perfect clusters that truly sets this recipe apart.
Why You’ll Love This Recipe
This homemade granola recipe has a unique twist that solves the age-old problem of granola not clumping. My secret is incorporating just one whisked egg white into the wet ingredients before combining them with the dry. As the granola bakes, the egg white proteins create an invisible binder, leading to significantly larger, crispier, and more stable clusters without altering the delicate flavor.
Beyond the fantastic clumps, this recipe is wonderfully easy and quick to prepare, making it perfect for busy mornings or meal prep. It is incredibly customizable, allowing you to adapt it for gluten-free granola, nut-free granola, or even vegan granola by making a few simple tweaks. You control the sugar content, ensuring a healthier and more wholesome alternative to store-bought options. Each bite promises a crisp, chunky, and warming experience that will keep you coming back for more.
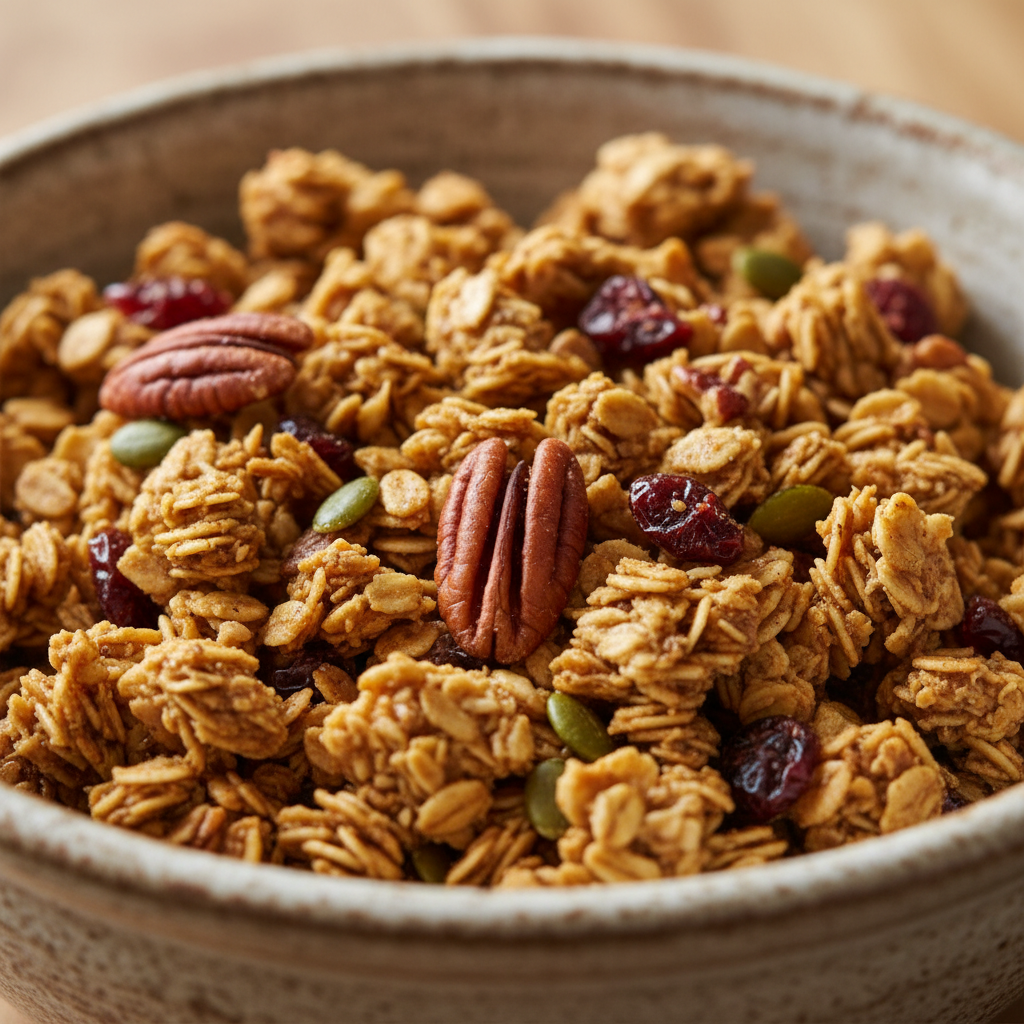
Ingredients Needed

- 4 cups old-fashioned rolled oats (use certified gluten-free oats for gluten-free granola)
- 1 ½ cup raw nuts and/or seeds (I used 1 cup pecans and ½ cup pepitas)
- 1 teaspoon fine-grain sea salt (if you’re using standard table salt, scale back to ¾ teaspoon)
- ½ teaspoon ground cinnamon
- ½ cup melted coconut oil or olive oil
- ½ cup maple syrup or honey
- 1 teaspoon vanilla extract
- ⅔ cup dried fruit, chopped if large (I used dried cranberries)
- Totally optional additional mix-ins: ½ cup chocolate chips or coconut flakes*
Ingredient Notes & Substitutions
Oats: Old-fashioned rolled oats are essential for the best texture in your homemade granola, providing that hearty chew and crispness. These oats also offer numerous health benefits, including being a good source of fiber. If you need gluten-free granola, make sure to use certified gluten-free oats.
Nuts & Seeds: Feel free to get creative with your raw nuts and seeds. Walnuts, almonds, cashews, sunflower seeds, peanuts, pistachios, or macadamia nuts are all excellent choices. For a nut-free granola, simply use a combination of seeds like pepitas and sunflower seeds.
Fats (Oils): Melted coconut oil adds a subtle sweetness and helps the granola become very crisp. Olive oil provides a more neutral flavor profile and still delivers fantastic results. The choice impacts both flavor and final texture.
Sweeteners: Maple syrup and honey are my go-to choices for naturally sweetened granola, contributing to both flavor and the all-important clumpy granola texture. For a richer, darker flavor, you can try a touch of molasses. You can also slightly reduce the quantity for a less sweet option.
Salt: Do not skip the fine-grain sea salt. It balances the sweetness and brings out all the lovely flavors, making your granola truly shine.
Mix-ins: Dried fruit like dried cranberries, golden raisins, or dried apricots should be added after baking to prevent them from burning. Chocolate chips also go in after baking to avoid melting. If you are using coconut flakes and want them toasted, add them halfway through the baking process.
Vanilla Extract: This enhances all the warming flavors in your homemade granola, adding a lovely depth.
For Dietary Needs: To make vegan granola, ensure you use maple syrup instead of honey. If you are a strict vegan, omit the egg white for binding; however, be aware the clumps will not be as pronounced. This recipe is naturally dairy free and can be soy free depending on your oil choice.

How to Make The Best Homemade Granola (with the Secret Clumping Trick!)
Prepare Your Baking Sheet
Preheat your oven to 350 degrees Fahrenheit. Line a large, rimmed baking sheet with parchment paper. This simple step prevents sticking and greatly aids in achieving those desired clumps.
Combine Dry Ingredients
In a large mixing bowl, combine the old-fashioned rolled oats, your chosen raw nuts and/or seeds, fine-grain sea salt, and ground cinnamon. Stir these dry ingredients well to ensure they are evenly blended.
Prepare Wet Ingredients (The Secret!)
In a separate small bowl, whisk one egg white until it is just frothy. Pour this whisked egg white into your melted coconut oil or olive oil, maple syrup or honey, and vanilla extract. This is the crucial clumping secret! Mix these wet ingredients thoroughly.
Combine Wet and Dry
Pour the prepared wet mixture into the large mixing bowl with your dry ingredients. Mix well, using a large spoon, until every oat and nut piece is lightly but completely coated. This thorough mixing ensures even baking and binding.
Bake to Golden Perfection
Pour the granola mixture onto your prepared pan and use a large spoon or spatula to spread it into an even layer. Bake until it is lightly golden, which usually takes about 21 to 24 minutes. For extra-clumpy granola, I recommend stirring halfway through baking, then firmly pressing the stirred granola down with your spatula to create a more even, compact layer. The fragrant aroma of cinnamon will fill your kitchen, and the granola will further crisp up beautifully as it cools.
Cool Completely and Add Mix-ins
This step is paramount for achieving excellent clumps. Let the granola cool completely and undisturbed on the pan for at least 45 minutes, or even overnight if you have the patience. Once cool, top with your dried fruit and any optional mix-ins like chocolate chips. Break the granola into pieces with your hands if you want to retain impressive big chunks, or stir it around with a spoon if you prefer a looser texture.
Store for Freshness
Store your homemade granola in an airtight container at room temperature for 1 to 2 weeks. For longer storage, you can place it in a sealed freezer bag in the freezer for up to 3 months. If using dried fruit, note that it can freeze solid, so allow it to warm to room temperature for 5 to 10 minutes before serving for the best texture.
Customizing Your Perfect Granola
Adjusting Sweetness & Flavor Profiles
Making your homemade granola uniquely yours is part of the fun. For those who prefer a less sweet option, simply reduce the amount of maple syrup or honey by a tablespoon or two. If you enjoy a sweeter treat, you can add a touch more. Experiment with different sweetener alternatives like molasses, which imparts a rich, deep flavor perfect for a Gingerbread Granola.
Spices and zest are fantastic for flavor enhancement. Beyond ground cinnamon, consider adding a pinch of ground ginger, nutmeg, or even a pumpkin spice blend for a seasonal touch. Orange zest, grated fresh into the wet ingredients, adds a bright, citrusy note that truly elevates the taste, creating a wonderful Orange and Almond Granola. Incorporate these before baking for the best infusion of flavor.
Do not be afraid to play with your nut and seed combinations. Walnuts, almonds, cashews, and pecans offer different textures and flavors. Combine them with sunflower seeds or pepitas. Try a Honey Almond Granola or a mix of pistachios and dried cherries for a gourmet twist.
Ingredient Deep Dive: Why Your Choices Matter
Your choice of ingredients can significantly impact the final texture and flavor of your chunky granola. For fats, melted coconut oil provides a subtle coconut flavor and tends to solidify more easily at room temperature, which contributes to a crispier granola. Olive oil, on the other hand, offers a milder, more neutral flavor and keeps the granola slightly softer. Both create a delicious result, but consider their nuances.
Sweeteners like maple syrup, honey, and molasses are not just for sweetness; they are critical for the binding properties that create chunky granola. Each sugar structure caramelizes differently during baking, contributing to the stickiness and chewiness. This plays a large role in how well your granola holds together in those coveted clumps.
For those with dietary needs, ingredient choices are paramount. To make dairy free or vegan granola, ensure you use maple syrup instead of honey. If you are strictly vegan, you may choose to omit the egg white for binding, understanding that the clumps will be less pronounced but the granola will still be delicious and wholesome.
Pro Tips & Troubleshooting for Perfect Granola
Pro Tips for Granola Success
The Egg White Difference: My unique twist using one whisked egg white is truly the secret to ultimate clumps. Whisk it into your wet ingredients until just frothy before combining everything for the best results.
Pan Choice & Crowding: For ideal oat crowding and to encourage more contact between ingredients, always use a large half sheet pan. This helps create bigger, more cohesive clusters.
Pressing for Clumps: After stirring your granola halfway through baking, use a spatula to press it down firmly. This technique helps compact the mixture, leading to extra-clumpy granola when cooled.
Cooling Patience: This cannot be stressed enough: Let granola cool completely, undisturbed, for at least 45 minutes, or even overnight. Breaking it up too soon will prevent the sugar bonds from setting, resulting in a crumbly granola instead of big chunks.
Ingredient Timing: Delicate ingredients like chocolate chips and most dried fruit should always be added after the granola has fully cooled to prevent them from melting or burning. If you are adding unsweetened coconut flakes, they can be added halfway through baking if you want them nicely toasted.
Salt for Flavor: Always ensure adequate fine-grain sea salt for optimal flavor. Granola without enough salt can taste surprisingly bland.
Scaling the Recipe: If you wish to double or halve this recipe, it is generally safe to do so. For larger batches, use multiple sheet pans to ensure the granola is spread thinly and bakes evenly, preventing overcrowding.
Oven Type Considerations: If you have a convection oven, you might find that your granola bakes more quickly and evenly. Consider reducing the oven temperature by 25 degrees Fahrenheit or shortening the baking time slightly, keeping a close eye on it to prevent over-baking.
Common Granola Mistakes to Avoid
Not Cooling Completely: One of the most common mistakes is breaking up the granola before it has cooled. This prevents the sugar and egg white bonds from setting properly, resulting in a lack of clumps. Always be patient!
Over-baking: Over-baking can cause the sugar bonds to become brittle and break, leading to less clumpy granola and potentially a slightly bitter or burnt taste. Remove your granola from the oven when it is just lightly golden, as it will continue to crisp as it cools.
Insufficient Salt: Undersalting is a major culprit for bland granola. Salt is crucial for balancing the sweetness and enhancing the overall flavor profile.
Adding Delicate Mix-ins Too Early: Adding chocolate chips or delicate dried fruit during baking will cause them to melt, burn, or become overly hard. Always stir these in after the granola has completely cooled.
Under-mixing: If your oats and nuts are not thoroughly coated with the wet mixture, you will end up with unevenly baked granola and fewer clumps. Ensure everything is well combined before spreading it on the pan.
Too Soft Granola: If your granola turns out too soft, it might be due to underbaking, too much moisture from liquid sweeteners, or not enough fat for binding. Try baking it for a few more minutes at a slightly lower temperature, ensuring it is spread in an even, thin layer on the pan.
Serving & Storage
Serving Ideas
Homemade granola is incredibly versatile! I love to enjoy it on its own as a quick and satisfying snack for an energy boost. It is fantastic served with milk, whether dairy or your favorite plant-based alternative, and topped with fresh fruit like berries or sliced banana. Sprinkle it generously over creamy yogurt with fresh fruit for a healthy and delicious breakfast or dessert. For a unique crunchy element, try it as granola croutons in a salad. It also makes a wonderful topping for smoothies, smoothie bowls, baked apples, or fruit crisps.
Storage and Make-Ahead
Your homemade granola will stay fresh and delicious when stored properly. Keep it in an airtight container at room temperature for 1 to 2 weeks. For longer preservation, it freezes beautifully. Simply transfer the cooled granola into a sealed freezer bag and store it in the freezer for up to 3 months. Remember that any dried fruit included might freeze solid, so allow it to warm to room temperature for 5 to 10 minutes before enjoying.
This homemade granola is an excellent make-ahead item for meal prep. A single batch provides quick and healthy breakfasts and snacks throughout the week, making your mornings a little easier.
Conclusion
I hope you are now inspired to make the best homemade granola you have ever tasted. This recipe, with its simple yet brilliant egg white twist, guarantees those irresistible chunky clusters and crisp texture every time. You now have all the tools and knowledge to achieve fantastic results, even if you are new to making granola.
Feel free to experiment with different variations, mix-ins, and serving suggestions to truly make this recipe your own. Your kitchen will smell incredible, and your taste buds will thank you. Do not hesitate to print this recipe, share it with friends, and explore other healthy breakfast ideas right here on my blog!
FAQ
How do I make my homemade granola clumpy?
The best way to ensure clumpy granola is to incorporate one whisked egg white into the wet ingredients before mixing them with the dry. Additionally, press the granola down with a spatula halfway through baking and, most importantly, allow it to cool completely and undisturbed on the baking sheet.
Why is my granola not clumping and how can I fix it?
Common reasons for a lack of clumping include not cooling the granola completely, over-baking it, or having an insufficient binder. To fix it, try the egg white trick for future batches. Also, ensure you press the granola down during baking and give it ample time to cool undisturbed for those sugar and protein bonds to set.
Can I make this granola gluten-free or nut-free?
Yes, absolutely! To make gluten-free granola, simply use certified gluten-free oats. For a nut-free granola, substitute all nuts with seeds like sunflower seeds, pepitas, or a mix of both.
What are the best ingredients for healthy homemade granola?
For healthy homemade granola, I recommend using old-fashioned rolled oats, natural liquid sweeteners like maple syrup or honey, healthy fats such as coconut oil or olive oil, a variety of raw nuts and seeds, and dried fruit. You can also control the amount of sweetener for a naturally sweetened granola.
How long does homemade granola last and how should I store it?
Homemade granola lasts about 1 to 2 weeks when stored in an airtight container at room temperature. For longer storage, you can freeze it in a sealed freezer bag for up to 3 months. Allow frozen dried fruit to warm before serving.
What are some creative ways to customize my granola?
There are endless ways to customize your granola! Experiment with different nuts and seeds, add various spices like ginger or pumpkin spice, or include citrus zest for brightness. Mix in different dried fruits, chocolate chips (after baking), or toasted coconut flakes for added flavor and texture.
How can I adjust the sweetness of my granola?
You can easily adjust the sweetness of your granola by reducing or increasing the amount of liquid sweetener, such as maple syrup or honey, to match your personal preference. Start with less and add more if desired in future batches.
What’s the best oil for healthy granola and why?
Both melted coconut oil and olive oil are excellent choices for healthy granola. Coconut oil adds a subtle coconut flavor and helps achieve a crispier texture as it solidifies at room temperature. Olive oil offers a more neutral flavor profile and contributes to a lovely crunch without any specific taste. The best oil depends on your flavor preference.
When should I add dried fruit and chocolate chips to granola?
Always add delicate ingredients like chocolate chips and most dried fruit after the granola has completely cooled. This prevents chocolate from melting and dried fruit from burning or becoming overly hard. If you are adding coconut flakes and want them toasted, you can add them halfway through baking.
Homemade Granola Recipe: The Secret to Irresistible Chunky Clusters!
Ingredients
Equipment
Method
- Preheat your oven to 350 degrees Fahrenheit (175°C). Line a large, rimmed baking sheet with parchment paper. This simple step prevents sticking and greatly aids in achieving those desired clumps.
- In a large mixing bowl, combine the old-fashioned rolled oats, your chosen raw nuts and/or seeds, fine-grain sea salt, and ground cinnamon. Stir these dry ingredients well to ensure they are evenly blended.
- In a separate small bowl, whisk one egg white until it is just frothy. Pour this whisked egg white into your melted coconut oil or olive oil, maple syrup or honey, and vanilla extract. This is the crucial clumping secret! Mix these wet ingredients thoroughly.
- Pour the prepared wet mixture into the large mixing bowl with your dry ingredients. Mix well, using a large spoon, until every oat and nut piece is lightly but completely coated. This thorough mixing ensures even baking and binding.
- Pour the granola mixture onto your prepared pan and use a large spoon or spatula to spread it into an even layer. Bake until it is lightly golden, which usually takes about 21 to 24 minutes. For extra-clumpy granola, stir halfway through baking, then firmly press the stirred granola down with your spatula to create a more even, compact layer.
- This step is paramount for achieving excellent clumps. Let the granola cool completely and undisturbed on the pan for at least 45 minutes, or even overnight if you have the patience. Once cool, top with your dried fruit and any optional mix-ins like chocolate chips. Break the granola into pieces with your hands if you want to retain impressive big chunks, or stir it around with a spoon if you prefer a looser texture.
- Store your homemade granola in an airtight container at room temperature for 1 to 2 weeks. For longer storage, you can place it in a sealed freezer bag in the freezer for up to 3 months. If using dried fruit, note that it can freeze solid, so allow it to warm to room temperature for 5 to 10 minutes before serving for the best texture.