

There’s something incredibly nostalgic and comforting about a plate of classic Chocolate Crinkle Cookies, especially as the holiday season approaches. In my kitchen, these delightful treats are a non-negotiable part of our annual baking tradition, gracing everything from casual family gatherings to elaborate holiday cookies and Christmas cookies spreads. I’ve perfected a recipe that promises an intensely fudgy interior with a perfectly crisp, crackly exterior—a true hallmark of these beloved cookies. This article will guide you through crafting the best possible Chocolate Crinkle Cookies, complete with a unique flavor-enhancing technique that sets them apart.
Why You’ll Love This Recipe
I know what you’re thinking—another Chocolate Crinkle Cookie recipe? But trust me, this one has a secret weapon that elevates it from good to absolutely extraordinary. My unique twist involves **blooming the cocoa powder in hot melted butter** instead of the usual neutral vegetable oil, and the scientific logic behind it is pure magic.
Deeper, Richer Chocolate Flavor: When you bloom the cocoa powder in hot butter, you’re essentially activating and bringing out its aromatic compounds. This process deepens the chocolate flavor significantly, creating a more complex and intense profile, subtly hinting at the Maillard reaction that occurs with heat and certain compounds.
Superior Fudgy Texture: Butter, with its rich milk solids and specific fat composition, contributes a far more luxurious mouthfeel than vegetable oil. This results in incredibly fudgy cookies with a brownie-like cookies interior that melts in your mouth, perfectly contrasted by that signature crackly exterior.
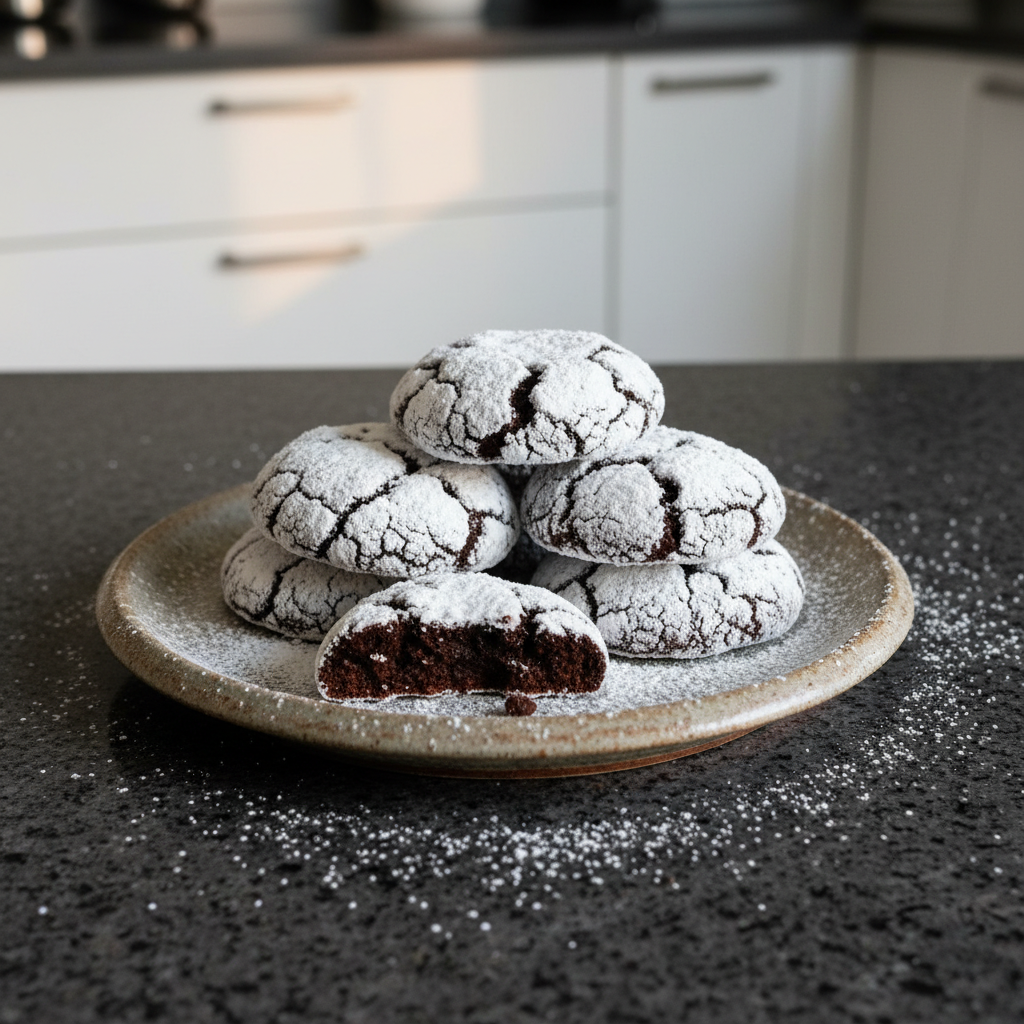
Impressive Visual Appeal: The enhanced depth of color and the perfect crinkle make these cookies visually stunning, ideal for a cookie swap, holiday parties, or as a cherished treat for family gatherings. They look as good as they taste!
Ingredients Needed

- 1 cup unsweetened cocoa powder (100g)
- 1¾ cups granulated sugar (350g)
- ½ cup vegetable oil (120mL)
- 4 large eggs (room temperature)
- 2 teaspoons vanilla extract
- 2 cups all-purpose flour (240g)
- 2 teaspoons baking powder
- ¾ teaspoon salt
- 1 cup powdered sugar (120g)
Ingredient Notes & Substitutions
Cocoa Powder: The quality of your unsweetened cocoa powder truly impacts the final taste. For a classic, bright chocolate flavor, use natural cocoa. For a darker color and milder, less acidic flavor, opt for Dutch-processed cocoa. Dark chocolate cocoa powder can be used for an extra deep, intense chocolate flavor, creating a more decadent brownie-like cookie.
Eggs: Using room temperature eggs is critical! Cold eggs can cause the fat in your batter to seize up, resulting in a less smooth dough and potentially affecting the fudgy texture. To quickly bring cold large eggs to room temperature, simply place them in a bowl of warm water for 5-10 minutes.
Sugar: While granulated sugar provides the classic sweetness and structure, you can experiment by substituting up to half of the granulated sugar with light brown sugar for subtle molasses undertones and an even chewier texture.
Vanilla Extract: Vanilla is a powerful complement to chocolate. For holiday cookies, consider festive alternatives like a teaspoon of peppermint extract for a minty twist or orange extract for a bright, citrusy note.
All-Purpose Flour: Proper measurement of all-purpose flour is key to avoiding dense cookies. Always spoon your flour into the measuring cup and level it off with a straight edge rather than scooping directly from the bag. This ensures optimal gluten development without excessive toughness, maintaining a tender crumb.
Baking Powder: Ensure your baking powder is fresh! It’s responsible for the cookie’s lift and contributes to the beautiful crackle. Expired baking powder can lead to flat cookies and impact cracking issues troubleshooting. Test freshness by adding a teaspoon to hot water; it should fizz vigorously.

How to Make Chocolate Crinkle Cookies
Creating these Chocolate Crinkle Cookies is a joyous process. Here’s how I do it in my kitchen:
1. Combine Wet Ingredients & Cocoa
In a large mixing bowl using a hand mixer or the bowl of a stand mixer fitted with the paddle attachment, combine the granulated sugar, cocoa powder, and vegetable oil. Beat on medium speed until well combined and shiny. Watch as the mixture transforms into a thick, dark, and glossy paste. Continue beating until no dry streaks of cocoa powder remain and it has a uniform, paste-like consistency, laying the foundation for our rich chocolate flavor.
2. Add Eggs & Vanilla
Add the large eggs one at a time, beating until well combined after each addition. This step is crucial because adding eggs one at a time allows each egg to fully emulsify into the mixture. This creates a smoother dough structure, prevents a greasy texture, and contributes significantly to that irresistible fudgy cookies result. Beat in the vanilla extract. You’ll notice the mixture lightening slightly and becoming creamier with each egg incorporated.
3. Mix in Dry Ingredients
Combine the all-purpose flour, baking powder, and salt in a medium bowl, stirring to combine thoroughly. Add the flour mixture to the cocoa mixture and mix on low speed just until combined. This step requires a light hand. Over-mixing activates gluten development excessively, leading to tough, cake-like cookies and can affect cracking issues troubleshooting. Stop mixing as soon as no dry streaks of flour are visible to ensure a tender, fudgy crumb.
4. Chill the Dough Thoroughly
Cover the dough in plastic wrap and refrigerate for at least 4 hours or up to overnight. This dough chilling phase is absolutely critical. Chilling firms the dough, making it easier to handle and preventing excessive spreading during baking temperature. It also allows the flavors to meld beautifully, which is key for developing a prominent crackly exterior. Don’t rush this time; sticky dough needs to firm up to prevent flat cookies.
5. Prepare for Baking
Once the dough has chilled, preheat oven to 350°F. Line two large baking sheets with parchment paper. Place the powdered sugar in a small bowl. Make sure your oven is fully preheated; baking in an oven that hasn’t reached full temperature is a common mistake that can affect spreading and cracking. Parchment paper ensures non-stick baking and makes cleanup a breeze.
6. Scoop, Roll, and Coat
Using a small cookie scoop or tablespoon, scoop the chilled dough and roll into roughly one-inch balls. Aim for uniform one-inch balls to ensure even baking time and predictable cracking. Roll the dough balls in powdered sugar until well coated and place on the prepared baking sheet about 2 inches apart. You want a very visible, thick layer of confectioner’s sugar completely covering each dough ball. Only coat as many dough balls as you can fit on the baking sheets at one time. Refrigerate the remaining dough balls and roll in powdered sugar just before baking; coating them too early can lead to the sugar being absorbed.
7. Bake and Cool
Bake for 10 to 12 minutes or until the edges of the cookies are firm and the center is puffed but still appears slightly wet. The edges should look set, but the center will still be soft and glossy. Remove cookies from the oven when centers still look wet for a soft, fudgy interior. Cookies will naturally deflate in the center when cooling cookies, which is a great indicator of that desired fudgy texture. Let them cool on the baking sheets for a few minutes to allow them to set before transferring them to a wire rack to cool completely. This prevents breakage and allows for even cooling cookies.
Mastering the Crinkle Effect & Smart Storage
Achieving those picture-perfect crinkles and ensuring your cookies stay fresh is an art. Here’s my advice:
The Science of the Perfect Crinkle
The magic of the crinkle happens in the oven. As the well-chilled, pliable dough spreads rapidly in the hot oven, the thick powdered sugar coating remains relatively rigid, creating those characteristic cracks. A generous sugar coating and proper dough chilling are paramount. Humidity can also affect the powdered sugar coating and cracking; if possible, bake on less humid days. In humid environments, ensure cookies are stored carefully to prevent the powdered sugar from dissolving or creating a sticky film, reinforcing the importance of that visible, thick sugar coating.
Dough Chilling & Make-Ahead Solutions
I cannot stress enough the non-negotiable importance of dough chilling for firm dough and a distinct crackly exterior. For make-ahead solutions, raw dough can be stored in the fridge, wrapped tightly, for up to 3 days. For longer storage, you can freeze cookie dough! Portion the dough into balls, freeze them solid on a tray, then transfer them to an airtight container or freezer bag. They’ll keep for up to 2-3 months in the freezer. To use, thaw frozen dough overnight in the fridge before rolling dough balls in powdered sugar and baking.
Storing Baked Crinkles & Transporting Like a Pro
To keep your baked cookies fresh and prevent the powdered sugar from disappearing, store them in a single layer or with wax paper between layers in a truly airtight container at room temperature for up to 5-7 days. A slice of plain bread placed in the container can help keep them soft. For transporting cookies without damaging the powdered sugar coating, especially for a cookie swap or gifting, use sturdy cookie tins or boxes. Layer the cookies with parchment paper or wax paper, and pack them snugly to minimize movement.
Pro Tips & Troubleshooting
Years in the kitchen have taught me a few tricks to ensure every batch of Chocolate Crinkle Cookies is a triumph.
Pro Tips for Fudgy, Crackly Perfection
- Implement the Unique Twist for Ultimate Flavor: To implement the unique twist for an even richer chocolate flavor and fudgier texture, gently melt ½ cup unsalted butter. Remove from heat, then stir in the cocoa powder until a thick, glossy paste forms (this is blooming). Let this mixture cool slightly before combining it with the granulated sugar and large eggs, thereby omitting the ½ cup vegetable oil from the original recipe’s first step. This extra step truly elevates the chocolate depth!
- The Double Sugar Roll: For an extra crisp sugar coating that truly lasts, roll dough balls in granulated sugar first, then in powdered sugar. The granulated sugar creates a barrier that prevents the powdered sugar from absorbing too quickly, resulting in a more prominent crackle and a lasting white finish.
- Perfect Doneness: Remove cookies from the oven when centers still look wet for a soft, fudgy interior. The edges should be set, but the center will still be soft and slightly puffed. They will continue to set as they cool.
- Uniform Dough Balls: Use a cookie scoop for consistent sizing. This ensures even baking time across the entire batch and uniform crackly exterior on every single cookie.
- Flavor Enhancers: For an even deeper chocolate flavor, add 1 teaspoon of instant espresso powder to the dry ingredients. For holiday cookies, consider ½ teaspoon of peppermint extract or orange extract along with the vanilla.
Common Mistakes to Avoid
- Insufficient Dough Chilling: Not chilling the dough long enough or allowing it to warm up too much can lead to flat cookies troubleshooting. Cold dough spreads slower, promoting those beautiful cracks.
- Pre-Coating All Dough: Coating all dough balls in powdered sugar too early can cause the sugar to be absorbed, creating a hard shell and preventing crinkling/spreading. Only coat the batch you’re about to bake.
- Incorrect Oven Temperature: Baking in an oven that hasn’t reached full temperature or using outdated baking powder can prevent cracking issues troubleshooting. Always use an oven thermometer for accuracy.
- Over-Mixing Dry Ingredients: Mixing the dry ingredients too long after they’re combined with the wet can lead to excessive gluten development, resulting in tough, dry, or cake-like cookies. Mix just until combined.
- Uneven Dough Balls: Inconsistent rolling dough balls size leads to uneven baking, with some cookies burning while others are underbaked. Take the time to make them uniform.
Serving & Storage
These fudgy cookies are as versatile as they are delicious, perfect for any occasion.
Serving Ideas
Serve these fudgy cookies as festive treats at holiday parties, a delightful addition to Santa’s cookie plate, or as thoughtful gifting in decorative cookie tins. I love pairing them with a tall glass of cold milk, a warm mug of coffee, or a rich hot chocolate to complement their deep chocolate flavor. They’re a fantastic addition to any cookie swap box, sitting beautifully alongside other popular Christmas cookies like spritz cookies, Linzer cookies, or Mexican wedding cookies. For a gourmet touch, consider a light re-dusting of powdered sugar right before serving or a sprinkle of flaky sea salt.
Storage and Make-Ahead
Storing Baked Cookies: To maintain freshness and prevent the powdered sugar from melting, store baked cookies in an airtight container at room temperature for up to 5-7 days. I often place a slice of plain bread in the container to help keep them soft, and always layer them with parchment or wax paper to protect that delicate sugar coating.
Freezing Baked Cookies: These cookies freeze beautifully! Once completely cooled, arrange them in a single layer on a baking sheet and freeze until solid. Then transfer them to an airtight container or freezer bag. They can be frozen for up to 3 months. Thaw at room temperature for a few hours before enjoying.
Raw Dough: The raw dough can be stored, tightly wrapped in plastic wrap, in the fridge for up to 3 days. For longer storage, freeze cookie dough balls on a tray until solid, then transfer to a freezer-safe bag or container for up to 2-3 months. Thaw in the fridge overnight before baking.
Adaptations for Holiday Gifting
When assembling cookie tins for holiday gifting, presentation and protection are key. Line tins with tissue paper or festive liners to cushion the holiday cookies and prevent them from shifting. Placing small squares of parchment paper between layers of cookies helps protect their delicate powdered sugar coating, ensuring they arrive looking as perfect as they taste.
Conclusion
I hope you’ll enjoy making these Chocolate Crinkle Cookies as much as I do. With their intensely fudgy, brownie-like cookies interior, impressive crackly exterior, and that deep, enhanced chocolate flavor (thanks to our unique blooming twist!), they are truly a cut above the rest. With this detailed recipe and my expert tips, I’m confident you can achieve bakery-quality Chocolate Crinkle Cookies, whether you’re a seasoned baker or just starting out.
Don’t hesitate to try the suggested variations or share these festive treats with family and friends this season. Print the recipe, leave a comment with your experience, and explore more holiday cookie recipes on my blog!
FAQ
1. How do I know when chocolate crinkle cookies are done baking?
Chocolate Crinkle Cookies are done when their edges appear firm but their centers still look slightly puffed and wet/glossy. They will naturally deflate slightly upon cooling cookies, which is a sign of a perfectly fudgy interior. Avoid overbaking, as this can lead to dry cookies.
2. Why are my chocolate crinkle cookies flat?
Flat cookies troubleshooting typically points to a few common mistakes: insufficient dough chilling, the dough warming up too much before baking temperature, outdated baking powder, an oven not at the correct 350°F, or over-mixing the dough which can lead to excessive spread.
3. Why didn’t my chocolate crinkle cookies crack?
Cracking issues troubleshooting often involves insufficient dough chilling, not enough powdered sugar coating, the powdered sugar being absorbed prematurely (usually from coating too early or high humidity), or an incorrect baking temperature (often too low). Ensure a thick, visible layer of confectioner’s sugar.
4. Can you freeze chocolate crinkle cookie dough or baked cookies?
Yes, both can be frozen! For freezing cookie dough, roll into balls, freeze solid on a tray, then transfer to an airtight container for up to 2-3 months. For storing baked cookies, cool them completely, then freeze solid on a tray before transferring to an airtight container or freezer bag for up to 3 months. Thaw at room temperature.
5. How long can chocolate crinkle cookie dough be chilled?
The dough can be chilled for at least 4 hours or up to overnight (12 hours) for best results. It can safely be chilled longer, up to 72 hours (3 days), if wrapped very tightly in plastic wrap to prevent it from drying out.
6. What are some flavor variations for chocolate crinkle cookies?
You can use dark chocolate cocoa powder for a deeper flavor, substitute half of the granulated sugar with brown sugar for chewiness, or add 1 teaspoon of peppermint extract or orange extract for festive holiday cookies. A teaspoon of instant espresso powder can also enhance the chocolate flavor, and chocolate chips can be folded in for extra texture.
7. Can this recipe easily be doubled or tripled?
Yes, this recipe can generally be doubled or tripled. When scaling, be mindful of your mixer’s capacity, ensure all large eggs are at room temperature for larger batches, and be prepared for potentially longer dough chilling times due to the increased volume of dough.
8. How do I transport chocolate crinkle cookies without damaging the powdered sugar?
To transport cookies without damaging the powdered sugar coating, use sturdy cookie tins or boxes. Place parchment paper or wax paper between layers of cookies to prevent them from sticking and to protect the powdered sugar coating from rubbing off. Pack them snugly to minimize movement during transport, especially for cookie swap events.
Fudgy Chocolate Crinkle Cookies with a Flavor-Boosting Twist
Ingredients
Equipment
Method
- In a large mixing bowl, gently melt the ½ cup unsalted butter. Remove from heat and stir in the unsweetened cocoa powder until a thick, glossy paste forms (this is blooming). Let the mixture cool slightly. Once cooled, add the granulated sugar to the bowl. Using a hand mixer or a stand mixer with the paddle attachment, beat on medium speed until well combined and shiny, forming a thick, dark, and glossy paste with no dry streaks of cocoa powder.
- Add the large eggs one at a time, beating until well combined after each addition. This creates a smoother dough structure and contributes to a fudgy result. Beat in the vanilla extract until the mixture lightens slightly and becomes creamier.
- Combine the all-purpose flour, baking powder, and salt in a medium bowl, stirring thoroughly. Add the flour mixture to the cocoa mixture and mix on low speed just until combined. Stop mixing as soon as no dry streaks of flour are visible to ensure a tender, fudgy crumb and prevent toughness.
- Cover the dough in plastic wrap and refrigerate for at least 4 hours or up to overnight. This chilling phase is critical for firming the dough, making it easier to handle, preventing excessive spreading, and developing a prominent crackly exterior.
- Once the dough has chilled, preheat oven to 350°F (175°C). Line two large baking sheets with parchment paper. Place the powdered sugar in a small bowl. Ensure your oven is fully preheated for proper spreading and cracking.
- Using a small cookie scoop or tablespoon, scoop the chilled dough and roll into roughly one-inch balls. Roll the dough balls in powdered sugar until well coated, ensuring a very visible, thick layer. Place them on the prepared baking sheet about 2 inches apart. Only coat as many dough balls as you can fit on the baking sheets at one time; refrigerate the remaining dough and roll in powdered sugar just before baking to prevent absorption.
- Bake for 10 to 12 minutes or until the edges of the cookies are firm and the center is puffed but still appears slightly wet. The edges should look set, but the center will still be soft and glossy. Remove cookies from the oven when centers still look wet for a soft, fudgy interior. Let them cool on the baking sheets for a few minutes to allow them to set before transferring them to a wire rack to cool completely.