

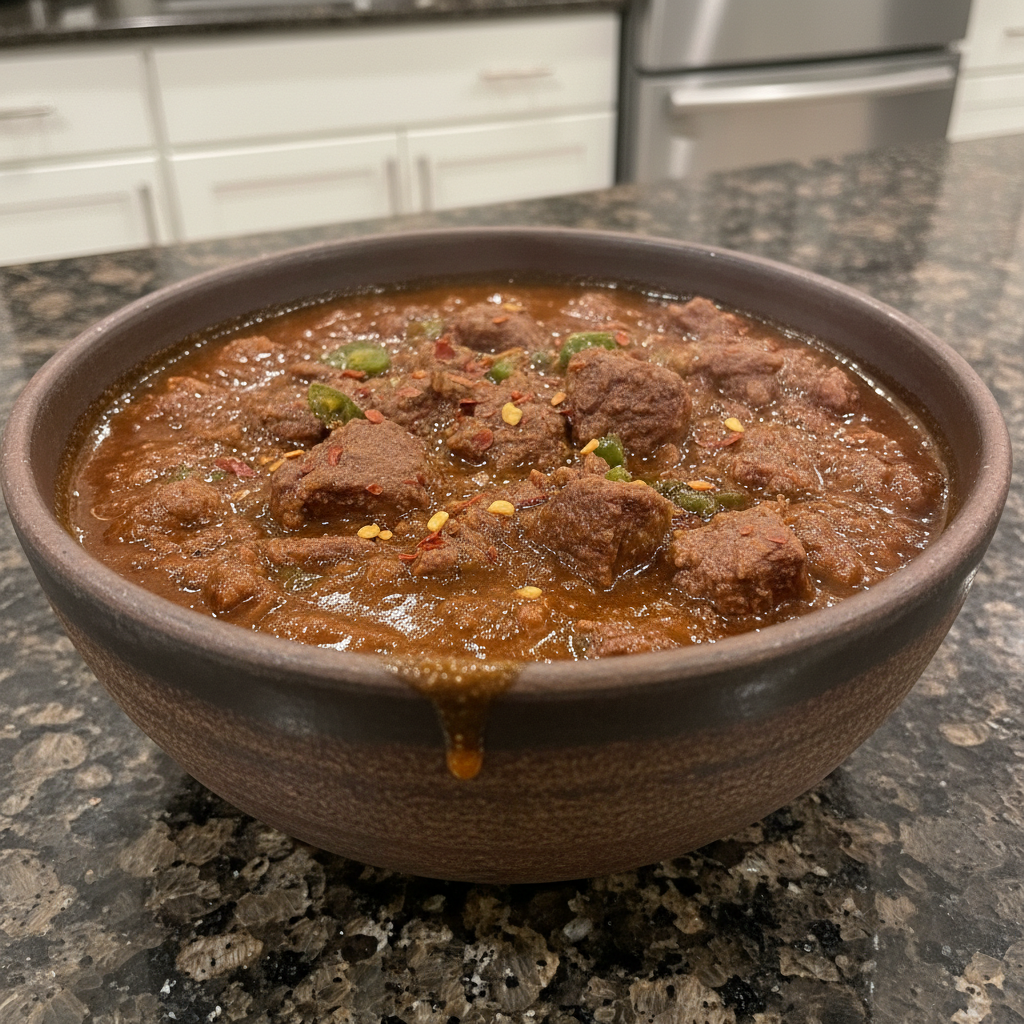
There’s nothing quite like a truly authentic, hearty, and flavorful bowl of Texas Chili to warm your soul and satisfy your deepest cravings. As a professional chef, I’ve spent years perfecting the art of a classic Texas Chili, and I’m thrilled to share my ultimate texas chili recipe with you. This isn’t just any chili; it’s a definitive guide that blends tradition with innovative techniques to deliver a deeply satisfying, beef-centric experience. Prepare for rich, complex flavors and tender, varied textures that make it ideal for ultimate comfort food, game days, or memorable family meals. Get ready to discover the secrets that make this chili truly stand out!
Why You’ll Love This Recipe
My kitchen thrives on pushing culinary boundaries while honoring tradition, and this Texas Chili is a perfect example. I’ve incorporated a couple of unique twists that elevate it beyond anything you’ve tasted before, focusing on unparalleled depth of flavor and dynamic texture.
Deep Flavor from Roasted Dried Chilies: Forget basic chili powder alone. My secret lies in incorporating a small amount of roasted dried chili peppers, like Ancho chili or `Guajillo chili`, rehydrated in rich `beef stock` and then blended into a smooth, concentrated paste. Roasting these peppers first kicks off the Maillard reaction, intensifying their inherent fruity, smoky, and earthy notes. This paste becomes the backbone of the chili, contributing a profound, complex flavor profile that simply can’t be achieved with just powdered spices.
Dynamic Beef Texture: While the slow simmer ensures melt-in-your-mouth tender `beef chuck roast`, my second twist creates an exciting textural contrast. After the long braise, I carefully remove and shred only half of the beef, returning it to the pot alongside the remaining larger chunks. This means every spoonful offers both succulent, pulled beef and satisfying, hearty bites of meat, making for a far more engaging and satisfying eating experience.
Emotional & Practical Benefits:
- Unrivaled Flavor Complexity: This chili is rich, savory, and intensely beefy, with layers of smoky spice that truly sing.
- Perfectly Tender & Textural: Enjoy both fork-tender shredded beef and satisfying, robust chunks in every bite.
- Crowd-P_leaser: The ultimate `comfort food` or `game day food` dish that will impress even the most discerning chili connoisseurs.
Ingredients Needed

Gathering high-quality ingredients is the first step to a truly spectacular Texas Chili. Here’s exactly what you’ll need from my pantry to yours:
- 4 pounds beef chuck roast (trimmed of excess fat, cut into ½ inch chunks)
- salt and black pepper (to taste)
- 6 tablespoons olive oil (divided)
- 3 jalapeños (seeded and diced)
- 1 large yellow onion (diced)
- 5 cloves garlic (minced)
- 1 chipotle pepper in adobo sauce (seeded and finely chopped)
- 28 ounces crushed tomatoes (1 can)
- 3 tablespoons tomato paste
- 4 cups beef stock (or broth)
- 2 bay leaves
- Seasoning Mix:
- 2 tablespoons chili powder
- 2 tablespoons smoked paprika
- 1 tablespoon cumin
- 1 tablespoon dried oregano
- 2 teaspoons chipotle chili powder
- 2 teaspoons unsweetened cocoa powder
- 1 teaspoon ground coriander
- ½ teaspoon cinnamon
Ingredient Notes & Substitutions
Understanding your ingredients is key to mastering any recipe. Here’s a little more insight into what makes this Texas Chili so special:
Beef Chuck Roast: I always recommend `beef chuck roast` for this recipe. Its generous marbling and connective tissue break down beautifully during long `braising`, resulting in incredibly tender, beefy chili that embodies true `comfort food`. While `stew beef` or ground beef can be used in other chili recipes, they won’t provide the same deep flavor and luxurious texture characteristic of traditional Texas Chili.
Chili Peppers (Fresh & Dried): Fresh `jalapeños` provide a bright, clean heat, while the `chipotle pepper in adobo sauce` brings a wonderful smoky depth and mild spice. For our unique twist, we’ll also be using dried peppers like `Ancho chili`, `Guajillo chili`, or `Pasilla chili`. `Ancho chili` offers a mild, fruity, and earthy profile; `Guajillo chili` is sweet and tangy with medium heat; and `Pasilla chili` provides rich, smoky, raisin-like notes. These dried chilies are crucial for building a complex base flavor, which we’ll detail how to prepare in Section 5.
Aromatics & Spices: The `yellow onion` and `garlic` lay a foundational aromatic sweetness and pungency. Our carefully curated `seasoning mix`, featuring `chili powder`, `smoked paprika`, `cumin`, `dried oregano`, `chipotle chili powder`, `unsweetened cocoa powder`, `ground coriander`, and `cinnamon`, is essential for that authentic Texas flavor. The `unsweetened cocoa powder` and `cinnamon` might seem unusual, but they subtly enhance the savory notes and add a profound, earthy depth without making the chili taste sweet.
Beef Stock: Always use a good quality `beef stock` or broth. It forms the liquid base and is critical for developing the rich flavors. A poor-quality stock will result in a less flavorful chili.
Substitutions & Dietary Notes: For those with `dairy-free` needs, simply opt for non-dairy sour cream or omit the dairy toppings. This `texas chili recipe` is inherently `gluten-free` when prepared as written and served without gluten-containing accompaniments.

How to Make Texas Chili: Step-by-Step Instructions
Creating this deeply flavorful Texas Chili is a labor of love, but every step is worth it. Follow these instructions carefully, and you’ll be rewarded with a masterpiece.
Step 1: Prepare and Season the Beef
Begin by trimming any excess fat from your `beef chuck roast`. Cut the meat into uniform ½-inch chunks. This size allows for even cooking and optimal tenderness. Generously season the beef all over with `kosher salt` and `black pepper`.
Step 2: Brown the Beef in Batches
Heat 2 tablespoons of `olive oil` in a `large pot` or Dutch oven over medium-high heat. Once shimmering, add about half of the seasoned beef in a single layer. It’s crucial to avoid overcrowding the pot; this allows the meat to `brown meat` beautifully and develop a rich, savory crust through the Maillard reaction, rather than just steaming. Brown the meat on all sides, about 5-7 minutes. Remove the browned beef from the pot and set it aside. Repeat this process with the remaining beef, adding another tablespoon of oil if needed, until all the beef is deeply browned. Set aside all browned beef.
Step 3: Sauté Aromatics
Add the remaining 2 tablespoons of `olive oil` to the pot and heat for 30 seconds. Add the diced `jalapeño peppers` and `yellow onion` to the pot. `Sauté` for about 10 minutes over medium heat, stirring occasionally, until the onions are softened and translucent. It’s important that they are *not browned*, as browning them can introduce a bitter flavor to your chili.
Step 4: Bloom Spices and Garlic
Stir the `minced garlic` and the entire `seasoning mix` (chili powder, smoked paprika, cumin, dried oregano, chipotle chili powder, unsweetened cocoa powder, ground coriander, cinnamon) into the softened onions and jalapeños. Cook for just 30 seconds, stirring constantly, until the spices become incredibly `fragrant`. This step, called “blooming,” awakens their flavors. Be careful not to burn the garlic.
Step 5: Combine All Ingredients & Add Unique Chili Paste
Return all of the browned beef chunks to the pot. Add the finely chopped `chipotle pepper in adobo sauce`, the can of `crushed tomatoes`, `tomato paste`, `beef stock`, and the `bay leaves`. **(Unique Twist Integration – Chili Paste):** *Now, add the prepared roasted dried chili paste (from Section 5 instructions) into the pot.* Stir everything together thoroughly to combine, ensuring all ingredients are well incorporated.
Step 6: Bring to a Simmer
Increase the heat to medium-high and bring the chili mixture to a rolling `boil`, making sure to scrape any browned bits from the bottom of the pot. These bits, called fond, add incredible flavor. Once boiling, immediately reduce the heat to low.
Step 7: Slow Simmer for Flavor & Tenderness
Allow the chili to `simmer`, uncovered, for 3 to 3 ½ hours. Stir occasionally (every 30-45 minutes) to prevent ingredients from `sticking to the bottom of the pot` and ensure even cooking. Simmering uncovered allows the sauce to `reduce and thicken`, concentrating all those wonderful flavors. If the chili becomes too thick before the beef is fork-tender, add a splash more `beef stock` as needed to reach your desired consistency. The beef should become incredibly tender, practically falling apart on its own.
Step 8: (Unique Twist) Shred Half the Beef for Perfect Texture
*After 3 to 3 ½ hours of simmering, remove the pot from the heat. Carefully remove about half of the large beef chunks from the pot and place them on a cutting board or in a separate bowl. Using two forks, shred this portion of beef into smaller, tender pieces. Return the shredded beef to the pot, mixing it in with the remaining larger chunks.* This creates that desired dynamic textural variety that makes this chili so satisfying.
Step 9: Final Prep & Serve
Before serving, remember to remove and discard the `bay leaves`. Taste the chili and adjust `salt` and `pepper` as needed. Serve this magnificent chili hot, either `plain` or with your favorite classic toppings. Enjoy!
Mastering Dried Chilies: The Secret to Deep Flavor
For me, the true magic in this Texas Chili lies in the intentional use of dried chili peppers. They offer a depth and complexity that simply can’t be achieved with only powdered spices, bridging the `content_gaps` in your chili knowledge.
Selecting Your Dried Chilies (Ancho, Guajillo, Pasilla)
Dried chilies are where the art of flavor truly begins. Their concentrated flavors, developed through drying, add layers of fruitiness, smokiness, and subtle heat that are foundational to authentic Tex-Mex and Mexican cuisine. For this `texas chili recipe`, I recommend experimenting with these varieties:
- Ancho Chili: This is a dried poblano pepper. It’s mild, fruity, and earthy, with notes of raisin and coffee. It provides a beautiful, deep red color and a foundational sweetness.
- Guajillo Chili: A dried mirasol pepper, `Guajillo chili` offers a sweet, tangy, and slightly smoky flavor with medium heat. It’s often described as having notes of green tea and berries.
- Pasilla Chili: Meaning “little raisin,” `Pasilla chili` (dried chilaca pepper) is rich, smoky, and subtly sweet, with a hint of chocolate. It’s darker and often a bit spicier than an Ancho.
You can often find these in the Mexican aisle of larger supermarkets, specialty food stores, or local Mexican markets. Look for chilies that are pliable, not brittle, and have a rich, uniform color.
Rehydrating and Preparing the Chili Paste
This paste is a core component of our unique twist, bringing unparalleled depth to your chili.
- Step 1: Toasting the Chilies. Lightly toast 2-3 dried chilies (for example, 1 `Ancho chili` and 2 `Guajillo chili`) in a dry skillet over medium heat for 30-60 seconds per side. You’ll know they’re ready when they become fragrant and slightly pliable. Be vigilant and ensure you do *not* burn them, as this can make them bitter. This toasting step enhances their natural oils and deepens their flavor through a gentle `Maillard reaction`.
- Step 2: Rehydration. Place the toasted chilies in a heatproof bowl. Pour enough hot `beef stock` (or boiling water) over them to cover completely. Let them rehydrate for 20-30 minutes until they are fully softened and pliable. This rehydrates their flesh and allows their flavors to bloom.
- Step 3: Blending the Paste. Once soft, carefully remove the stems and as many seeds as you prefer (wear gloves if you’re sensitive to capsaicin). Transfer the rehydrated chilies and about ½ to 1 cup of their soaking liquid (depending on how thick you want the paste) to a blender. Blend until you achieve a smooth, thick paste. Add more soaking liquid sparingly, only if needed, to reach a pourable but still concentrated consistency. This flavorful paste will be added with the `crushed tomatoes` to build an incredibly rich and deep chili base.
Pro Tips & Troubleshooting
Even the most seasoned chefs encounter challenges. Here’s my collective wisdom to ensure your Texas Chili is a roaring success every time, helping you bridge common `content_gaps` and avoid typical culinary pitfalls.
Pro Tips for the Best Texas Chili
- Brown Beef in Batches: Always `brown meat` in small batches. Overcrowding cools the pan, steaming the meat instead of searing it, which prevents that crucial deep flavor development from the `Maillard reaction`.
- Don’t Brown Onions: `Sauté` your `yellow onion` until softened and translucent, not browned. Browning can introduce an undesirable bitterness that detracts from the chili’s overall profile.
- Simmer Uncovered: For maximum flavor concentration and a naturally thick sauce, `simmer` your chili uncovered. This allows the liquid to reduce and flavors to intensify beautifully.
- Stir Occasionally: During the long simmer, stir the chili every 30-45 minutes. This prevents ingredients from `sticking to the bottom of the pot` and ensures even cooking and reduction.
- Adjust Consistency: If your chili becomes too thick during simmering, simply add a splash more `beef stock` or water until it reaches your preferred consistency.
- Flavor Development: Like many stews, chili often tastes even better the next day after the flavors have had a chance to meld and deepen. It’s a perfect `meal prep` option!
- Mastering Heat Levels: To customize the spice, for less heat, deseed all `jalapeños` and reduce the amount of `chipotle chili powder`. For more heat, leave some jalapeño seeds, add an extra `chipotle pepper in adobo sauce`, or a pinch of cayenne pepper during simmering.
Common Mistakes to Avoid
- Overcrowding the Pot: This is a cardinal sin in chili-making! It steams the meat instead of browning it, robbing your chili of vital flavor depth.
- Browning the Onions: While browning is great for other dishes, for this chili, it can introduce a bitter taste that you definitely want to avoid.
- Not Stirring During Simmering: Neglecting to stir can lead to ingredients sticking and potentially burning on the bottom of the pot, which can ruin an entire batch.
- Too Watery Chili: If your chili is too thin, extend the simmering time with the lid off to allow it to reduce. As a last resort, a cornstarch slurry (1 tablespoon cornstarch mixed with 2 tablespoons cold water) can be stirred in at the end, though this is less traditional.
- Too Salty Chili: If you’ve accidentally over-salted, try adding a peeled raw potato half to absorb some excess salt during the last hour of simmering, then discard it. Alternatively, dilute the chili by adding more unsalted `beef stock` or `crushed tomatoes`.
Serving & Storage
A great chili deserves to be enjoyed to its fullest, and that includes perfect accompaniments and smart storage.
Serving Ideas & Pairings
This rich texas chili recipe is fantastic on its own, but here are some of my favorite ways to serve it:
- Classic Toppings: I love to offer a spread of `sour cream`, `shredded cheese` (a sharp cheddar or Monterey Jack is perfect), sliced `green onions`, fresh cilantro, diced avocado, or a squeeze of fresh lime juice.
- Accompaniments: For a complete meal, serve alongside warm cornbread (sweet or savory, depending on your preference), crusty `garlic bread`, or a side of fluffy `Spanish rice`. For those who *must* have beans, you can offer `refried kidney beans`, `red beans`, or `pinto beans` on the side, but remember, traditional Texas Chili proudly stands alone without them!
- Beverage Pairings: To complement the rich, spicy flavors, consider a hoppy IPA, a robust stout, or a medium-bodied red wine like a Zinfandel or Syrah.
Storage and Make-Ahead Tips
This chili is fantastic for `meal prep` and often tastes even better the next day!
- Refrigeration: Allow leftover Texas Chili to cool completely before transferring it to an airtight container. It will keep beautifully in the refrigerator for up to 3-4 days.
- Freezing: For longer storage, this chili freezes exceptionally well. Once completely cooled, portion it into freezer-safe containers or heavy-duty freezer bags. It can be frozen for up to 3-4 months. Thaw overnight in the refrigerator before reheating.
- Reheating: Gently reheat on the stovetop over medium-low heat, stirring occasionally, until heated through. Alternatively, you can reheat it in the microwave. If it seems too thick after reheating, add a splash of `beef stock` or water to reach your desired consistency.
Conclusion
I hope this journey into crafting the perfect Texas Chili has inspired you. This isn’t just a `texas chili recipe`; it’s a celebration of robust flavors, tender beef, and clever techniques, like our roasted dried chili paste and dynamic beef texture. Even if you’re new to chili-making, I promise you can achieve fantastic results with these detailed steps. So, gather your ingredients, fire up your pot, and prepare to create a truly unforgettable meal. Don’t forget to experiment with your favorite serving ideas, and please share your delicious creations with me and your friends! Enjoy this hearty `comfort food` masterpiece.
FAQ
What is the defining characteristic of traditional Texas Chili?
Traditional Texas Chili, often called “Chili Con Carne,” is famously bean-less and typically uses minimal tomatoes, focusing heavily on tender, cubed beef and a rich, complex sauce built from various chili peppers and spices.
Does Texas chili have beans?
Authentic Texas Chili does *not* traditionally contain beans. While many regional variations or personal preferences include them, our recipe stays true to the beef-focused Texas style.
What are the best cuts of beef for Texas Chili, and why?
`Beef chuck roast` is my top choice because its marbling and connective tissue break down during long, slow `braising` to become incredibly tender and flavorful. This creates a rich, beefy base that’s essential for a great chili. Other suitable options include beef plate or short ribs for similar results.
Can this Texas Chili recipe be adapted for a slow cooker or Instant Pot?
Yes, absolutely! For a slow cooker, brown the beef and `sauté` the aromatics on the stovetop first. Then, combine all ingredients in the slow cooker and cook on low for 6-8 hours or high for 3-4 hours. For an `Instant Pot`, use the sauté function to brown the beef and sauté the aromatics directly in the pot. Then, add the remaining ingredients and pressure cook for about 45-60 minutes with a natural release, adjusting the liquid as needed.
How can I customize the spice level in my Texas Chili?
To reduce the heat, deseed all `jalapeños` and use less `chipotle chili powder`. To increase the heat, you can leave some jalapeño seeds, add an extra `chipotle pepper in adobo sauce`, or introduce a pinch of cayenne pepper during simmering.
What are common serving and topping suggestions for Texas Chili?
Popular toppings include `sour cream`, `shredded cheese`, sliced `green onions`, and fresh cilantro. Great sides are `cornbread`, `garlic bread`, or `Spanish rice`.
What is the best way to store and reheat leftover Texas Chili?
Store cooled chili in an airtight container in the refrigerator for 3-4 days. For longer storage, `freezing leftovers` in freezer-safe containers for up to 3-4 months works wonderfully. Reheat gently on the stovetop over medium-low heat or in the microwave, adding a splash of `beef stock` if it’s too thick.
What is the difference between sweating and browning onions?
Sweating onions means cooking them over low to medium heat until they become translucent and softened, releasing their natural sweetness without developing any color. Browning onions involves higher heat to caramelize their sugars, resulting in a darker color and a more intense, sometimes slightly bitter, flavor, which we aim to avoid in this particular chili recipe.
Best Texas Chili Recipe: Beefy, Spicy & No Beans!
Ingredients
Equipment
Method
- Lightly toast 2-3 dried chilies (e.g., 1 Ancho and 2 Guajillo) in a dry skillet over medium heat for 30-60 seconds per side until fragrant and pliable. Do not burn them, as this can make them bitter. This step enhances their natural oils and deepens their flavor.
- Place the toasted chilies in a heatproof bowl. Pour enough hot beef stock (or boiling water) over them to cover completely. Let them rehydrate for 20-30 minutes until fully softened and pliable.
- Once soft, carefully remove the stems and as many seeds as you prefer. Transfer the rehydrated chilies and about ½ to 1 cup of their soaking liquid to a blender. Blend until you achieve a smooth, thick paste. Add more soaking liquid sparingly, only if needed, to reach a pourable but still concentrated consistency. Set aside for later use.
- Begin by trimming any excess fat from your beef chuck roast. Cut the meat into uniform ½-inch chunks. Generously season the beef all over with kosher salt and black pepper.
- Heat 2 tablespoons of olive oil in a large pot or Dutch oven over medium-high heat. Once shimmering, add about half of the seasoned beef in a single layer, avoiding overcrowding. Brown the meat on all sides, about 5-7 minutes. Remove the browned beef from the pot and set it aside. Repeat with the remaining beef, adding another tablespoon of oil if needed, until all beef is deeply browned. Set aside all browned beef.
- Add the remaining 2 tablespoons of olive oil to the pot and heat for 30 seconds. Add the diced jalapeño peppers and yellow onion to the pot. Sauté for about 10 minutes over medium heat, stirring occasionally, until the onions are softened and translucent but not browned.
- Stir the minced garlic and the entire seasoning mix (chili powder, smoked paprika, cumin, dried oregano, chipotle chili powder, unsweetened cocoa powder, ground coriander, cinnamon) into the softened onions and jalapeños. Cook for just 30 seconds, stirring constantly, until the spices become incredibly fragrant. Be careful not to burn the garlic.
- Return all of the browned beef chunks to the pot. Add the finely chopped chipotle pepper in adobo sauce, the can of crushed tomatoes, tomato paste, beef stock, and the bay leaves. Now, add the prepared roasted dried chili paste into the pot. Stir everything together thoroughly to combine.
- Increase the heat to medium-high and bring the chili mixture to a rolling boil, scraping any browned bits from the bottom of the pot. Once boiling, immediately reduce the heat to low.
- Allow the chili to simmer, uncovered, for 3 to 3 ½ hours. Stir occasionally (every 30-45 minutes) to prevent sticking and ensure even cooking. Simmering uncovered allows the sauce to reduce and thicken, concentrating flavors. If the chili becomes too thick, add a splash more beef stock as needed. The beef should become incredibly tender.
- After 3 to 3 ½ hours of simmering, remove the pot from the heat. Carefully remove about half of the large beef chunks from the pot and place them on a cutting board or in a separate bowl. Using two forks, shred this portion of beef into smaller, tender pieces. Return the shredded beef to the pot, mixing it in with the remaining larger chunks to create a dynamic textural variety.
- Before serving, remove and discard the bay leaves. Taste the chili and adjust salt and pepper as needed. Serve this magnificent chili hot, either plain or with your favorite classic toppings. Enjoy!