

There’s nothing quite like a hearty, comforting bowl of chili, especially when it conjures up memories of your favorite restaurant. If you’ve ever craved that rich, robust flavor of authentic Texas Roadhouse chili, you’re in the right place. I’ve spent countless hours perfecting this copycat Texas Roadhouse chili recipe to bring that restaurant-quality experience right into your kitchen. Get ready for a deeply satisfying, easy-to-follow recipe that promises to deliver on both incredible taste and perfect texture, making it a new staple for your family meals.
Why You’ll Love This Texas Roadhouse Chili Recipe
What truly elevates this Texas Roadhouse chili recipe from good to extraordinary is my unique **two-stage simmering process**. This isn’t just about cooking; it’s about coaxing every ounce of flavor from your ingredients and achieving that signature, rich restaurant-style consistency.
* Intensified Flavor Development: We start with an initial 25-minute uncovered simmer. This crucial step allows excess liquid to reduce, concentrating the flavors and kickstarting the Maillard reaction and subtle caramelization in the beef and aromatics.
* Unbeatable Depth and Texture: Following this, the chili gets a generous 1-2 hour covered simmer on low heat. This longer, gentle cook time is where the magic happens – spices fully meld, tomatoes deepen their sweetness, and all the ingredients harmonize into a truly complex and unified flavor profile. The low, slow heat also helps achieve that perfect, slightly thickened texture, not too soupy, not too dry.
* The Perfect Finish: A final 10-minute rest off the heat allows the chili to settle, flavors to integrate even further, and the texture to thicken just enough for that ideal, spoon-hugging consistency.
* Impressive & Satisfying: This method ensures a chili that’s not just delicious, but incredibly satisfying and impressive, whether you’re serving it for a casual family dinner or a game-day gathering. It’s a reliable recipe that delivers superior depth and a comforting warmth every time.
Ingredients Needed for Your Copycat Chili

Here’s everything you’ll need to create this amazing Texas Roadhouse chili in your own kitchen:
- 1 pound ground beef (chuck or sirloin)
- 2 tablespoons olive oil
- 3 cloves garlic (minced)
- 1 onion (yellow or white, diced)
- 15 ounces red kidney beans (rinsed and drained)
- 8 ounces tomato sauce
- 2 tablespoons tomato paste
- 15 ounces crushed tomatoes
- 1½ cups beef broth (can substitute vegetable or chicken broth)
- 1 tablespoons brown sugar (packed)
- 2 tablespoons chili powder
- 2 tablespoons cumin
- 1 tablespoon smoked paprika
- ½ teaspoon red pepper flakes
- ½ teaspoon black pepper
- 2 teaspoons salt
- ½ red onion (diced)
- ⅛ cup cheddar cheese
Ingredient Notes & Substitutions
- Ground Beef: I recommend using ground chuck for a richer flavor due to its higher fat content, but ground sirloin works if you prefer a leaner chili. A coarser grind is often preferred for chili, as it creates a better texture in the final dish. You can choose to drain the fat or leave some in for extra flavor, depending on your preference and the fat content of your beef.
- Beans: While traditional Texas Roadhouse chili doesn’t typically include beans, many home cooks, myself included, love them for added texture and nutrition. I’ve included red kidney beans here, but feel free to substitute with white chili beans or other varieties like black beans, or omit them entirely if you’re aiming for strict authenticity.
- Aromatics (Garlic & Onion): Freshly minced garlic and diced yellow or white onion are essential for building the foundational flavor of this chili. While powdered versions can be used in a pinch, fresh aromatics provide a more vibrant and complex taste.
- Tomato Products: The trio of tomato sauce, tomato paste, and crushed tomatoes is key. Tomato paste offers concentrated umami and thickens the chili. Tomato sauce provides a smoother, tangy base, while crushed tomatoes add body and a burst of fresh tomato flavor and texture. Each plays a distinct role in creating a balanced, rich tomato foundation.
- Brown Sugar: Don’t skip the brown sugar! Its sweetness is crucial for balancing the acidity of the tomatoes and rounding out the overall flavor profile. It doesn’t make the chili sweet, but rather harmonizes the savory, spicy, and tangy notes.
- Broth: Beef broth is my top choice for deep flavor, but vegetable broth or chicken broth can be excellent substitutes without compromising the overall taste.
- Dietary Considerations: To make this chili gluten-free, always check your beef broth label to ensure it’s certified gluten-free. For a dairy-free version, simply omit the shredded cheddar cheese and sour cream toppings, opting for avocado slices or fresh cilantro instead.

How to Make Texas Roadhouse Chili at Home
Crafting this hearty chili is a labor of love, but the steps are straightforward and designed for success. Follow along, and your kitchen will soon be filled with the most incredible aromas!
Phase 1: Sautéing the Aromatics
- Begin by heating 2 tablespoons of olive oil in a large, heavy-bottomed stock pot over medium heat.
- Add the minced garlic and diced yellow or white onion to the pot. Cook them for 3-4 minutes, stirring frequently, until the onions are translucent and slightly softened, releasing their fragrant aroma into your kitchen.
Phase 2: Browning the Beef
- Add the ground beef to the pot with the softened aromatics. Break up the meat with a spoon, stirring continually to separate the beef and prevent large chunks. Cook for 5-6 minutes, or until the beef is evenly browned all over. For optimal texture and flavor, aim for a good sear on the meat, as this develops rich, savory notes through the Maillard reaction.
- At this point, you can choose whether to drain off the rendered fat in the pot. This decision mostly depends on the fat content of the ground beef you used and your personal preference. Personally, I don’t drain the fat, as it contributes significantly to the chili’s flavor and richness.
Phase 3: Building the Flavor Base
- Now, it’s time to build the deep flavor profile! Add in all the remaining ingredients: the rinsed and drained red kidney beans, tomato sauce, rich tomato paste, crushed tomatoes, beef broth, packed brown sugar, chili powder, cumin, smoked paprika, red pepper flakes, black pepper, and salt. Stir everything thoroughly to ensure all the spices are well combined with the vibrant tomato base and beef.
Phase 4: The Two-Stage Simmer & Rest – Our Unique Twist
- Reduce the heat to a gentle simmer. First, let the chili cook, uncovered, for 25 minutes, stirring occasionally. This initial uncovered simmer helps to reduce some of the liquid and concentrate the flavors. After 25 minutes, cover the pot, reduce the heat to low, and continue to simmer for an additional 1-2 hours, stirring occasionally. This longer, covered simmer is the heart of our unique twist, allowing the complex flavors to fully meld and deepen, creating that signature restaurant-quality taste and consistency. You’ll notice a truly rich aroma filling your kitchen!
- Once the simmering is complete, remove the chili from the heat. This is another crucial step in our unique twist: let the chili rest, uncovered, for 10 minutes before serving. This resting period allows the flavors to integrate even further and the chili to slightly thicken to its optimal, spoon-hugging texture.
Phase 5: Serving Your Masterpiece
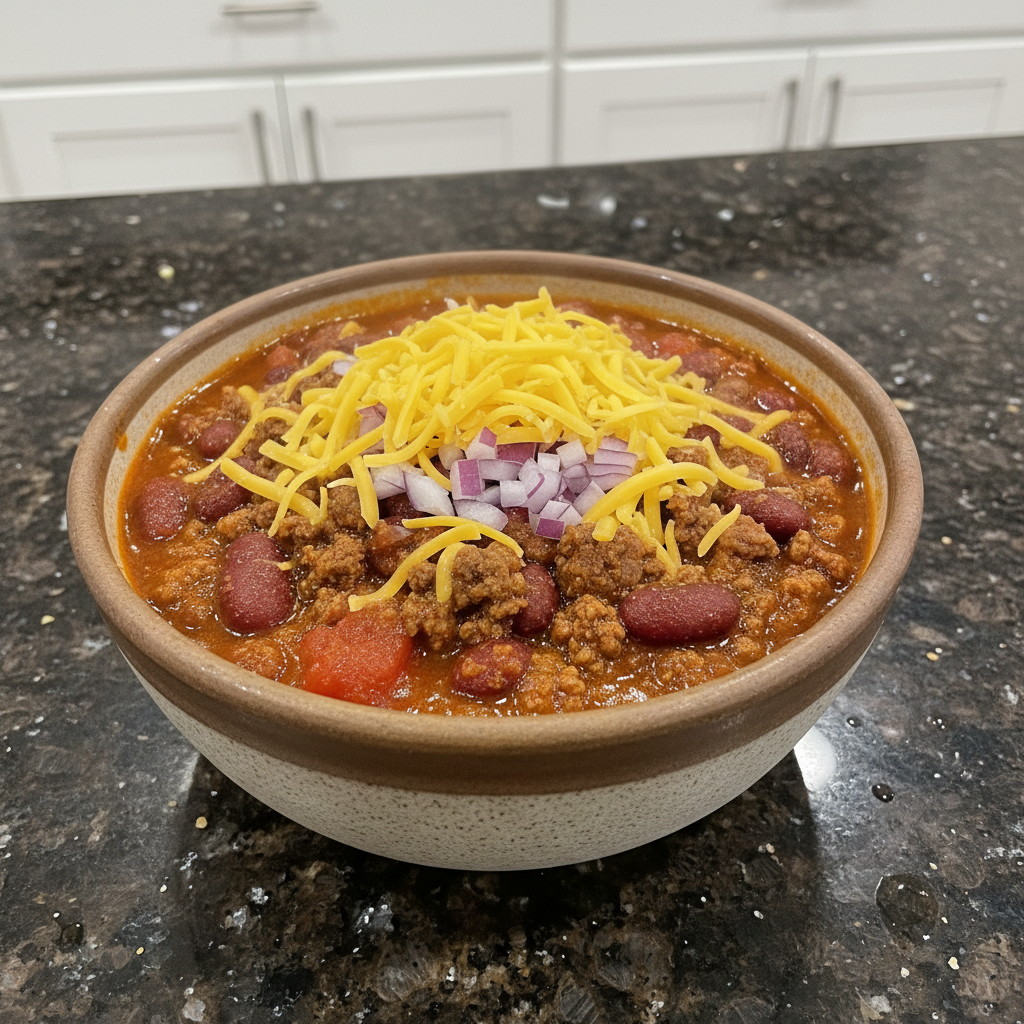
- Serve your homemade Texas Roadhouse chili hot, topped generously with shredded cheddar cheese and diced red onions, or any other favorite toppings. Enjoy the fruits of your labor!
The Science Behind This Chili’s Unbeatable Flavor
There’s a method to the madness in creating truly spectacular chili. Let’s delve into the culinary science that makes this Texas Roadhouse copycat recipe shine.
The Tomato Trio: Sauce, Paste, and Crushed Tomatoes
Each tomato product in this recipe plays a distinct, vital role in building the chili’s complex flavor, body, and texture. Tomato paste is a powerhouse of concentrated umami, offering a deep, savory foundation and contributing significant body to the chili without adding much liquid. It’s essential for that “cooked-all-day” taste. Tomato sauce provides a smooth, tangy liquid base, carrying the flavors throughout the dish and contributing to a balanced acidity. Finally, crushed tomatoes introduce texture and a brighter, fresher tomato note, giving the chili a more rustic feel and a burst of natural sweetness.
The Secret Sweetness: Why Brown Sugar Matters
You might wonder why brown sugar is included in a savory chili recipe. It’s not to make the chili sweet, but rather to perform a crucial balancing act. Tomatoes, especially in their concentrated forms, can be quite acidic. A touch of brown sugar helps to mellow this acidity, enhancing the natural sweetness of the other ingredients and creating a more rounded, harmonious flavor profile. It allows the other spices and savory notes to shine without being overwhelmed by tartness, adding depth and complexity that would otherwise be missing.
The Magic of Browning: Maillard Reaction & Caramelization
Properly browning your ground beef and aromatics is not just about cooking them through; it’s about flavor development. The Maillard reaction is a chemical process that occurs when amino acids and reducing sugars react at high temperatures, creating hundreds of new flavor compounds. This is what gives the beef its deep, savory, and complex taste. Similarly, the initial sautéing of onions and garlic triggers caramelization, sweetening them and adding another layer of depth. These browning steps are foundational, building the rich, robust base that defines a truly great chili.
Pro Tips & Troubleshooting Your Chili
Even seasoned chefs encounter moments where a little guidance goes a long way. Here are my expert tips and solutions for common chili challenges.
Pro Tips
- Embrace the Two-Stage Simmer: This is the secret weapon of this recipe. The initial uncovered simmer concentrates flavors, while the longer covered simmer allows them to meld deeply. Don’t rush this process; it’s critical for maximum flavor and that perfect, restaurant-quality consistency.
- Don’t Skip the Rest: The 10-minute rest off heat is essential. It allows the flavors to fully integrate and the chili to thicken slightly, ensuring every spoonful is packed with perfectly balanced taste and texture.
- Choose the Right Beef: Opt for ground chuck with a coarser grind if possible. The slightly higher fat content adds moisture and flavor, and the coarser texture holds up well during the long simmer. For food safety and optimal texture, ensure your beef reaches an internal temperature of at least 160°F (71°C) during cooking.
- Make Ahead for Better Flavor: Chili is one of those magical dishes that tastes even better the next day. The flavors continue to meld and deepen overnight, making it an ideal candidate for meal prepping.
- Low and Slow is the Way: The science behind simmering for flavor development is simple: gentle, prolonged heat allows ingredients to slowly break down and release their compounds, creating a harmonious and complex taste that cannot be achieved with quick cooking.
Common Mistakes to Avoid
- Not Separating Ground Beef: Failing to break up the ground beef adequately while browning can lead to large, unappealing chunks in your chili. Stir continually to ensure a consistent texture.
- Not Stirring While Browning: While you want to achieve a good sear, ignoring the beef can lead to it sticking and burning in spots. Stirring helps to brown it evenly without searing into a solid crust.
- Cooking on Too High Heat: A rapid boil can cause splattering, potentially burn the bottom of your pot, and break down ingredients too quickly, leading to a less desirable texture. Maintain a gentle simmer throughout the cooking process.
- Chili That’s Too Thin: If your chili is too thin after the full simmering time, continue to simmer uncovered for a bit longer, allowing more liquid to evaporate. You can also mix a tablespoon of cornstarch with a tablespoon of cold water, then stir into the chili and simmer for a few more minutes to thicken.
- Chili That’s Too Thick: If your chili becomes too thick, simply stir in a little more beef broth (a quarter cup at a time) until it reaches your desired consistency.
- Bland Chili: If your chili tastes bland, it likely needs more salt or a boost of spices. Add a pinch more salt, chili powder, or cumin, and let it simmer for another 15-20 minutes to allow the flavors to develop. A dash of hot sauce can also add depth without necessarily adding extreme heat.
- Bitter Chili: Bitterness can sometimes come from overcooked spices or an imbalance of acidity. Try adding a little more brown sugar (a half teaspoon at a time) to balance the flavors, or a splash of broth to dilute it slightly.
Serving & Storage Suggestions
Once your chili is perfectly cooked, it’s time to enjoy it! And if you’re lucky enough to have leftovers, I’ve got you covered on how to keep them delicious.
Serving Ideas
Texas Roadhouse chili is a meal in itself, but it truly shines with the right accompaniments:
- Classic Toppings: A generous sprinkle of shredded cheddar cheese and a spoonful of diced red onion are essential. Don’t forget a dollop of sour cream or Greek yogurt for a creamy contrast.
- Elevated Toppings: Get creative with avocado slices, fresh jalapeño slices for a kick, a sprinkle of fresh green onions or cilantro, or even some crumbled bacon.
- Perfect Pairings: Serve your chili alongside crispy tortilla chips for dipping, warm, buttery cornbread, a simple side salad, or even over a bed of white rice. A fluffy dinner roll is also a comforting addition.
Storage and Make-Ahead
- Refrigerating Leftovers: Allow your chili to cool completely before transferring it to an airtight container. It will keep beautifully in the refrigerator for up to 3-4 days. The flavors often deepen and improve overnight!
- Freezing Leftover Chili: Chili freezes exceptionally well, making it perfect for meal prep. Once cooled, spoon the chili into freezer-safe containers or heavy-duty freezer bags, leaving about an inch of headspace to allow for expansion. Lay freezer bags flat for efficient storage. Properly stored, frozen chili can last for 4-6 months. To defrost, transfer it to the refrigerator overnight, or use the defrost setting on your microwave.
- Reheating Chili:
- Stovetop: Transfer the chili to a saucepan and heat over medium-low heat, stirring occasionally, until thoroughly warmed through. Add a splash of beef broth or water if it’s too thick.
- Microwave: Place individual servings in a microwave-safe bowl, cover loosely, and heat in 1-minute intervals, stirring between each, until hot.
Conclusion: Your Best Homemade Texas Roadhouse Chili
You now have all the tools and knowledge to create the most authentic and deeply satisfying copycat Texas Roadhouse chili right in your own kitchen. My unique two-stage simmering process, coupled with carefully selected ingredients and cooking techniques, ensures a depth of flavor and perfect texture that truly rivals the restaurant’s best. Even if you’re new to chili making, you’re set up for success!
I encourage you to embrace this recipe, customize your toppings, and savor every hearty spoonful. Don’t hesitate to share your creations with friends and family – this is a dish meant to be enjoyed and celebrated. For more comforting recipes and culinary adventures, keep exploring my kitchen!
Texas Roadhouse Chili FAQ
What kind of ground beef should I use for Texas Roadhouse chili?
I recommend using ground chuck for its rich flavor and higher fat content, which contributes to a more tender and flavorful chili. Ground sirloin can be used for a leaner option. A coarser grind is generally preferred for chili texture.
Does Texas Roadhouse chili contain beans, and can I adjust them?
Authentic Texas Roadhouse chili typically does not contain beans. However, many home cooks, including myself, enjoy the added texture and nutrition of beans. This recipe includes red kidney beans, but you can easily adjust by omitting them or substituting with other varieties like black beans or white chili beans.
How can I adjust the spice level of this chili?
To increase the spice, you can add more red pepper flakes, a pinch of cayenne pepper, or a dash of your favorite hot sauce during the simmering stage. For a milder chili, simply reduce or omit the red pepper flakes.
What are the best toppings and sides to serve with Texas Roadhouse chili?
Classic toppings include shredded cheddar cheese, diced red onion, and a dollop of sour cream. Other great additions are avocado slices, jalapeño slices, and fresh green onions. Perfect sides include cornbread, tortilla chips, or a simple side salad.
Can I make this a vegetarian chili?
Yes, you can! Substitute the ground beef with an equal amount of plant-based ground “meat” crumbles or a mixture of hearty vegetables like diced bell peppers, zucchini, and corn. Use vegetable broth instead of beef broth. The two-stage simmering process will still benefit flavor development for a vegetarian version.
How should I store, freeze, and reheat leftover chili?
Store cooled chili in an airtight container in the refrigerator for up to 3-4 days. For longer storage, freeze chili in freezer-safe containers or bags for 4-6 months. To reheat, warm gently on the stovetop over medium-low heat, stirring occasionally, or in the microwave until heated through, adding a splash of broth if needed.
Can I omit brown sugar from the recipe without affecting the taste?
While you can omit brown sugar, I highly recommend including it. Its small addition doesn’t make the chili sweet, but it expertly balances the acidity of the tomatoes, rounding out the overall flavor profile and allowing the savory and spicy notes to shine more harmoniously.
What equipment do I need to make this chili?
You’ll need a large, heavy-bottomed stock pot or Dutch oven for simmering, a cutting board and sharp knife for preparing aromatics, and measuring spoons and cups for ingredients. A wooden spoon or spatula for stirring is also essential.
How long does it take to cook Texas Roadhouse chili?
The active cooking time is about 15-20 minutes, followed by a two-stage simmering process totaling 1 hour 25 minutes to 2 hours 25 minutes, plus a 10-minute rest. So, plan for approximately 1.5 to 2.5 hours total for deep, rich flavor.
Is Texas Roadhouse chili spicy?
This copycat recipe aims for a balanced flavor with a mild to medium warmth, reflecting the typical Texas Roadhouse chili. The red pepper flakes provide a gentle kick, but you can easily adjust the amount to suit your personal preference for spice.
Copycat Texas Roadhouse Chili: The Ultimate Homemade Recipe
Ingredients
Equipment
Method
- Begin by heating 2 tablespoons of olive oil in a large, heavy-bottomed stock pot over medium heat.
- Add the minced garlic and diced yellow or white onion to the pot. Cook them for 3-4 minutes, stirring frequently, until the onions are translucent and slightly softened, releasing their fragrant aroma into your kitchen.
- Add the ground beef to the pot with the softened aromatics. Break up the meat with a spoon, stirring continually to separate the beef and prevent large chunks. Cook for 5-6 minutes, or until the beef is evenly browned all over.
- You can choose whether to drain off the rendered fat. Personally, I don’t drain the fat, as it contributes significantly to the chili’s flavor and richness.
- Add in all the remaining ingredients: the rinsed and drained red kidney beans, tomato sauce, rich tomato paste, crushed tomatoes, beef broth, packed brown sugar, chili powder, cumin, smoked paprika, red pepper flakes, black pepper, and salt. Stir everything thoroughly to ensure all the spices are well combined with the vibrant tomato base and beef.
- Reduce the heat to a gentle simmer. First, let the chili cook, uncovered, for 25 minutes, stirring occasionally. After 25 minutes, cover the pot, reduce the heat to low, and continue to simmer for an additional 1-2 hours, stirring occasionally.
- Once the simmering is complete, remove the chili from the heat. Let the chili rest, uncovered, for 10 minutes before serving.
- Serve your homemade Texas Roadhouse chili hot, topped generously with shredded cheddar cheese and diced red onions, or any other favorite toppings. Enjoy the fruits of your labor!