
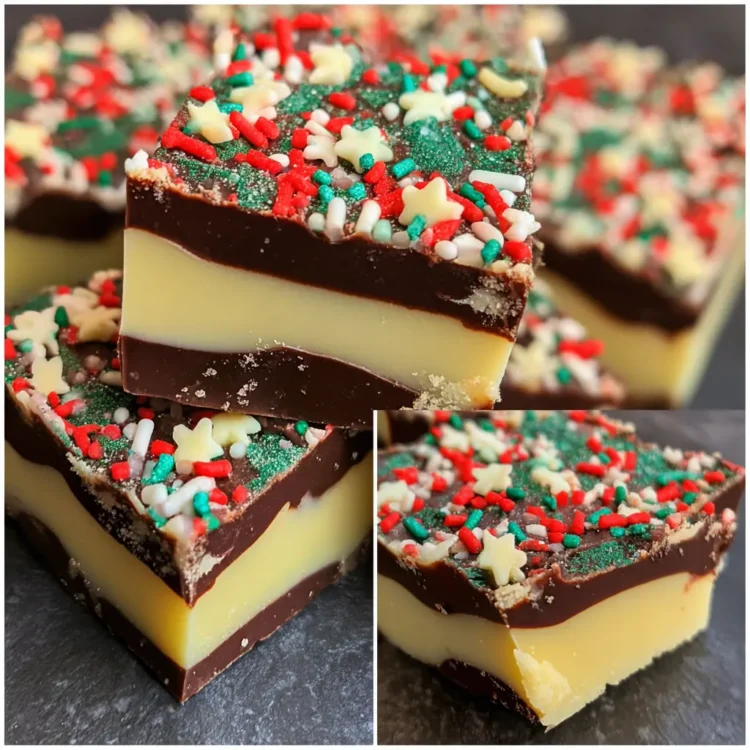
Get ready to create a truly magical treat this holiday season! This easy Christmas fudge recipe features a delightful two-layered design, combining rich semi-sweet chocolate with creamy white chocolate. It’s a festive, no-bake classic that comes together quickly. Perfect for holiday gifting, cookie exchanges, or simply enjoying with your family, this fudge will surely be a cherished part of your celebrations.
Why You’ll Love This Christmas Fudge
This delightful holiday treat is a must-make for countless reasons:
- It’s an effortless and quick holiday treat, perfect for busy schedules.
- You use simple, accessible ingredients for maximum flavor impact.
- The impressive layered presentation makes it look like you spent hours.
- It’s kid-friendly, making it a fun activity to make together.
- This versatile fudge works wonderfully for edible gifts or festive parties.
- You can make this entire Christmas fudge recipe easily in your microwave.
Ingredients
Gather these simple ingredients to create your beautiful layered Christmas fudge. These common pantry staples ensure a delicious, fuss-free treat every time.
- 14 oz sweetened condensed milk (divided)
- 6 oz white chocolate chips
- 6 oz semi-sweet chocolate chips
- 2 tsp vanilla extract (divided)
- 2 tbsp Christmas sprinkles
Notes & Substitutions
It’s important to understand the distinctions between ingredients, as highlighted by culinary resources, that sweetened condensed milk differs significantly from evaporated milk in sugar content and texture, impacting the final result of your fudge. Always use sweetened condensed milk for this Christmas fudge recipe; evaporated milk will not work. You can easily swap semi-sweet chocolate chips for dark chocolate or milk chocolate chips based on your preference. Feel free to adjust the vanilla extract amount or add a touch of peppermint extract for a festive twist. Customize your sprinkles for any holiday or occasion beyond Christmas! Always use chocolate chips, as chocolate bars have a different melting point and consistency.
Equipment
You only need a few basic kitchen tools for this quick and easy Christmas fudge recipe.
- 8×8 inch baking pan
- Parchment paper
- Nonstick cooking spray
- Two microwave-safe bowls
- Rubber spatula
- Sharp knife (for slicing)
Instructions
Follow these step-by-step instructions to create your delicious, layered Christmas fudge. This process is designed for beginners, ensuring perfect results every time.
- Prepare Pan: Line an 8×8-inch baking pan with parchment paper, leaving an overhang on the sides for easy removal. Spray the parchment paper lightly with nonstick cooking spray and set it aside.
- Divide Milk: Place the white chocolate chips in one medium microwave-safe bowl and the semi-sweet chocolate chips in a separate medium microwave-safe bowl. Divide the 14 oz can of sweetened condensed milk in half, adding approximately 7 oz (half of the can) to each bowl.
- Melt Dark Chocolate: Place the bowl with semi-sweet chocolate chips and half of the condensed milk into the microwave. Heat in 30-second increments, stirring well after each interval, until completely smooth and melted. This usually takes about 1-2 minutes total.
- Add Vanilla: Stir 1 teaspoon of vanilla extract into the melted semi-sweet chocolate mixture until fully combined.
- Spread First Layer: Quickly pour the dark chocolate fudge mixture into the prepared 8×8-inch baking pan. Use a rubber spatula to spread it evenly into a flat layer.
- Melt White Chocolate: Place the bowl with white chocolate chips and the remaining half of the condensed milk into the microwave. Heat in 30-second increments, stirring vigorously after each time, until the mixture is smooth and melted. Be careful not to overheat white chocolate.
- Add Vanilla & Sprinkles: Stir the remaining 1 teaspoon of vanilla extract into the melted white chocolate mixture. Then, gently fold in 1 tablespoon of the Christmas sprinkles.
- Spread Second Layer: Carefully pour the white chocolate fudge mixture over the semi-sweet chocolate layer in the pan. Use your spatula to spread it gently and evenly without mixing the layers.
- Decorate & Chill: Immediately sprinkle the remaining 1 tablespoon of Christmas sprinkles over the top of the white chocolate layer. Gently press them in slightly so they adhere. Refrigerate the pan for at least one hour, or until the fudge is completely firm and set.
- Slice & Serve: Once firm, lift the fudge out of the pan using the parchment paper overhang. Place it on a cutting board. Use a sharp, warm knife to cut the fudge into small, even squares. Enjoy your beautiful homemade Christmas fudge recipe!
Pro Tips & Troubleshooting
Achieving perfect fudge is simple with these helpful pointers. These tips address common concerns, making your fudge-making experience smooth.
- Work Quickly: Fudge sets fast once ingredients combine. Have all your equipment and ingredients ready before you start melting.
- Proper Melting: Use short microwave bursts and stir well between each. Overheating chocolate can cause it to seize or burn, especially white chocolate.
- Fudge Too Soft?: Ensure you used sweetened condensed milk. Chill the fudge for a longer period, even overnight, to help it firm up properly.
- Prevent Sticking: Generously grease your parchment paper with nonstick spray. This step ensures easy removal and clean slices of your festive fudge.
- Clean Slices: For perfectly neat squares, run your knife under hot water, wipe it dry, and then make a cut. Repeat this process for each slice of your delicious Christmas fudge recipe.
Serving, Storage, & Variations
This two-layered Christmas fudge is versatile and delightful. Here’s how to best enjoy and keep it, along with ideas for creative twists.
- Serving Ideas: Arrange squares on holiday dessert platters, pack them into decorative cookie boxes for friends, or give them as charming edible gifts.
- Storage: For optimal freshness and to prevent spoilage, remember that homemade fudge can be stored in an airtight container in the refrigerator for up to three weeks. Layer pieces with parchment paper to prevent sticking.
- Freezing: For longer storage, freeze fudge in an airtight container for up to three months. Thaw it in the refrigerator before serving.
- Flavor Variations: Infuse the white chocolate layer with a drop of peppermint extract for a minty twist. You could also add orange zest, a dash of cinnamon, or espresso powder to the dark chocolate for different flavor profiles.
- Topping Ideas: Before chilling, sprinkle with crushed candy canes, chopped toasted nuts, shredded coconut, or dried cranberries for added texture and flavor to this lovely Christmas fudge recipe.
Nutrition Information
Making homemade treats allows you to control the ingredients. Here is an approximate nutritional breakdown for this delicious Christmas fudge recipe.
These values are estimates only. Individual results may vary based on exact ingredient brands and portion sizes.
| Nutrient | Amount Per Serving (approx.) |
|---|---|
| Calories | 100 kcal |
| Total Fat | 5g |
| Saturated Fat | 3g |
| Cholesterol | 10mg |
| Sodium | 20mg |
| Total Carbs | 12g |
| Sugars | 10g |
| Protein | 1g |
FAQ
You have questions, and we have answers! Here are some common queries about making homemade fudge.
- Why is my fudge too soft? You likely used evaporated milk instead of sweetened condensed milk, or it didn’t chill long enough. Always use sweetened condensed milk for proper setting.
- Can I use regular condensed milk? No, you must use sweetened condensed milk. Regular (evaporated) milk lacks the sugar content needed for fudge to set correctly.
- How long does fudge take to set? This two-layered Christmas fudge recipe usually sets in the refrigerator within one hour, but it’s best to let it chill longer, up to 2-3 hours, for firm squares.
- What kind of chocolate chips are best? Use good quality chocolate chips that you enjoy eating on their own. Brand preference can impact the final flavor.
- Can I make this on the stovetop? Yes, you can melt the ingredients in a double boiler over low heat, stirring constantly until smooth. Ensure no water gets into the chocolate.
- Is Christmas fudge gluten-free? Yes, this specific recipe is naturally gluten-free, provided your chocolate chips and sprinkles are certified gluten-free.
Conclusion
This easy Christmas fudge recipe is your perfect companion for the festive season. Its simple instructions and delicious two-layered design make it a standout holiday treat. You’ll love how quickly it comes together, leaving you more time to enjoy the magic of the holidays. Go ahead, whip up a batch, and share the joy with loved ones. We encourage you to try this delightful recipe and share your creations in the comments below!