


St. Patrick’s Day is a time for celebration, good cheer, and, of course, wonderfully festive food. I love bringing a touch of holiday magic to my kitchen, and nothing quite says “festive” like a dish that’s both visually striking and bursting with fresh flavors. That’s why I am so excited to share my recipe for Shamrock Deviled Eggs. These aren’t just any deviled eggs; they feature a truly distinctive natural green color and a delicate, fresh herbaceous flavor, all thanks to a special, natural twist. This article will not only guide you through crafting this delicious appetizer but will also provide my expert tips for perfectly peeled eggs, a silky-smooth filling, easy make-ahead strategies, and creative garnishes, ensuring your St. Patrick’s Day spread is nothing short of spectacular.
Why You’ll Love These Shamrock Deviled Eggs
I promise you, these Shamrock Deviled Eggs will be the star of your St. Patrick’s Day party. Here’s what makes them truly special in my kitchen.
The Unique Twist: Naturally Green & Herbaceous Yolk Filling. My secret lies in blending a small amount of blanched baby spinach and finely chopped fresh chives directly into the egg yolk mixture. This simple step creates a stunning, vibrant green hue without needing any artificial dyes, while also infusing a delightful, fresh oniony note.
Enhanced Visual Appeal. The natural green color is absolutely eye-catching. These deviled eggs instantly become a festive centerpiece, perfectly aligned with the spirit of St. Patrick’s Day.
Elevated Flavor Profile. The chives add a layer of fresh pungency and a subtle onion flavor that beautifully complements the rich, creamy yolk. It’s a flavor combination that feels both familiar and refreshingly new.
Make-Ahead Friendly. I always appreciate recipes that ease party-day stress. You can prepare most components of these deviled eggs in advance, making assembly quick and effortless when it’s time to celebrate.
Foolproof & Delicious. With my step-by-step guidance and included pro tips, you’ll achieve perfectly creamy, smooth, and delicious deviled eggs every time. This recipe is designed to be easy for any home cook, from novice to seasoned chef.
Ingredients Needed
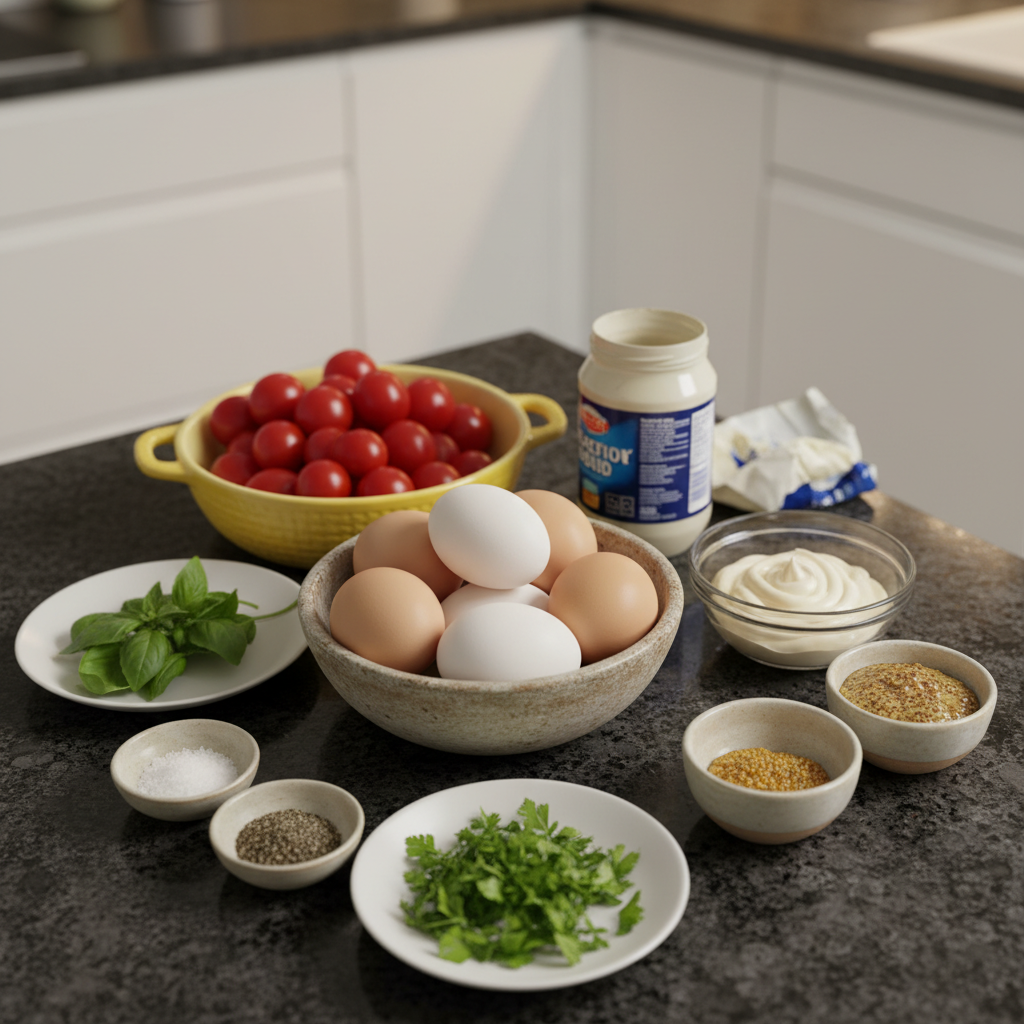
Here are the ingredients you will need to create these festive deviled eggs.
* 6 large eggs
* 2 tbsp. mayonnaise
* 1 tsp. stone ground mustard
* 4 cherry tomatoes – yellow
* 6 large basil leaves
* 1 tsp. mustard caviar
* parsley – a few small leaves
* salt & pepper – to taste
Ingredient Notes & Substitutions
Let’s talk about some of these key ingredients and how you can get the best results or find suitable alternatives.
Eggs: I recommend using large eggs for this recipe. For the easiest peeling experience, try to use eggs that are a few days to a week old rather than very fresh ones. Slightly older eggs tend to peel more cleanly.
Mayonnaise: Full-fat mayonnaise will give you the creamiest and most decadent yolk filling, which I highly recommend for that classic rich texture. However, if you prefer, lighter options can be used; just be aware the richness might be slightly different.
Stone Ground Mustard: This mustard adds a wonderful tangy depth to the yolk filling. If you don’t have stone ground mustard on hand, don’t worry. You can easily substitute it with Dijon mustard for a sharp, savory kick, or even classic yellow mustard for a more traditional flavor profile. I would advise against honey mustard as its sweetness isn’t ideal here.
Mustard Caviar: This is definitely a specialty item that adds a unique pop of flavor and texture. If you don’t have mustard caviar, or if you haven’t prepared it (it needs a full week to soak in pickle juice to develop its flavor), you have a few excellent substitutes. Finely minced capers offer a briny burst, black sesame seeds provide a nice visual contrast and a subtle crunch, or a light dusting of smoked paprika can add both color and a hint of smoky flavor.
Basil Leaves: These are specifically for crafting the decorative clovers. If basil isn’t your preference or readily available, you could also use fresh dill sprigs or small parsley leaves to create a similar green accent.
Spinach & Chives (For the Twist): While not listed in the main ingredients, a small amount of blanched baby spinach and finely chopped fresh chives are essential for achieving the vibrant natural green color and fresh herbaceous flavor in your yolk filling. Their role is integrated into the instructions section.
Dietary Notes: It’s good to know that this recipe is naturally gluten-free, making it a great option for those with dietary restrictions.
How to Make Shamrock Deviled Eggs
Creating these vibrant Shamrock Deviled Eggs is a joyful process. Follow these steps for a perfectly festive appetizer.
Step 1: Perfectly Hard-Boil Your Eggs
Place your 6 large eggs in a pot of cool water, ensuring the water just covers them. Put the pot on the stove and bring it to a boil over medium-high heat. Let them boil for exactly 20 minutes. Immediately after the 20 minutes, transfer the hot eggs into a bowl of cold water. An ice bath is ideal for this step, letting them cool for 5-10 minutes. This rapid cooling instantly stops the cooking process, preventing the eggs from overcooking and developing that undesirable greenish ring around the yolk.
Step 2: Peel and Prepare Egg Halves
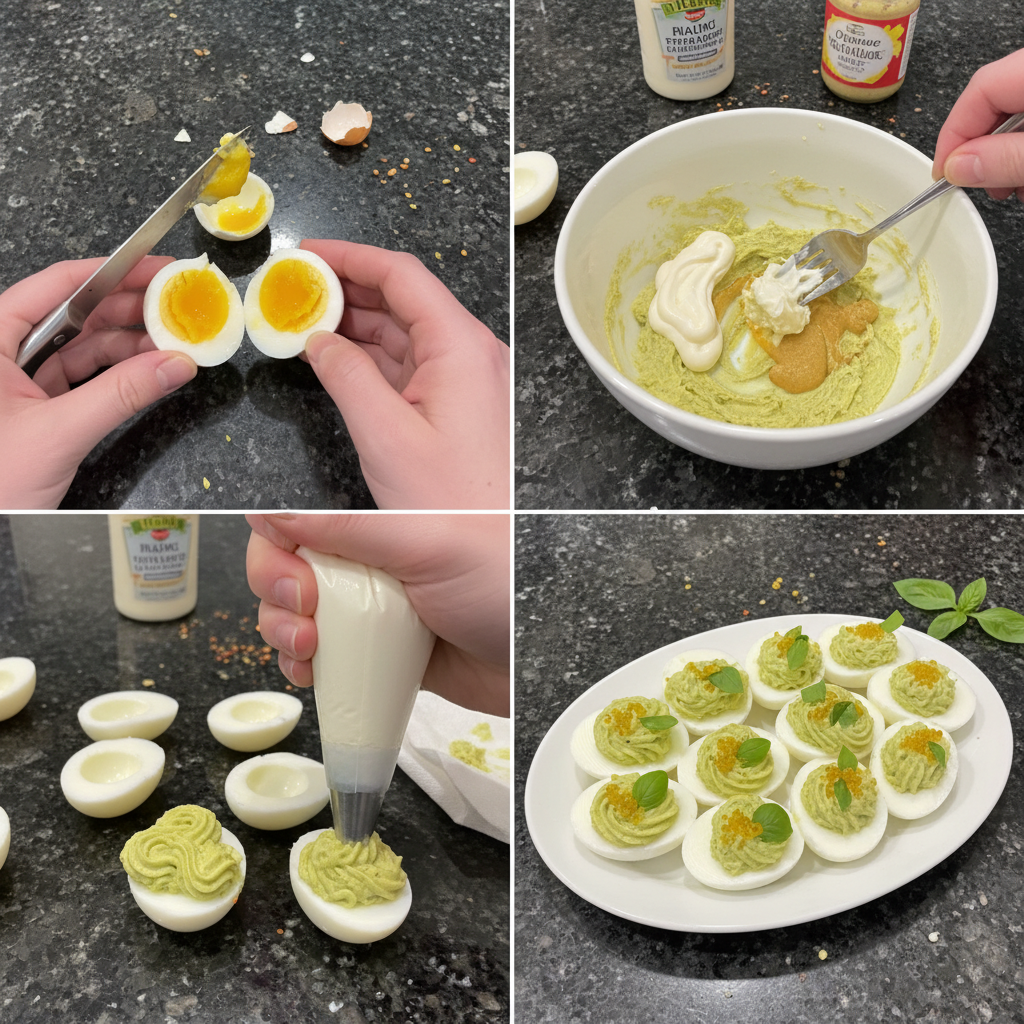
Once the eggs are cool enough to handle, carefully tap them around the center on a hard surface and gently peel away the shells. It’s crucial to peel very carefully to ensure each egg white remains pristine and free of any tears or dents, which is essential for a beautiful presentation. After peeling, use a sharp knife to slice each egg in half lengthwise. Carefully scoop out the bright yellow yolks into a separate mixing bowl, leaving the clean egg white halves ready for filling. For a more stable presentation, I like to slice a tiny bit off the bottom of each egg white half. This helps them sit flat on the serving platter and prevents them from sliding around.
Step 3: Create the Vibrant Shamrock Yolk Filling (The Unique Twist!)
Now for the heart of our Shamrock Deviled Eggs: the vibrant green filling. Begin by pushing the reserved egg yolks through a fine mesh strainer into a clean mixing bowl. This crucial step breaks up any lumps, ensuring your filling will be perfectly smooth and creamy. Next, to achieve that beautiful green color and fresh flavor, blanch a small handful of baby spinach, about 1/4 cup, in boiling water for just 15-30 seconds. Immediately plunge the blanched spinach into ice water, then squeeze out all excess moisture very thoroughly. Finely chop about 1 tablespoon of fresh chives. Blend the blanched spinach and chopped chives into a smooth paste. Add this green paste to your strained yolks along with 2 tablespoons of mayonnaise, 1 teaspoon of stone ground mustard, and a sprinkle of salt and pepper. Mix all these ingredients until they are well combined and the filling has a texture like creamy hummus. Taste and adjust your seasonings as needed. If the filling seems a bit dry, add a touch more mayonnaise or mustard to reach your desired creaminess. Finally, transfer this vibrant green filling to a pastry piping bag fitted with your desired decorative tip for an elegant and professional presentation.
Step 4: Craft Your Festive Garnishes
The garnishes truly make these Shamrock Deviled Eggs shine. First, slice 3-4 yellow cherry tomatoes into 12 very thin slices. Next, take your large basil leaves and, using a clover paper punch, punch out 12 small clovers. Carefully place each basil clover onto a tomato slice. You’ll find they stick easily without falling off, creating lovely little festive accents. For the cleanest cuts on your tomatoes, a very sharp, thin knife is always best.
Step 5: Assemble and Serve
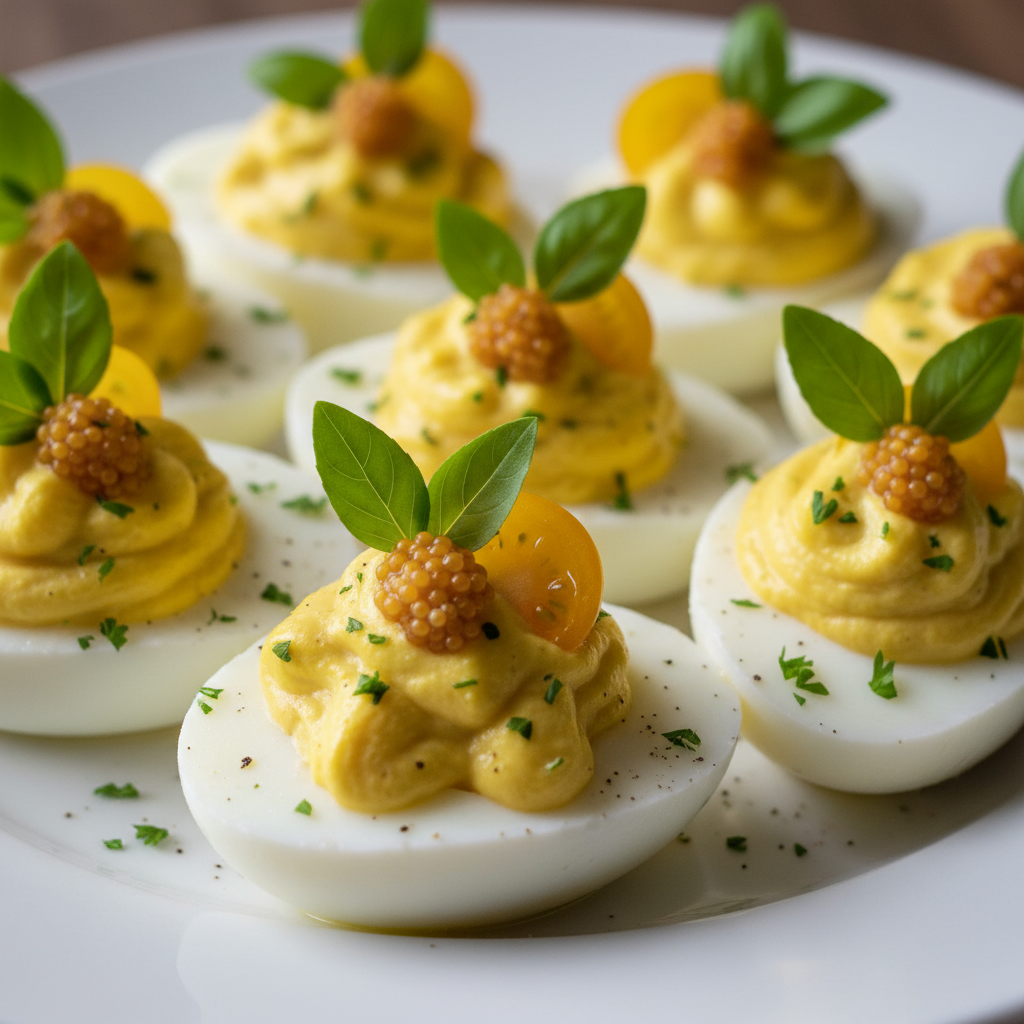
With your filling and garnishes ready, it’s time to assemble. Pipe the vibrant green yolk filling into each egg white half, creating an attractive mound. Then, carefully place the clover-tomato garnishes into the sides of the filling on each deviled egg. For the final flourish, add a small leaf of parsley behind the garnish and drizzle a tiny bit of mustard caviar on top of each egg. Arrange them beautifully on a platter and prepare for compliments!
Mastering the Perfect Hard-Boiled Egg for Deviled Delights
Achieving perfect hard-boiled eggs is the foundation of any great deviled egg recipe. I’ve learned a few tricks over the years that make all the difference.
The Secret to Easy Peeling
One of the most common frustrations is eggs that are difficult to peel. Here’s what I’ve found works best.
Egg Age Matters: The secret often lies in the age of your eggs. Slightly older eggs, those that are about 7-10 days old, are generally much easier to peel than very fresh ones. Over time, the pH of the egg changes and the inner membrane loosens, making separation from the shell much simpler.
Alternative Hard-Boiling Methods: Beyond the traditional boil, there are a couple of methods that can further ensure easy peeling.
* Steaming Method: Place your eggs in a steamer basket in a pot with about an inch of water. Bring the water to a boil, then cover and steam the large eggs for 10-12 minutes. Immediately transfer them to an ice bath.
* Rapid Boil-Then-Rest Method: Bring a pot of water to a rolling boil. Carefully add your eggs, boil for just 30 seconds, then remove the pot from the heat. Cover the pot tightly and let the eggs sit in the hot water for 10-12 minutes (for large eggs). Then, plunge them directly into an ice bath.
Preventing the Dreaded Green Ring
We’ve all seen that greenish-gray ring around the yolk of an overcooked hard-boiled egg. It’s not harmful, but it’s certainly not appealing.
Understanding the ‘Why’: That green ring is a result of sulfur from the yolk reacting with iron from the egg white, primarily due to overcooking. Too much heat for too long causes these compounds to interact, forming ferrous sulfide, which has that greenish hue and can sometimes impart a slightly sulfuric smell.
Proper Cooling is Key: To prevent this, immediate and rapid cooling in an ice bath after cooking is crucial. This halts the cooking process, preventing the sulfur-iron reaction from occurring and keeping your yolks bright yellow.
Elevating Your Shamrock Deviled Eggs: Garnishes, Substitutions & Food Safety
Beyond the core recipe, there are many ways to personalize your Shamrock Deviled Eggs and ensure they are both beautiful and safe for your guests.
Creative Garnishes & Substitutions
While basil clovers are charming, don’t feel limited.
Clover Punch Alternatives: If you don’t have a clover paper punch or prefer not to use basil, you can still create a festive look. Finely chopped green onion or fresh dill sprigs can be arranged to resemble a clover. Small parsley leaves can also be carefully placed, or you could even use very thinly sliced green bell pepper cut into tiny shapes.
Mustard Caviar Alternatives: As mentioned earlier, mustard caviar adds a unique pop and texture. If it’s unavailable or you’re short on time, finely minced capers provide a briny, salty alternative. Black sesame seeds offer a striking visual contrast and a subtle nuttiness. A light sprinkle of smoked paprika is another option for a touch of color and a hint of smoky flavor.
Beyond Basil: Don’t hesitate to explore other fresh herbs like dill or chives. They can add additional layers of flavor and visual appeal to your garnishes.
Detailed Food Safety & Make-Ahead Guidelines
Food safety is paramount, especially when serving appetizers like deviled eggs.
Safe Storage: For optimal freshness and food safety, store assembled deviled eggs in an airtight container in the refrigerator for up to 2-3 days. If you’re planning ahead, I recommend storing the components separately. The egg white halves can be kept in an airtight container for up to 5 days, and the vibrant green filling (without garnishes) can be stored for up to 3-4 days.
Room Temperature Limits: Deviled eggs should never be left at room temperature for more than 2 hours. After this time, bacteria can multiply rapidly, making them unsafe to eat. Always keep them chilled in the refrigerator until just before you plan to serve them.
Make-Ahead Strategies: To reduce stress on party-day, you can prepare the hard-boiled egg whites, the green yolk filling, and all your garnishes up to 24 hours in advance. Store them separately and assemble the deviled eggs within 30 minutes of serving for the freshest taste and appearance.
Pro Tips & Troubleshooting
Even the most experienced chefs encounter challenges. Here are my best tips for perfection and how to avoid common pitfalls.
Pro Tips for Perfection
These small details can make a big difference in your deviled egg game.
Sharp Knife for Garnishes: Always use a very sharp, thin knife for slicing cherry tomatoes thinly and cleanly. This ensures your garnishes look neat and professional.
Professional Piping: For an elegant and attractive presentation of the vibrant green filling, invest in a pastry piping bag with a pretty tip. It makes a huge difference in the final look.
Stabilize Egg Halves: As I mentioned earlier, slice a tiny bit off the bottom of each egg white half. This simple trick ensures they sit flat and don’t slide around on your serving platter, making them easier for guests to pick up.
Advance Prep: To streamline your party preparations, prepare your egg whites, the green yolk filling, and all garnishes up to 24 hours in advance. Store them separately in the refrigerator and assemble just before serving to maintain peak freshness and texture.
Season to Taste: Always taste your yolk filling before piping it into the egg whites. Adjust the salt and pepper as needed, or add a touch more mayonnaise or mustard to achieve your desired creaminess and flavor balance.
Common Mistakes to Avoid
Learning from common mistakes can save you time and frustration.
Assembling Too Early: Avoid assembling your deviled eggs too far in advance, especially more than 30-45 minutes before serving. The filling can dry out, and the flavors won’t be as fresh.
Lumpy Filling: Do not skip pushing the egg yolks through a fine mesh strainer. This is an absolutely critical step for achieving that perfectly smooth, creamy, and luxurious filling texture.
Torn Egg Whites: Improperly peeling eggs can lead to unsightly torn egg whites. Take your time, be gentle, and consider peeling them under cool running water to help loosen the shell.
Sliding Eggs: Forgetting to stabilize the egg halves by trimming the bottoms is a common issue. This causes them to slide around on the plate, making them difficult to serve and less appealing.
Watery Filling: If your filling is too watery, it could be due to too much mayonnaise or not thoroughly squeezing out all the excess moisture from the blanched spinach. If this happens, you can try adding a bit more strained yolk (if you have any extra) or a tiny pinch of dry mustard to help thicken it up.
Rubbery Whites/Green Ring: Overcooking your eggs will inevitably result in rubbery whites and the undesirable green ring around the yolk. Follow the specific cooking times and immediate cooling instructions precisely to avoid this.
Serving & Storage
Presenting your Shamrock Deviled Eggs beautifully and storing them safely are the final steps to culinary success.
Serving Suggestions & Pairings
These festive deviled eggs are a fantastic appetizer for any gathering, especially a St. Patrick’s Day celebration.
Elegant Presentation: Always garnish your deviled eggs with the basil clovers, thin yellow cherry tomato slices, a drizzle of mustard caviar, and small parsley leaves. Arrange them attractively on a platter for maximum visual impact.
St. Patrick’s Day Spread: For a truly festive St. Patrick’s Day party, pair these beautiful appetizers with other themed snacks, like a delicious creamy coleslaw recipe. Think mini reuben sandwiches, slices of traditional Irish soda bread, or a hearty shepherd’s pie dip. Offer them alongside green-themed drinks like a lime spritzer, or a classic Irish stout for a complete celebratory spread.
Transporting Tips: If you need to transport your deviled eggs to an event, a specialized egg carrier is a lifesaver. Alternatively, arrange them snugly in a single layer in an airtight container lined with paper towels to prevent shifting. Always keep them chilled in a cooler during transport and minimize their time at room temperature.
Storage & Make-Ahead Tips
Proper storage ensures your delicious creations remain safe and tasty.
Refrigeration: Store assembled Shamrock Deviled Eggs in an airtight container in the refrigerator for up to 2-3 days. For the absolute best quality, I always recommend storing the filling and egg white halves separately. The filling can be stored for up to 3-4 days, and the egg whites for up to 5 days, assembling them just before serving.
Room Temperature: Remember, deviled eggs should not be left at room temperature for more than 2 hours to ensure food safety. Chilling is key.
Freezing: Unfortunately, deviled eggs do not freeze well. The texture of the whites becomes rubbery and unpleasant, and the filling can separate and become watery upon thawing. It’s best to enjoy them fresh or within the recommended refrigeration period.
Conclusion
I truly hope you’ll try my recipe for Vibrant Shamrock Deviled Eggs. Their unique natural green color and fresh, herbaceous flavor, thanks to the blanched spinach and chives, make them an unforgettable and festive appetizer. By following my expert tips and clear instructions, you’ll find that achieving perfectly peeled eggs, a smooth and creamy filling, and beautiful garnishes is entirely achievable, even for beginner cooks. These Shamrock Deviled Eggs are the perfect addition to your St. Patrick’s Day celebration or any occasion where you want to add a touch of green charm. I can’t wait for you to experience the delight of these special deviled eggs. Please share your creations with me in the comments below, and feel free to explore my other holiday recipes on the blog!
FAQ
What’s the secret to perfectly peeling hard-boiled eggs for deviled eggs?
The secret to easy peeling involves using slightly older eggs, about 7-10 days old, as their membranes loosen with age. I also recommend either the steaming method (10-12 minutes for large eggs) or the rapid boil-then-rest method (30 seconds boil, 10-12 minutes rest). In both cases, immediately plunging the eggs into an ice bath after cooking is crucial. Gently tap and peel the eggs under cool running water for the cleanest results.
How far in advance can I prepare Shamrock Deviled Eggs for a party?
To ensure the freshest and best-tasting deviled eggs, you can prepare the components (hard-boiled whites, green yolk filling, and garnishes) up to 24 hours in advance. Store them separately in airtight containers in the refrigerator. Assemble the deviled eggs no more than 30 minutes to 1 hour before serving to prevent the filling from drying out.
What are creative ways to make deviled eggs green for St. Patrick’s Day without artificial food coloring?
My favorite way to achieve a vibrant natural green for St. Patrick’s Day deviled eggs is by blending blanched baby spinach and finely chopped fresh chives directly into the egg yolk filling. This method provides a beautiful, natural hue and adds a delicate, fresh herbaceous flavor, avoiding any artificial dyes.
Can I make these deviled eggs if I don’t have mustard caviar or a clover punch?
Absolutely! For mustard caviar, you can substitute finely minced capers, black sesame seeds, or a light dusting of smoked paprika for a similar pop of flavor or visual appeal. If you don’t have a clover punch or basil, you can get creative with garnishes like finely chopped green onion, fresh dill sprigs, or small parsley leaves arranged to resemble a clover.
How can I make my deviled egg filling extra smooth and creamy?
The key to a perfectly smooth and creamy deviled egg filling is pushing your cooked egg yolks through a fine mesh strainer. This step eliminates any lumps and ensures a silky texture. Also, make sure to use enough mayonnaise and a touch of stone ground mustard to achieve a consistency like creamy hummus.
What are the best tips for safely transporting deviled eggs to an event?
When transporting deviled eggs, use a specialized egg carrier if you have one. If not, arrange the eggs snugly in a single layer in an airtight container, ideally lined with paper towels to prevent them from shifting. Keep them chilled in a cooler during transport and adhere to the 2-hour rule: deviled eggs should not be left at room temperature for more than two hours.
How can I prevent a green ring around the egg yolks?
The green ring around egg yolks is caused by overcooking, which makes sulfur and iron compounds react. To prevent it, ensure you follow precise cooking times (like 20 minutes for large eggs in boiling water, or steaming for 10-12 minutes). Crucially, immediately plunge the hot eggs into an ice bath to halt the cooking process as soon as they are done.
What’s the best method for boiling eggs to ensure easy peeling?
For easy peeling, I highly recommend using eggs that are slightly older (about 7-10 days old). The steaming method (10-12 minutes for large eggs) or the rapid boil-then-rest method (boil for 30 seconds, then cover and rest off-heat for 10-12 minutes) followed by an immediate ice bath, are both excellent ways to achieve hard-boiled eggs that peel cleanly.
Vibrant Shamrock Deviled Eggs
Ingredients
Equipment
Method
- Place 6 large eggs in a pot of cool water, ensuring they are just covered. Bring the water to a boil over medium-high heat and boil for exactly 20 minutes.
- Immediately transfer the hot eggs into a bowl of ice water and let them cool for 5-10 minutes. This rapid cooling stops the cooking process and prevents a greenish ring around the yolk.
- Once cool enough to handle, carefully tap the eggs around the center on a hard surface and gently peel away the shells. Peel very carefully to keep egg whites pristine.
- Slice each egg in half lengthwise with a sharp knife. Carefully scoop out the yolks into a separate mixing bowl, leaving the clean egg white halves ready for filling.
- For a more stable presentation, slice a tiny bit off the bottom of each egg white half so they sit flat on the serving platter.
- Push the reserved egg yolks through a fine mesh strainer into a clean mixing bowl to ensure a smooth, creamy filling.
- Blanch about 1/4 cup of baby spinach in boiling water for 15-30 seconds. Immediately plunge it into ice water, then squeeze out all excess moisture very thoroughly.
- Finely chop about 1 tablespoon of fresh chives. Blend the blanched spinach and chopped chives into a smooth paste.
- Add this green paste to your strained yolks along with 2 tablespoons of mayonnaise, 1 teaspoon of stone ground mustard, and a sprinkle of salt and pepper. Mix until well combined and the filling has a creamy hummus-like texture.
- Taste and adjust seasonings as needed. If the filling seems dry, add a touch more mayonnaise or mustard for desired creaminess.
- Transfer the vibrant green filling to a pastry piping bag fitted with your desired decorative tip.
- Slice 3-4 yellow cherry tomatoes into 12 very thin slices. Use a sharp, thin knife for the cleanest cuts.
- Using a clover paper punch, punch out 12 small clovers from your large basil leaves.
- Carefully place each basil clover onto a tomato slice; they will stick easily.
- Pipe the vibrant green yolk filling into each egg white half, creating an attractive mound.
- Carefully place the clover-tomato garnishes into the sides of the filling on each deviled egg.
- Add a small leaf of parsley behind each garnish and drizzle a tiny bit of mustard caviar on top of each egg.
- Arrange beautifully on a platter and serve immediately.
